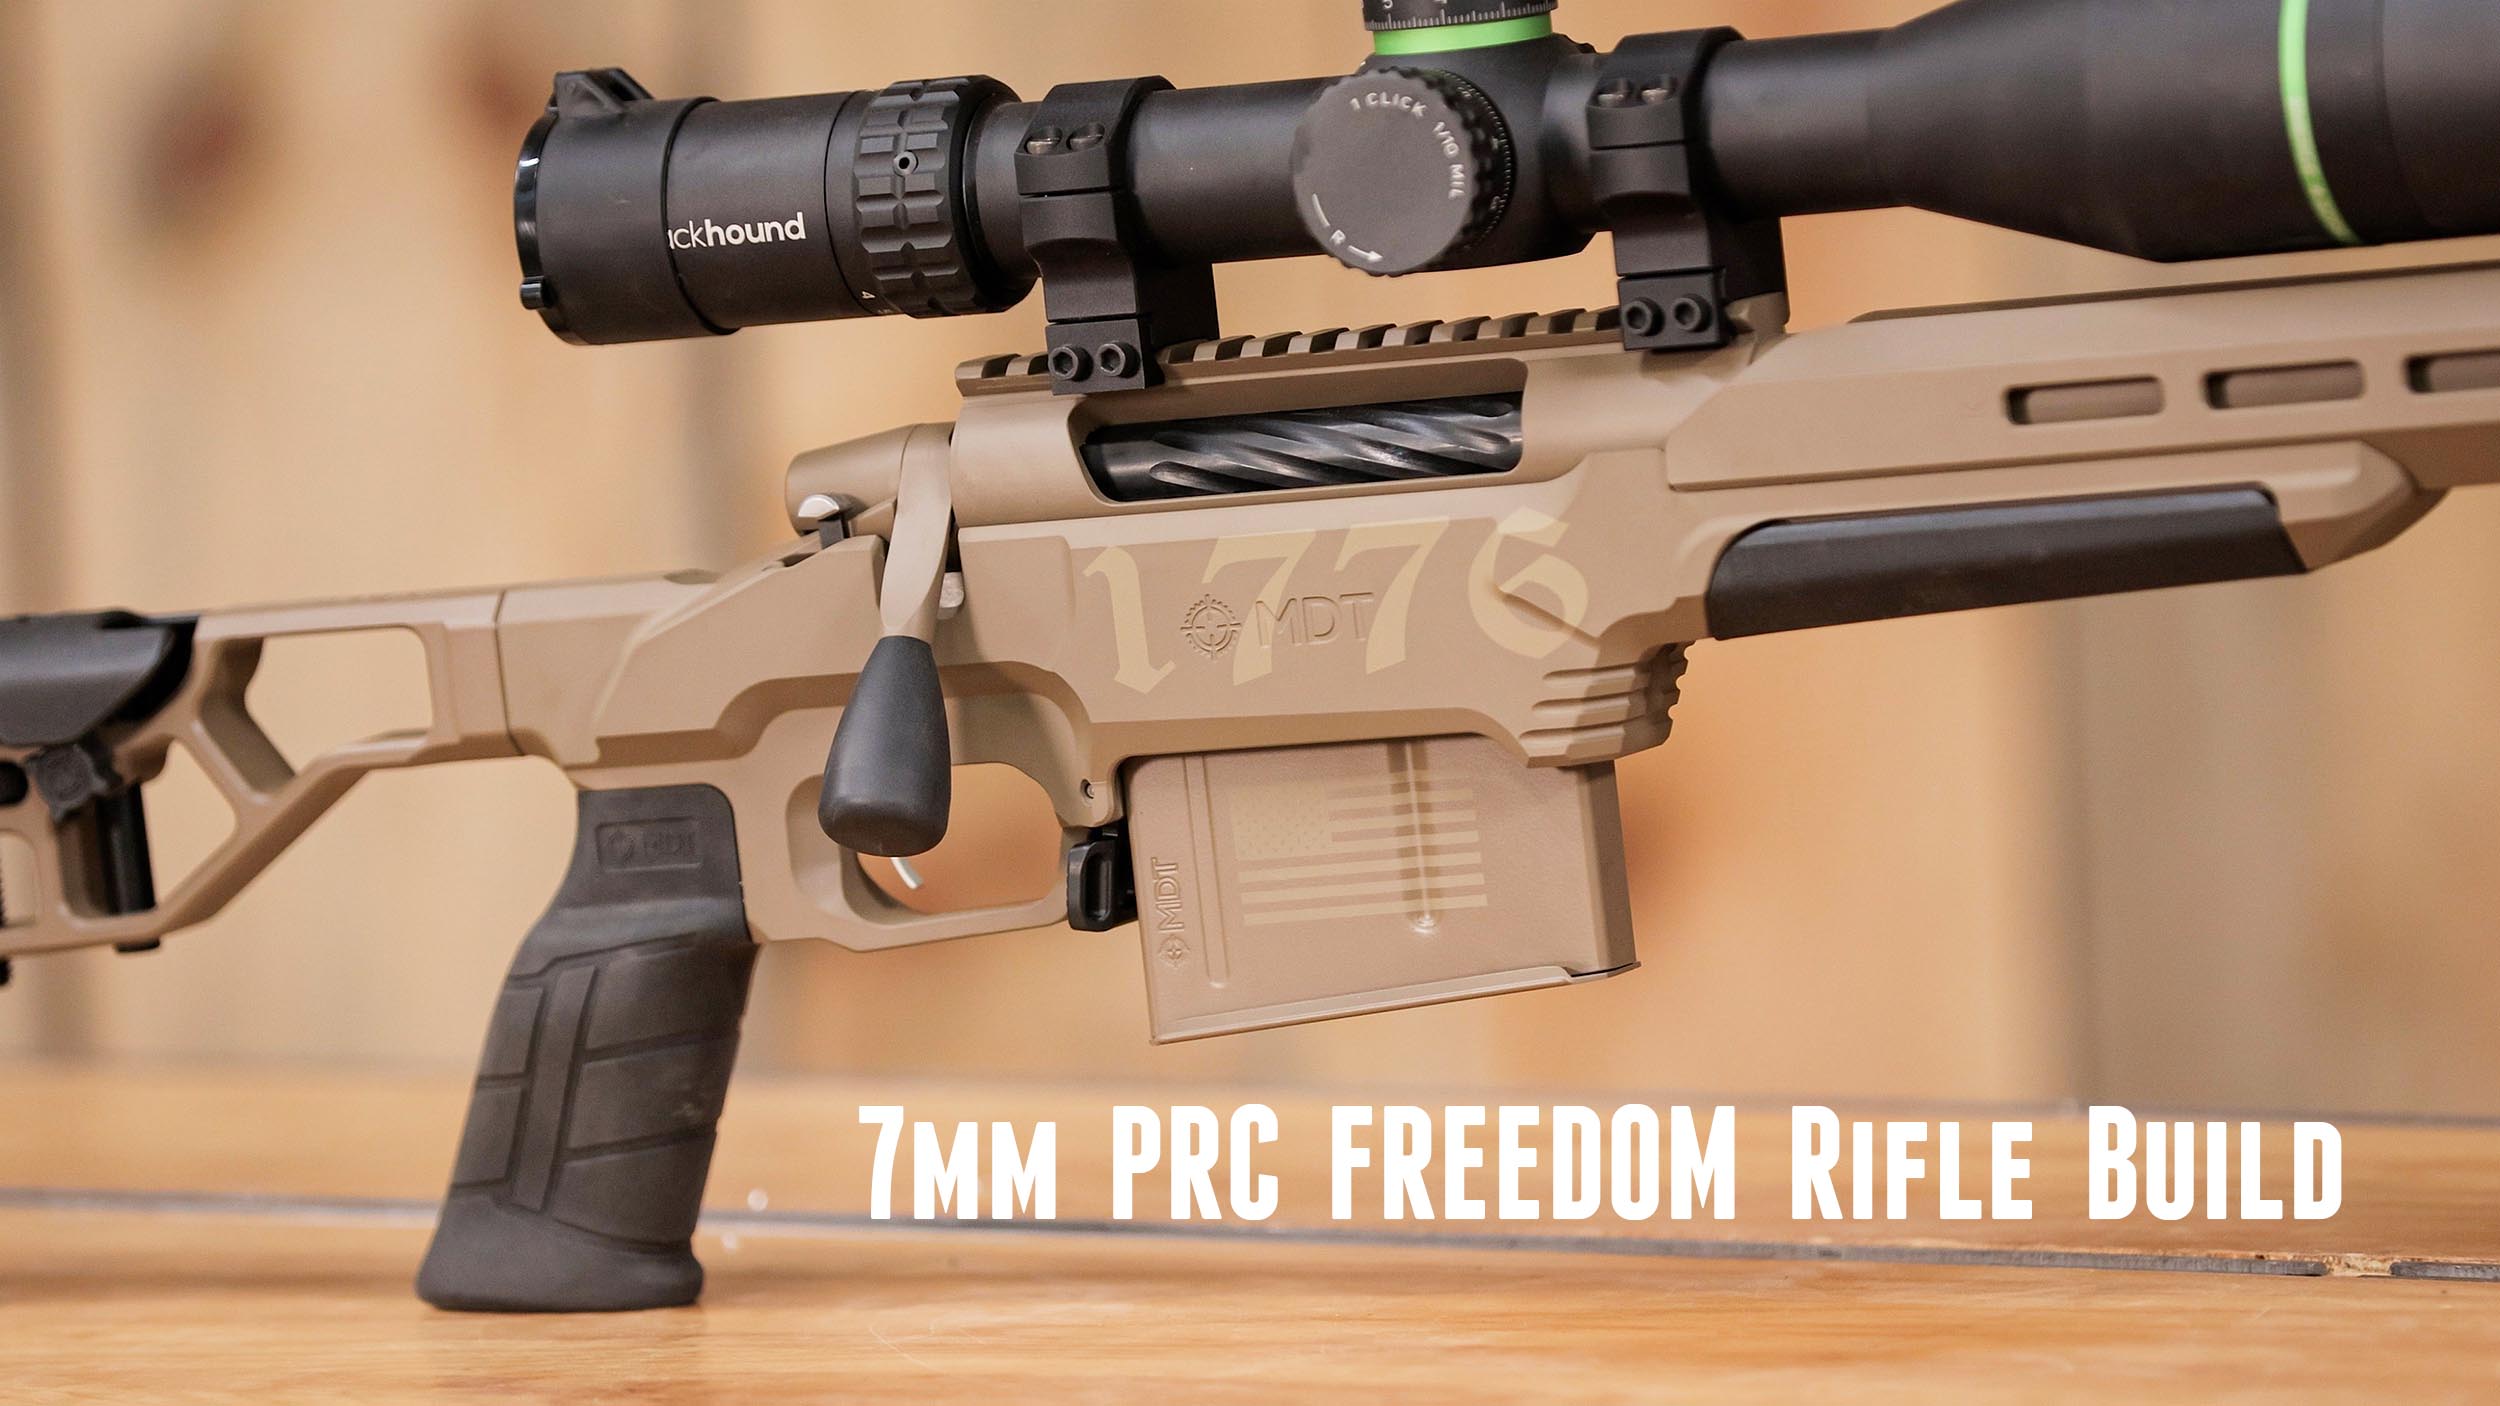
I wanted the ULTIMATE 7mm PRC rifle, and this story covers what I envisioned, why 7mm PRC was chosen, and how I built, Cerakoted, and laser engraved this rifle! Because this rifle has “1776” in the serial number, we decided to name it the “Freedom Rifle”!
Disclaimer
Ultimate Reloader LLC / Making with Metal Disclaimer: (by reading this article and/or watching video content you accept these terms)
- The content on this website (including videos, articles, ammunition reloading data, technical articles, gunsmithing and other information) is for demonstration purposes only.
- Do not attempt any of the processes or procedures shown or described on this website.
- All gunsmithing procedures should be carried out by a qualified and licensed gunsmith at their own risk.
- Do not attempt to repair or modify any firearms based on information on this website
- Ultimate Reloader, LLC and Making With Metal can not be held liable for property or personal damage due to viewers/readers of this website performing activities, procedures, techniques, or practices described in whole or part on this website.
- By accepting these terms, you agree that you alone are solely responsible for your own safety and property as it pertains to activities, procedures, techniques, or practices described in whole or part on this website.
NOTE: You’ll also want to check out my Bergara 7mm PRC rifle build, much of the information is shared between these two stories, because much of the tooling and background information is the same!
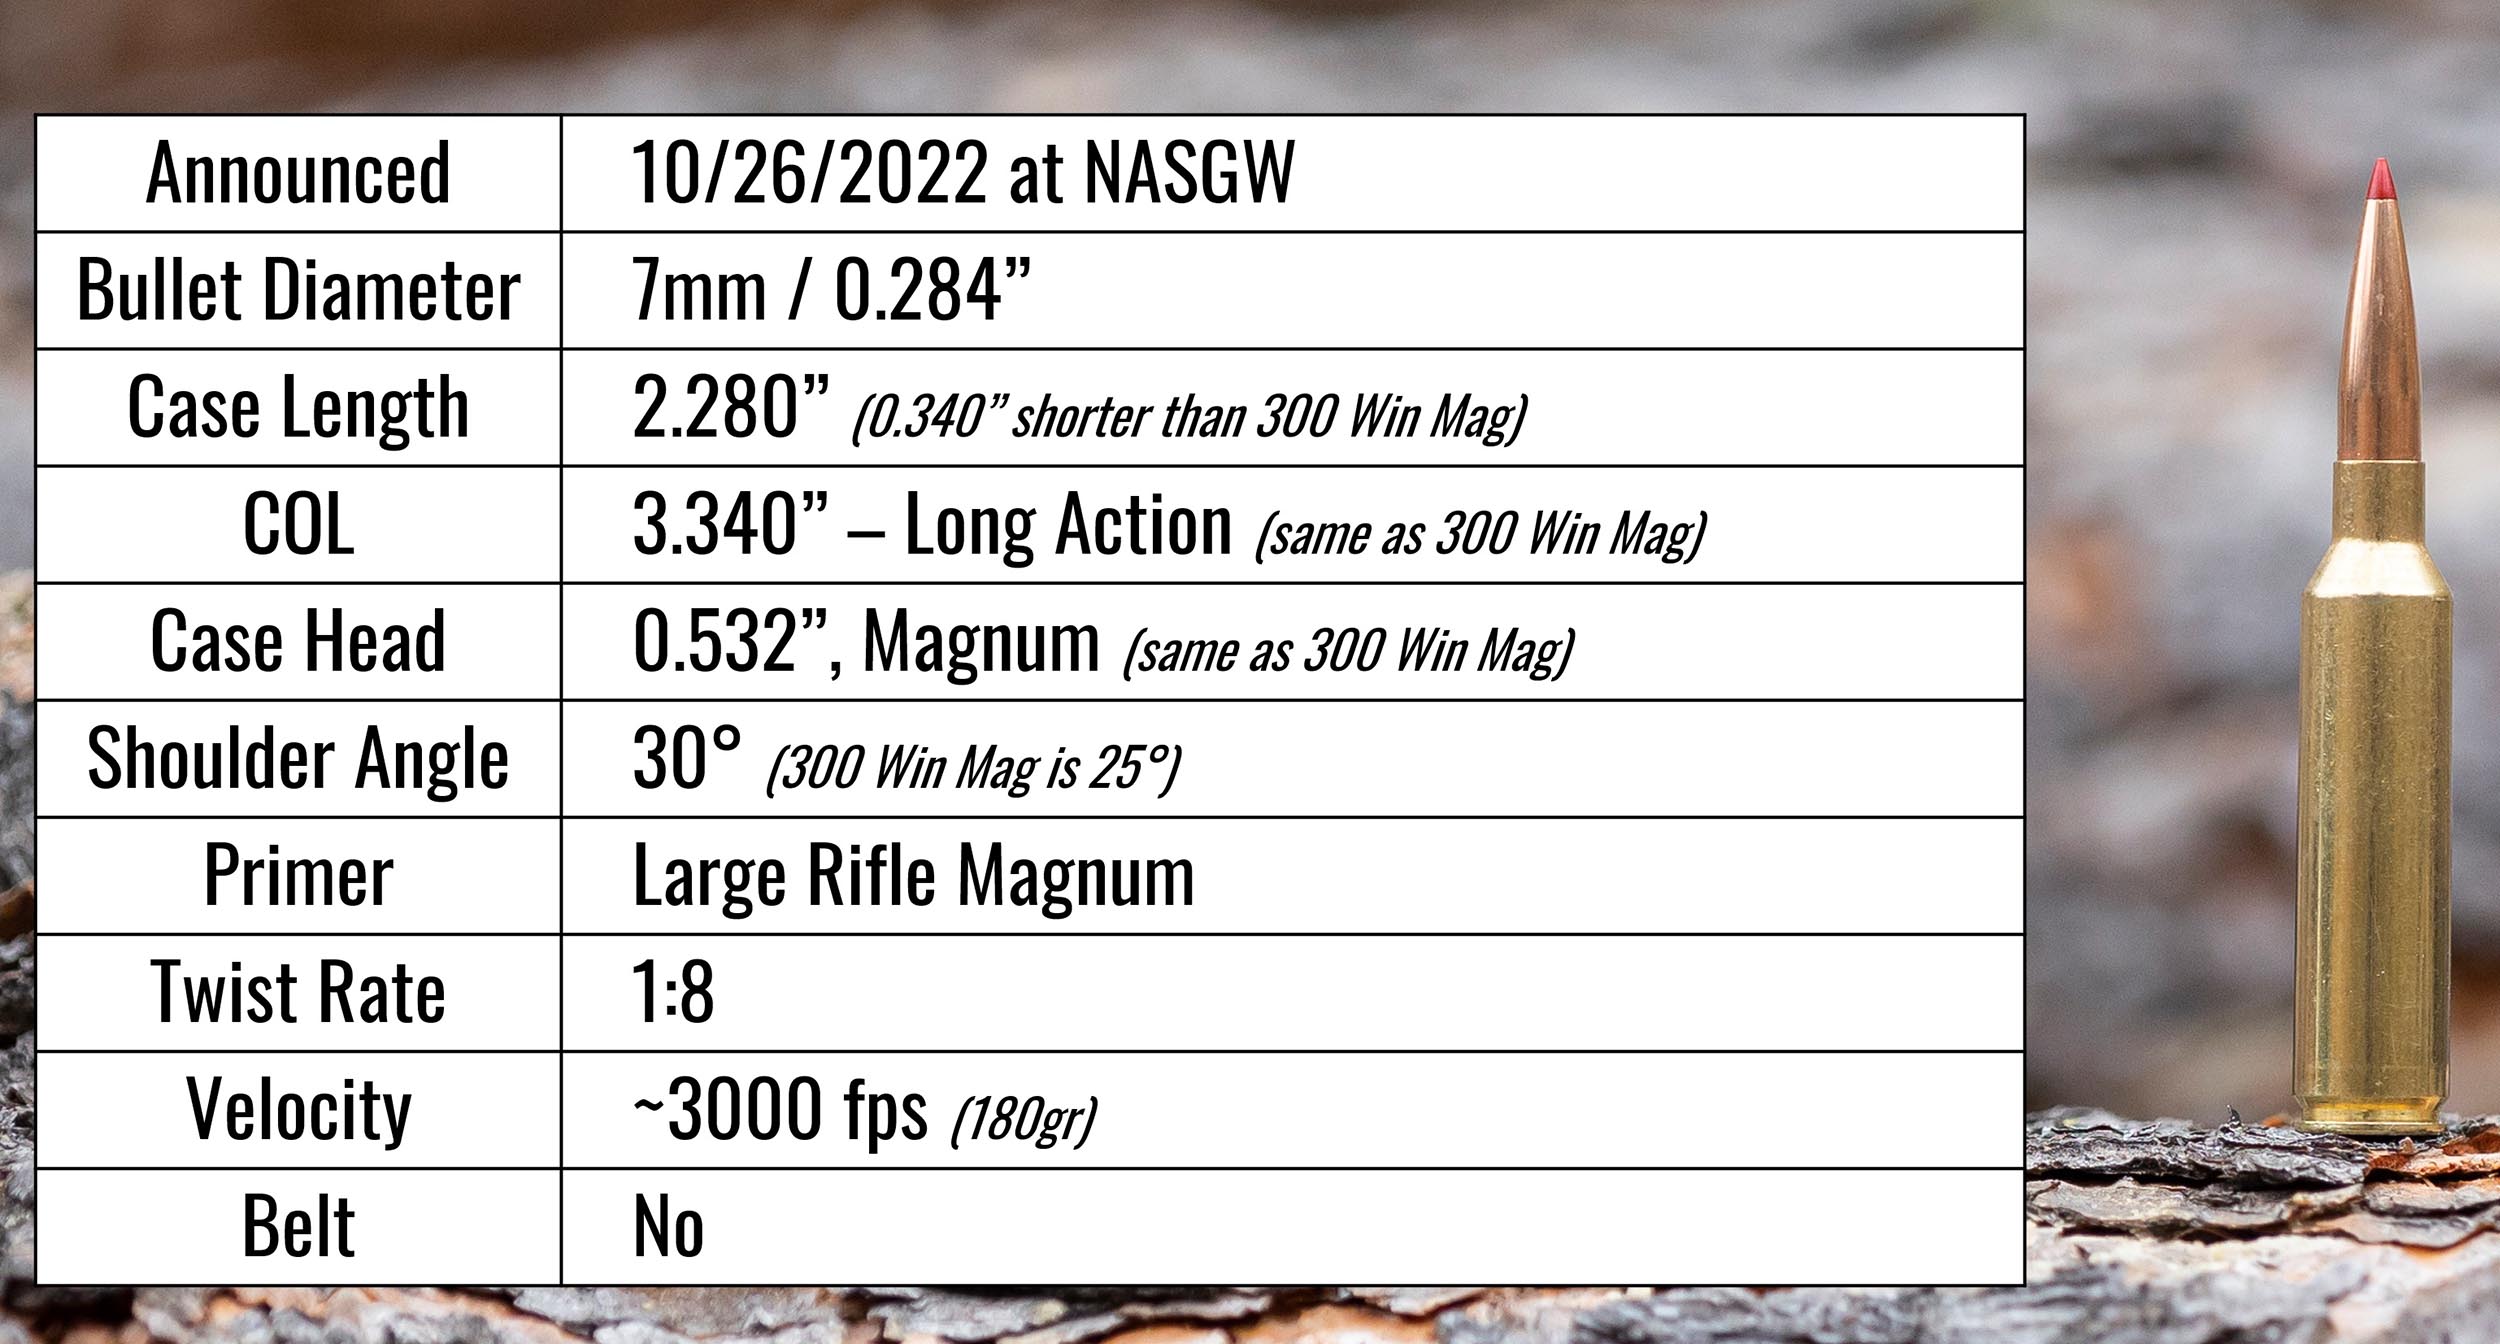
7mm PRC: Perhaps the Most Versatile PRC
7mm PRC is its own cartridge, different from the 6.5 PRC and 300 PRC fundamentally. Here’s some quick specs:
For more information on the 7mm PRC, check out my in-depth overview.
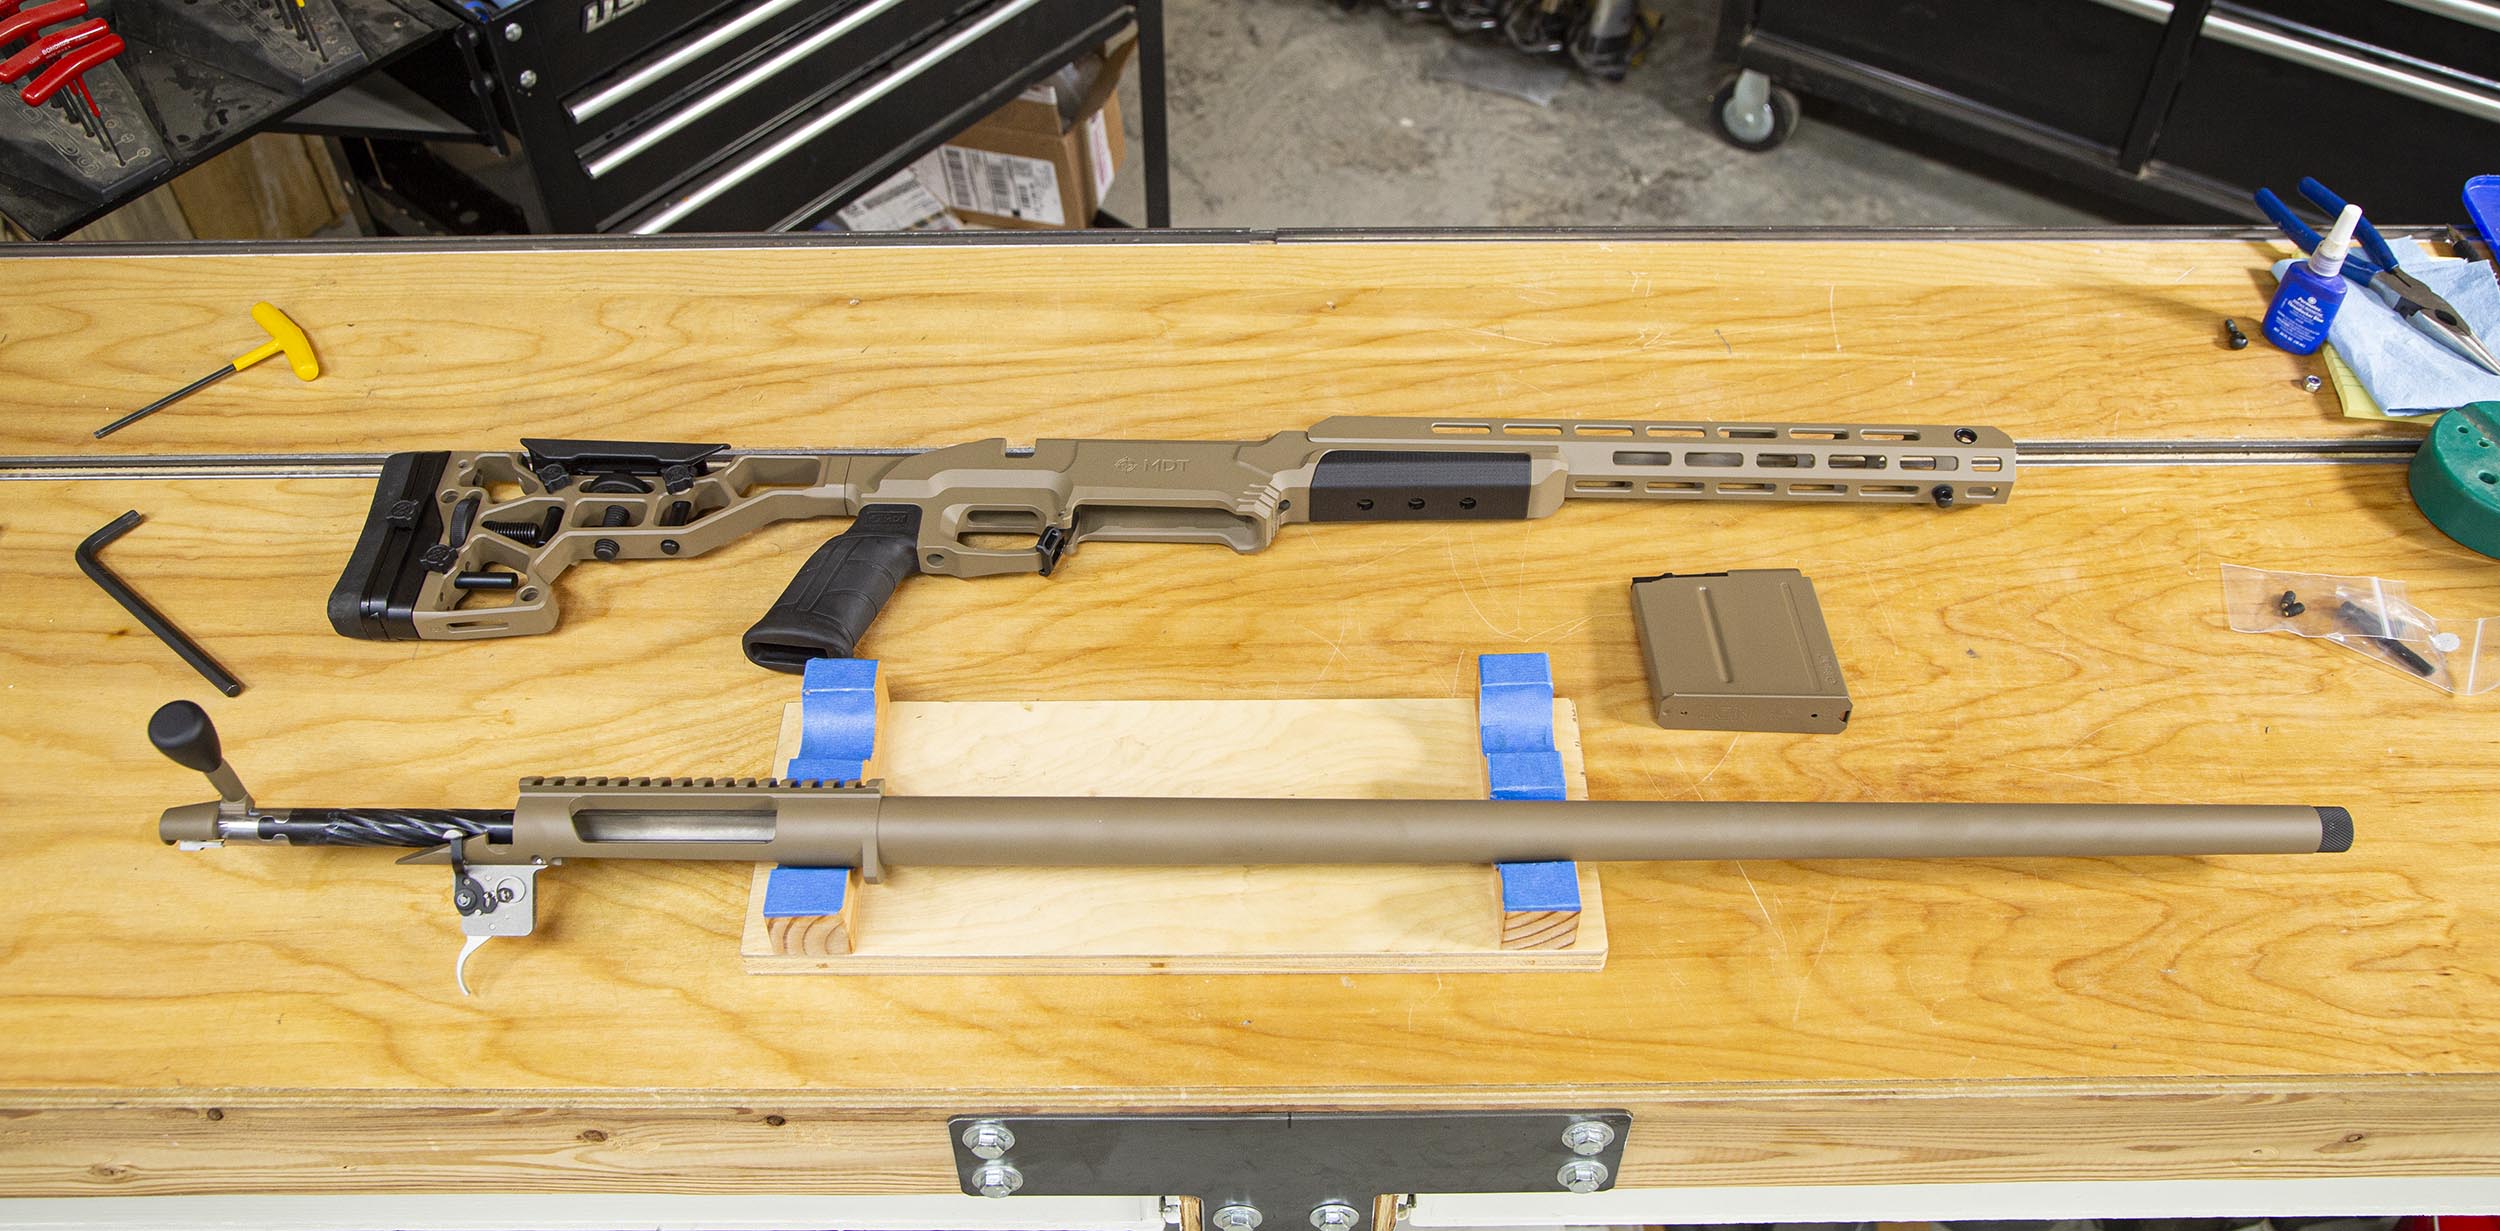
7mm PRC BAT/MDT “Freedom Rifle” Bill of Materials
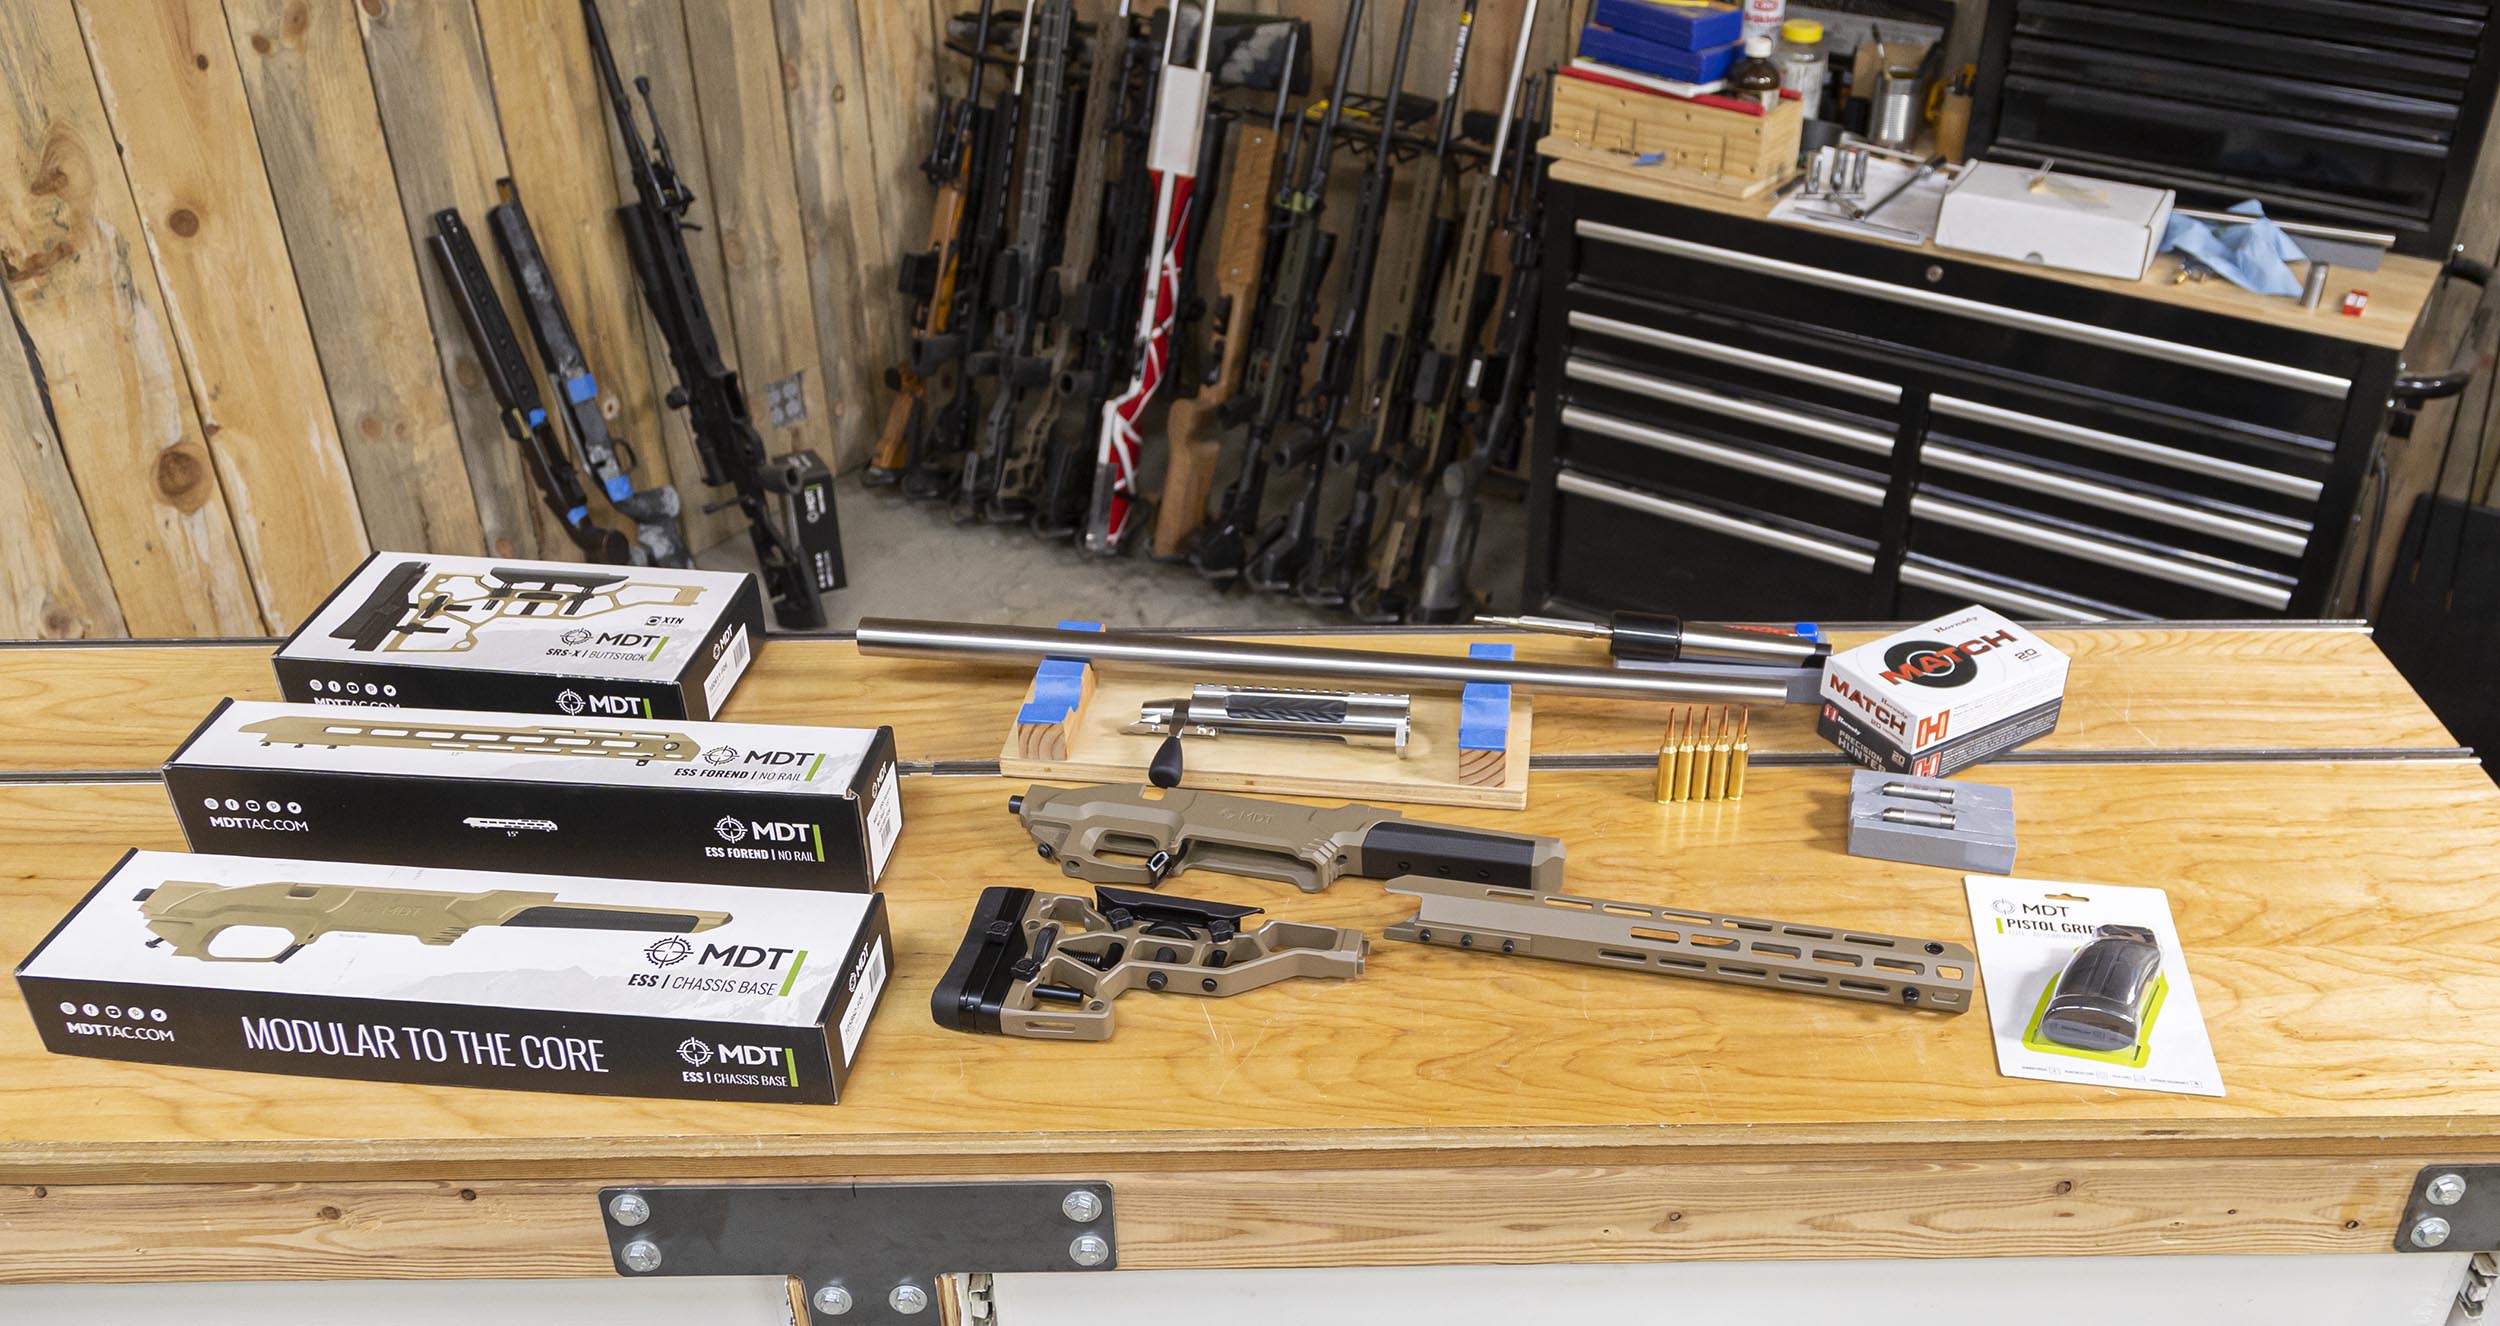
Here’s what’s pictured above:
- Bat HR Action (Long Action) with magnum bolt face bolt
- Bartlein 7mm 5R Barrel Blank 1:8
- MDT ESS Chassis System
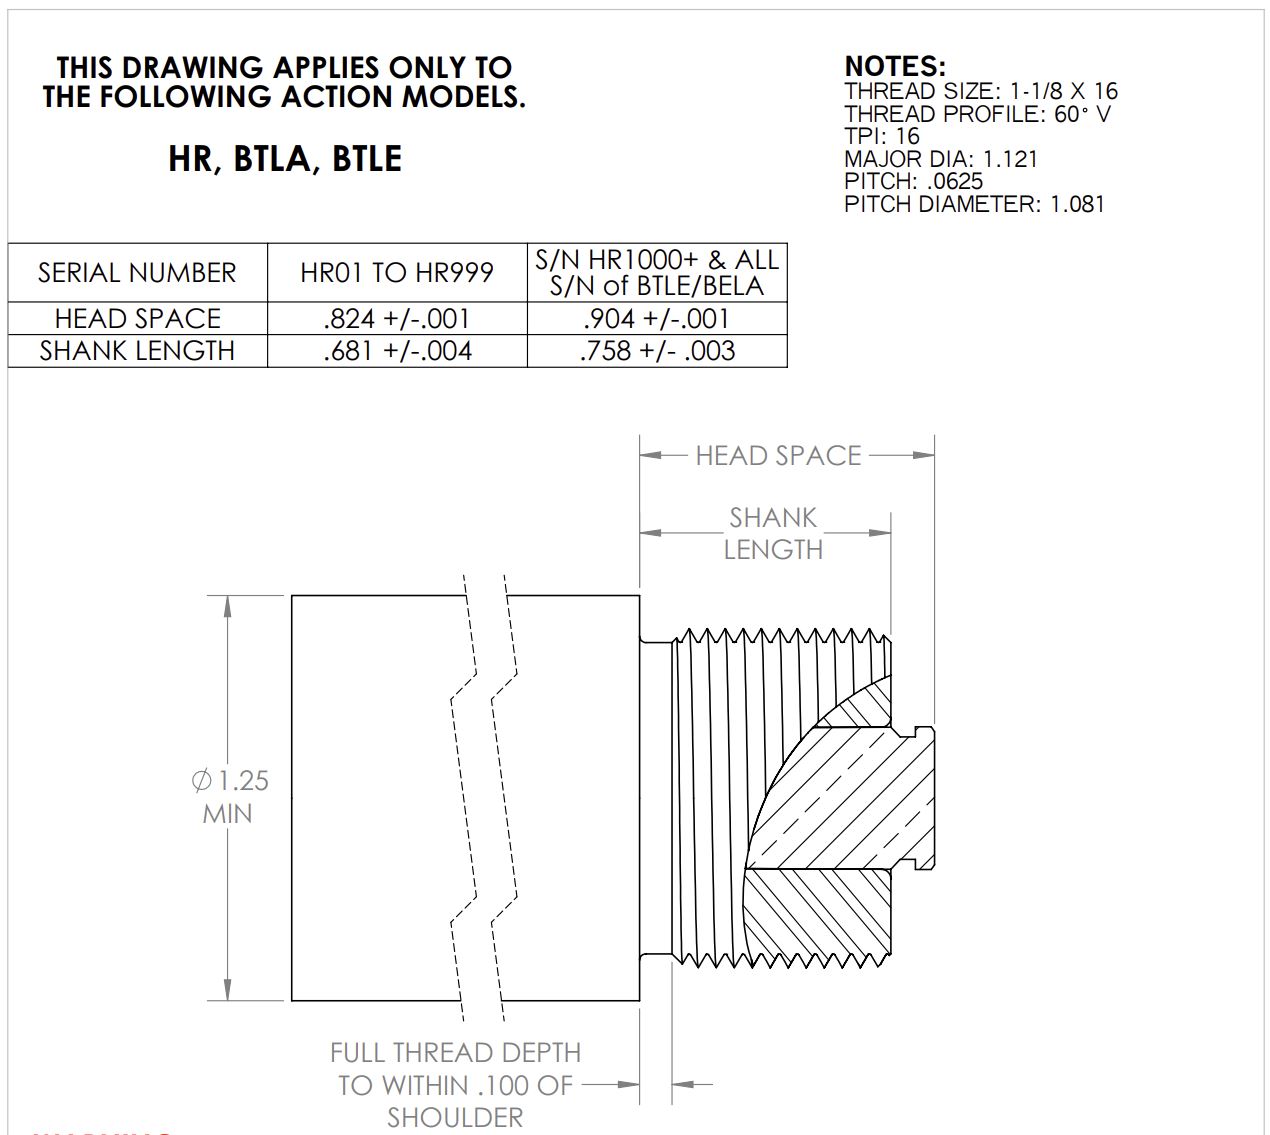
Bat HR Action

The Bat HR Action is ideal for long-action precision rifle builds! Here’s how mine was spec’d out:
- Remington 700 Footprint
- Integral Recoil Lug
- Integral 20 MOA Rail
- Repeater
- Fluted Modular Bolt (Magnum bolt head)
- 3.52” Ejection Port
- Tactical Bolt Knob
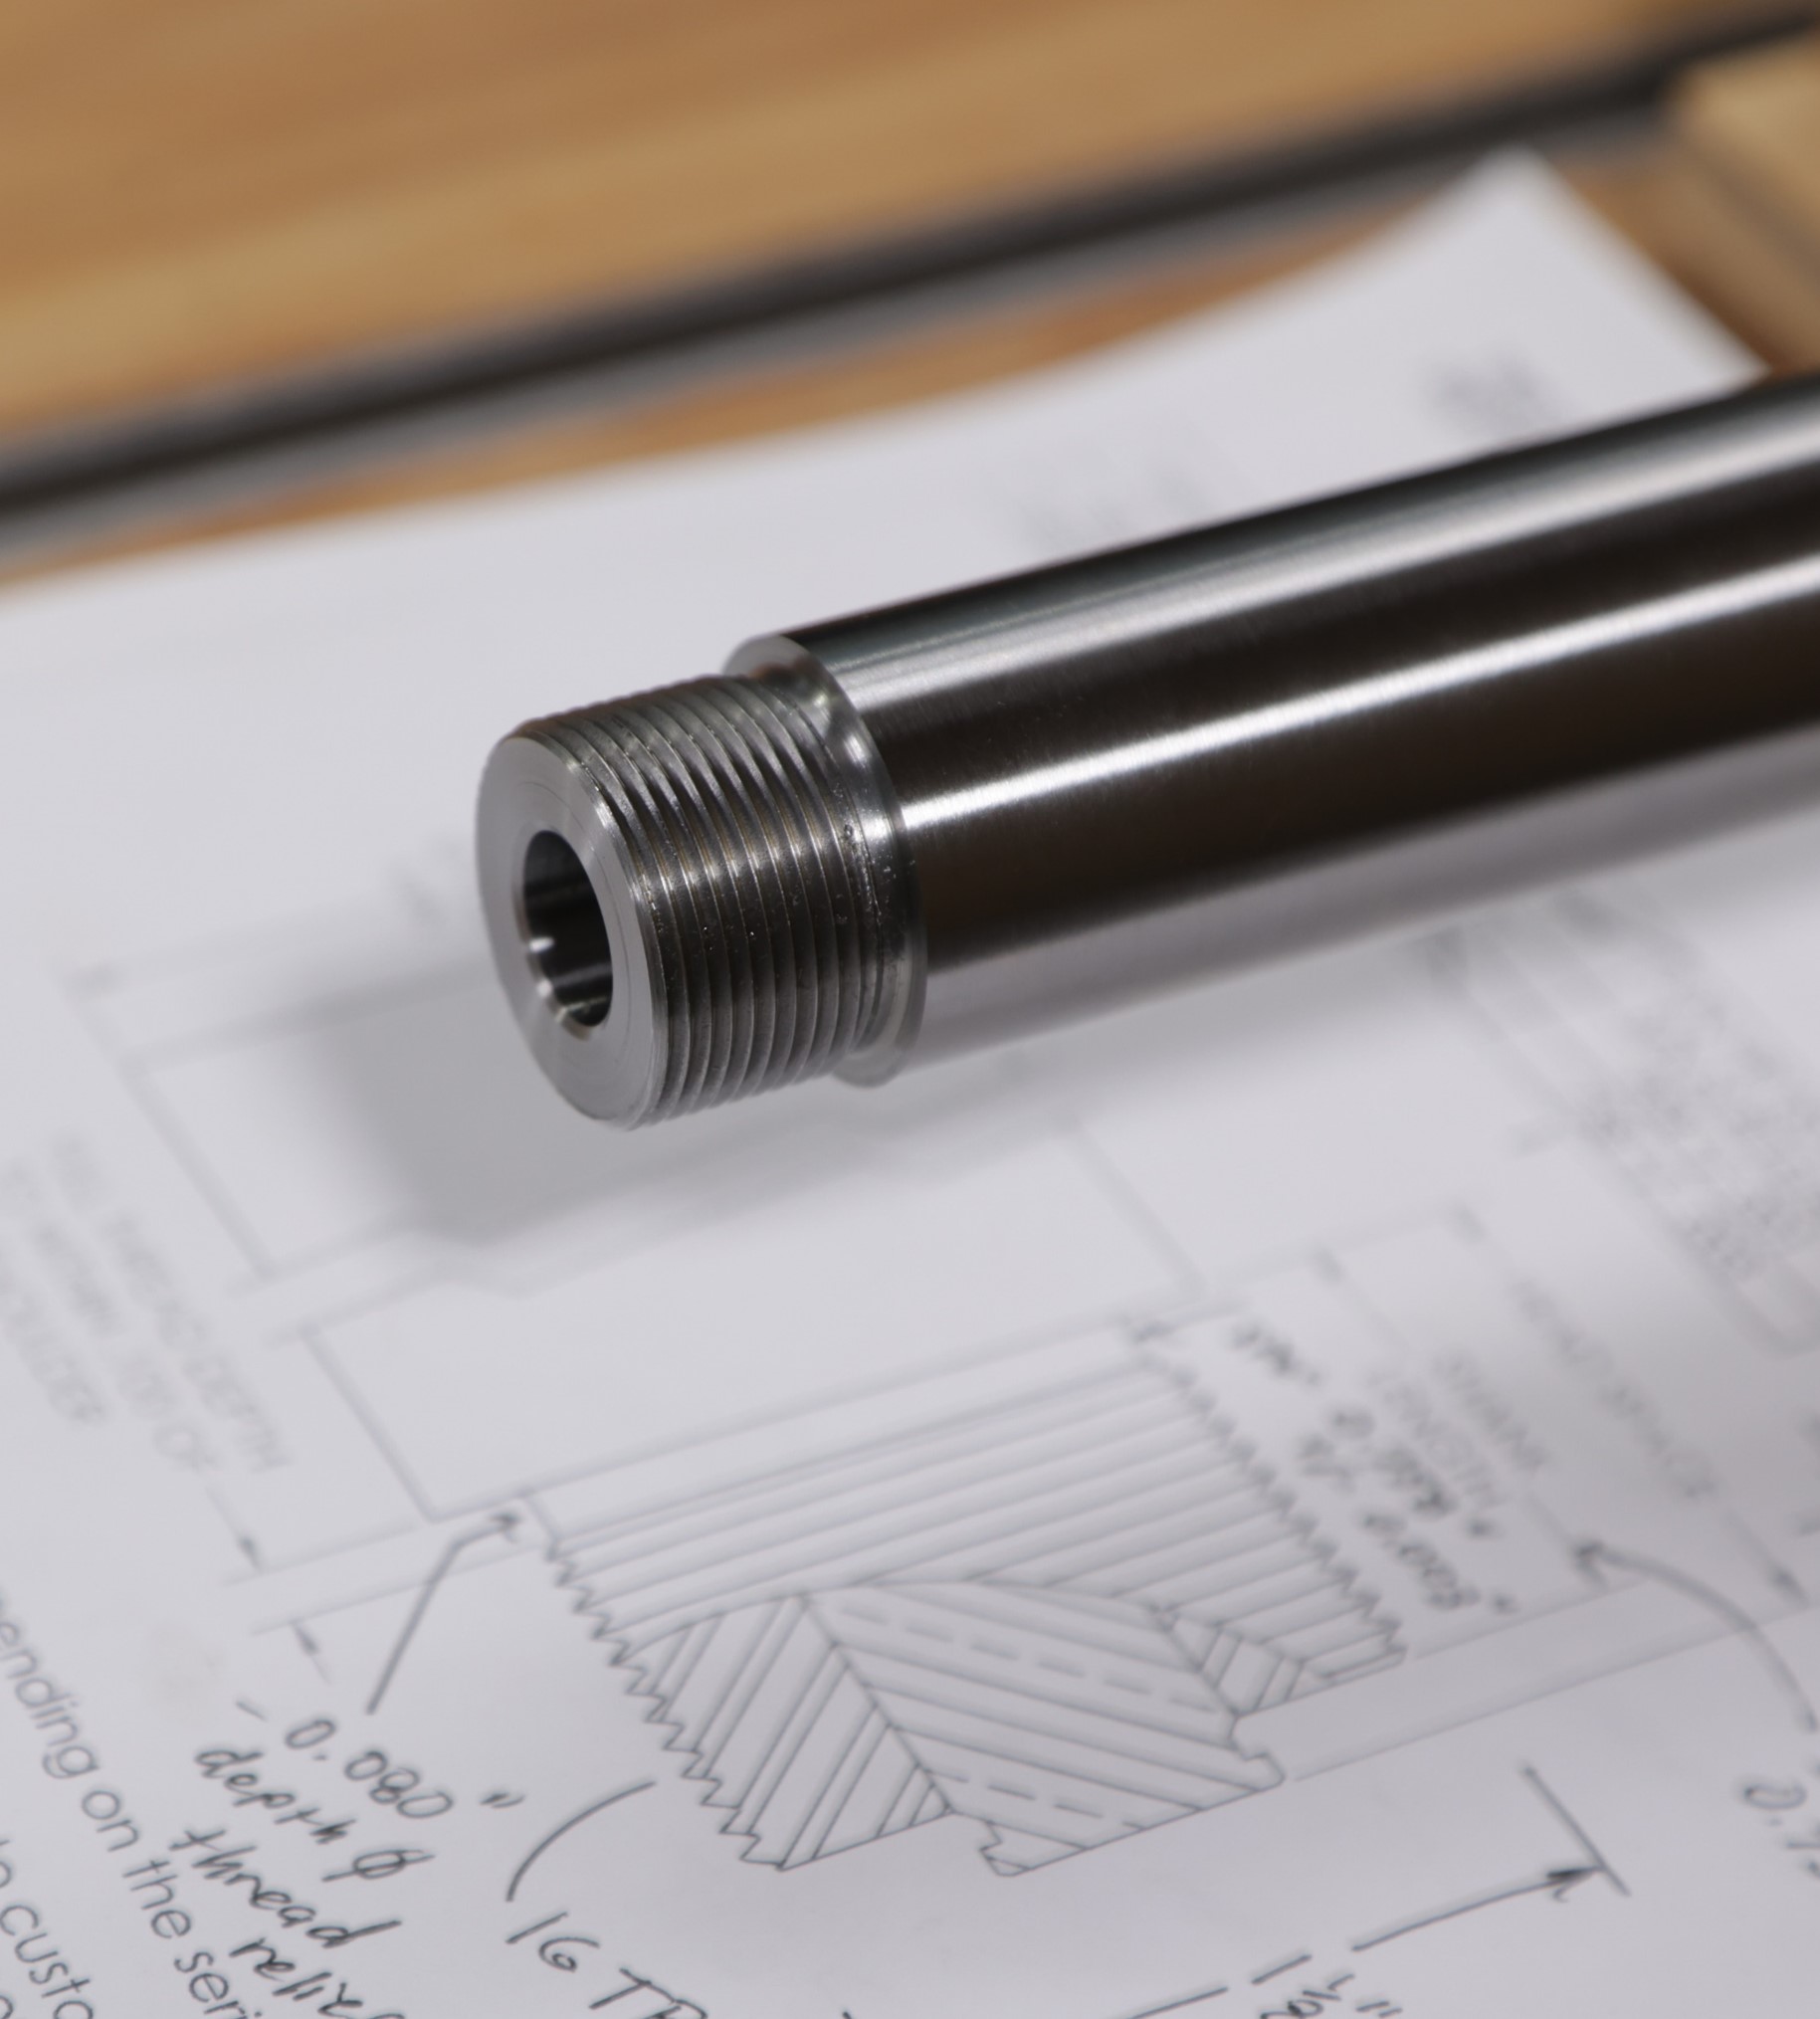
- 1 1/8” x 16 Tpi Threading
Here’s the tenon print for this action: (you can view the full document HERE)
Tools and Gear
Precision Matthews TL-1660 Ultra-Precision Lathe
Again I’m using my preferred manual lathe for chambering, the Precision Matthews TL-1660!

This lathe is a beast! Here are some of the specs for the Precision Matthews TL-1660:
- Ultra Precision, made in Taiwan
- 16″ swing, 60″ between centers capacity
- D1-6 high precision spindle
- English and Metric threading without gear changes
- One shot lube on the carriage
- 3-Phase 5hp motor
*Note: for most gunsmiths, the TL-1640 would be a great choice. You likely won’t need 60″ between centers like the TL-1660 offers. The TL-1640 can save both space, and significant money on freight! I opted for the larger lathe because I wanted to have a lathe on hand with extended capacity between centers.
Straight Shot Gunsmithing “True Bore Alignment System” and Range Rod
Recently I’ve become a huge fan of the SSG True Bore Alignment System (TBAS). This unique articulating chuck system allows you to dial in your barrel with both radial and axial adjustments.
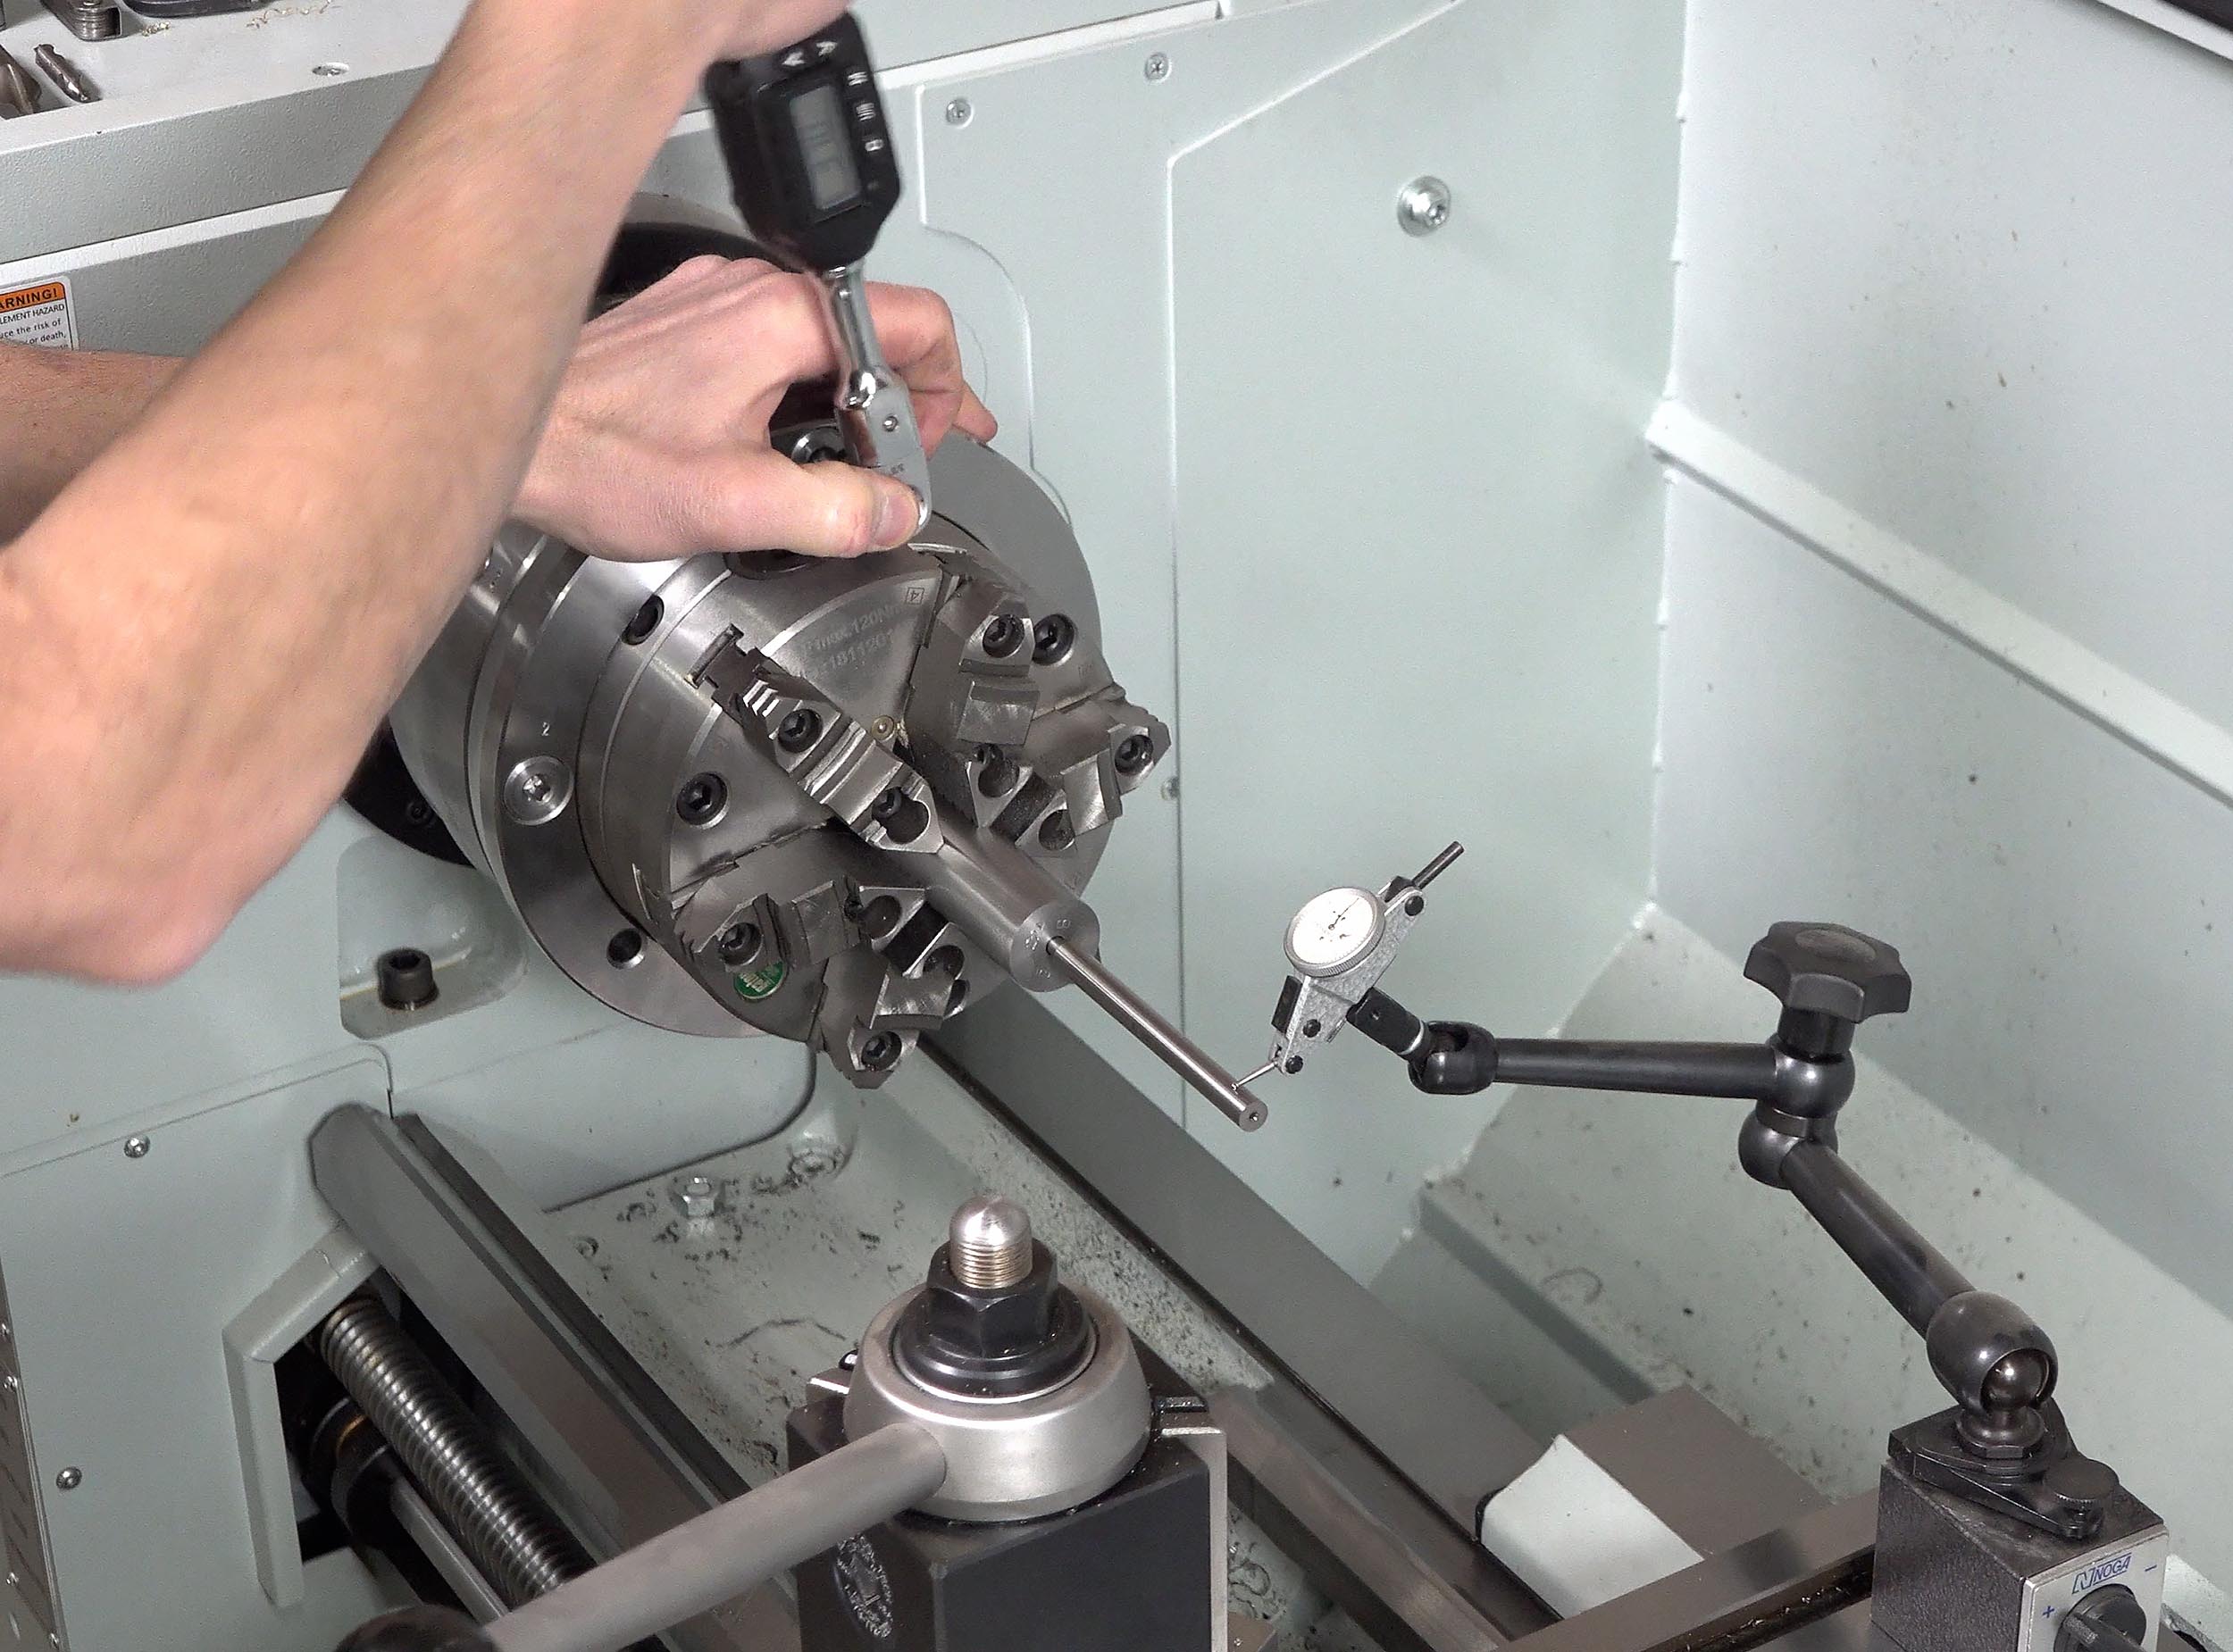
Above you can also see the SSG Range Rod (see bottom of page HERE) which is used in conjunction with the TBAS system to indicate barrels (I used this on both the breech and and the muzzle end of the barrel.
This top quality lathe has a 16” capacity swing and 60” between centers. On this lathe I have the Straight Shot Gunsmithing true-bore alignment system and will be using the Straight Shot Gunsmithing range rods as well. I also have a Greg Tannel (Gre-Tan) fixed holder for the specialized Alpha Munitions carbide reamer with 0.170” freebore. This was recommended by Alpha Munitions for use with the Berger 105’s, Berger 109’s and Hornady 110 A-Tips. For verification purposes, I also have the Dave Manson 6GT Go gauge, which can easily be converted into a no-go gauge with some masking tape. This tool was featured in my 22 GT build. Finally, I have a Mitutoyo Precision measurement and an Aloris CXA size tool post and tool holder system I splurged on when I bought my lathe.
JGS 7mm PRC Reamer and Gauges, Custom Rigid Reamer Holder
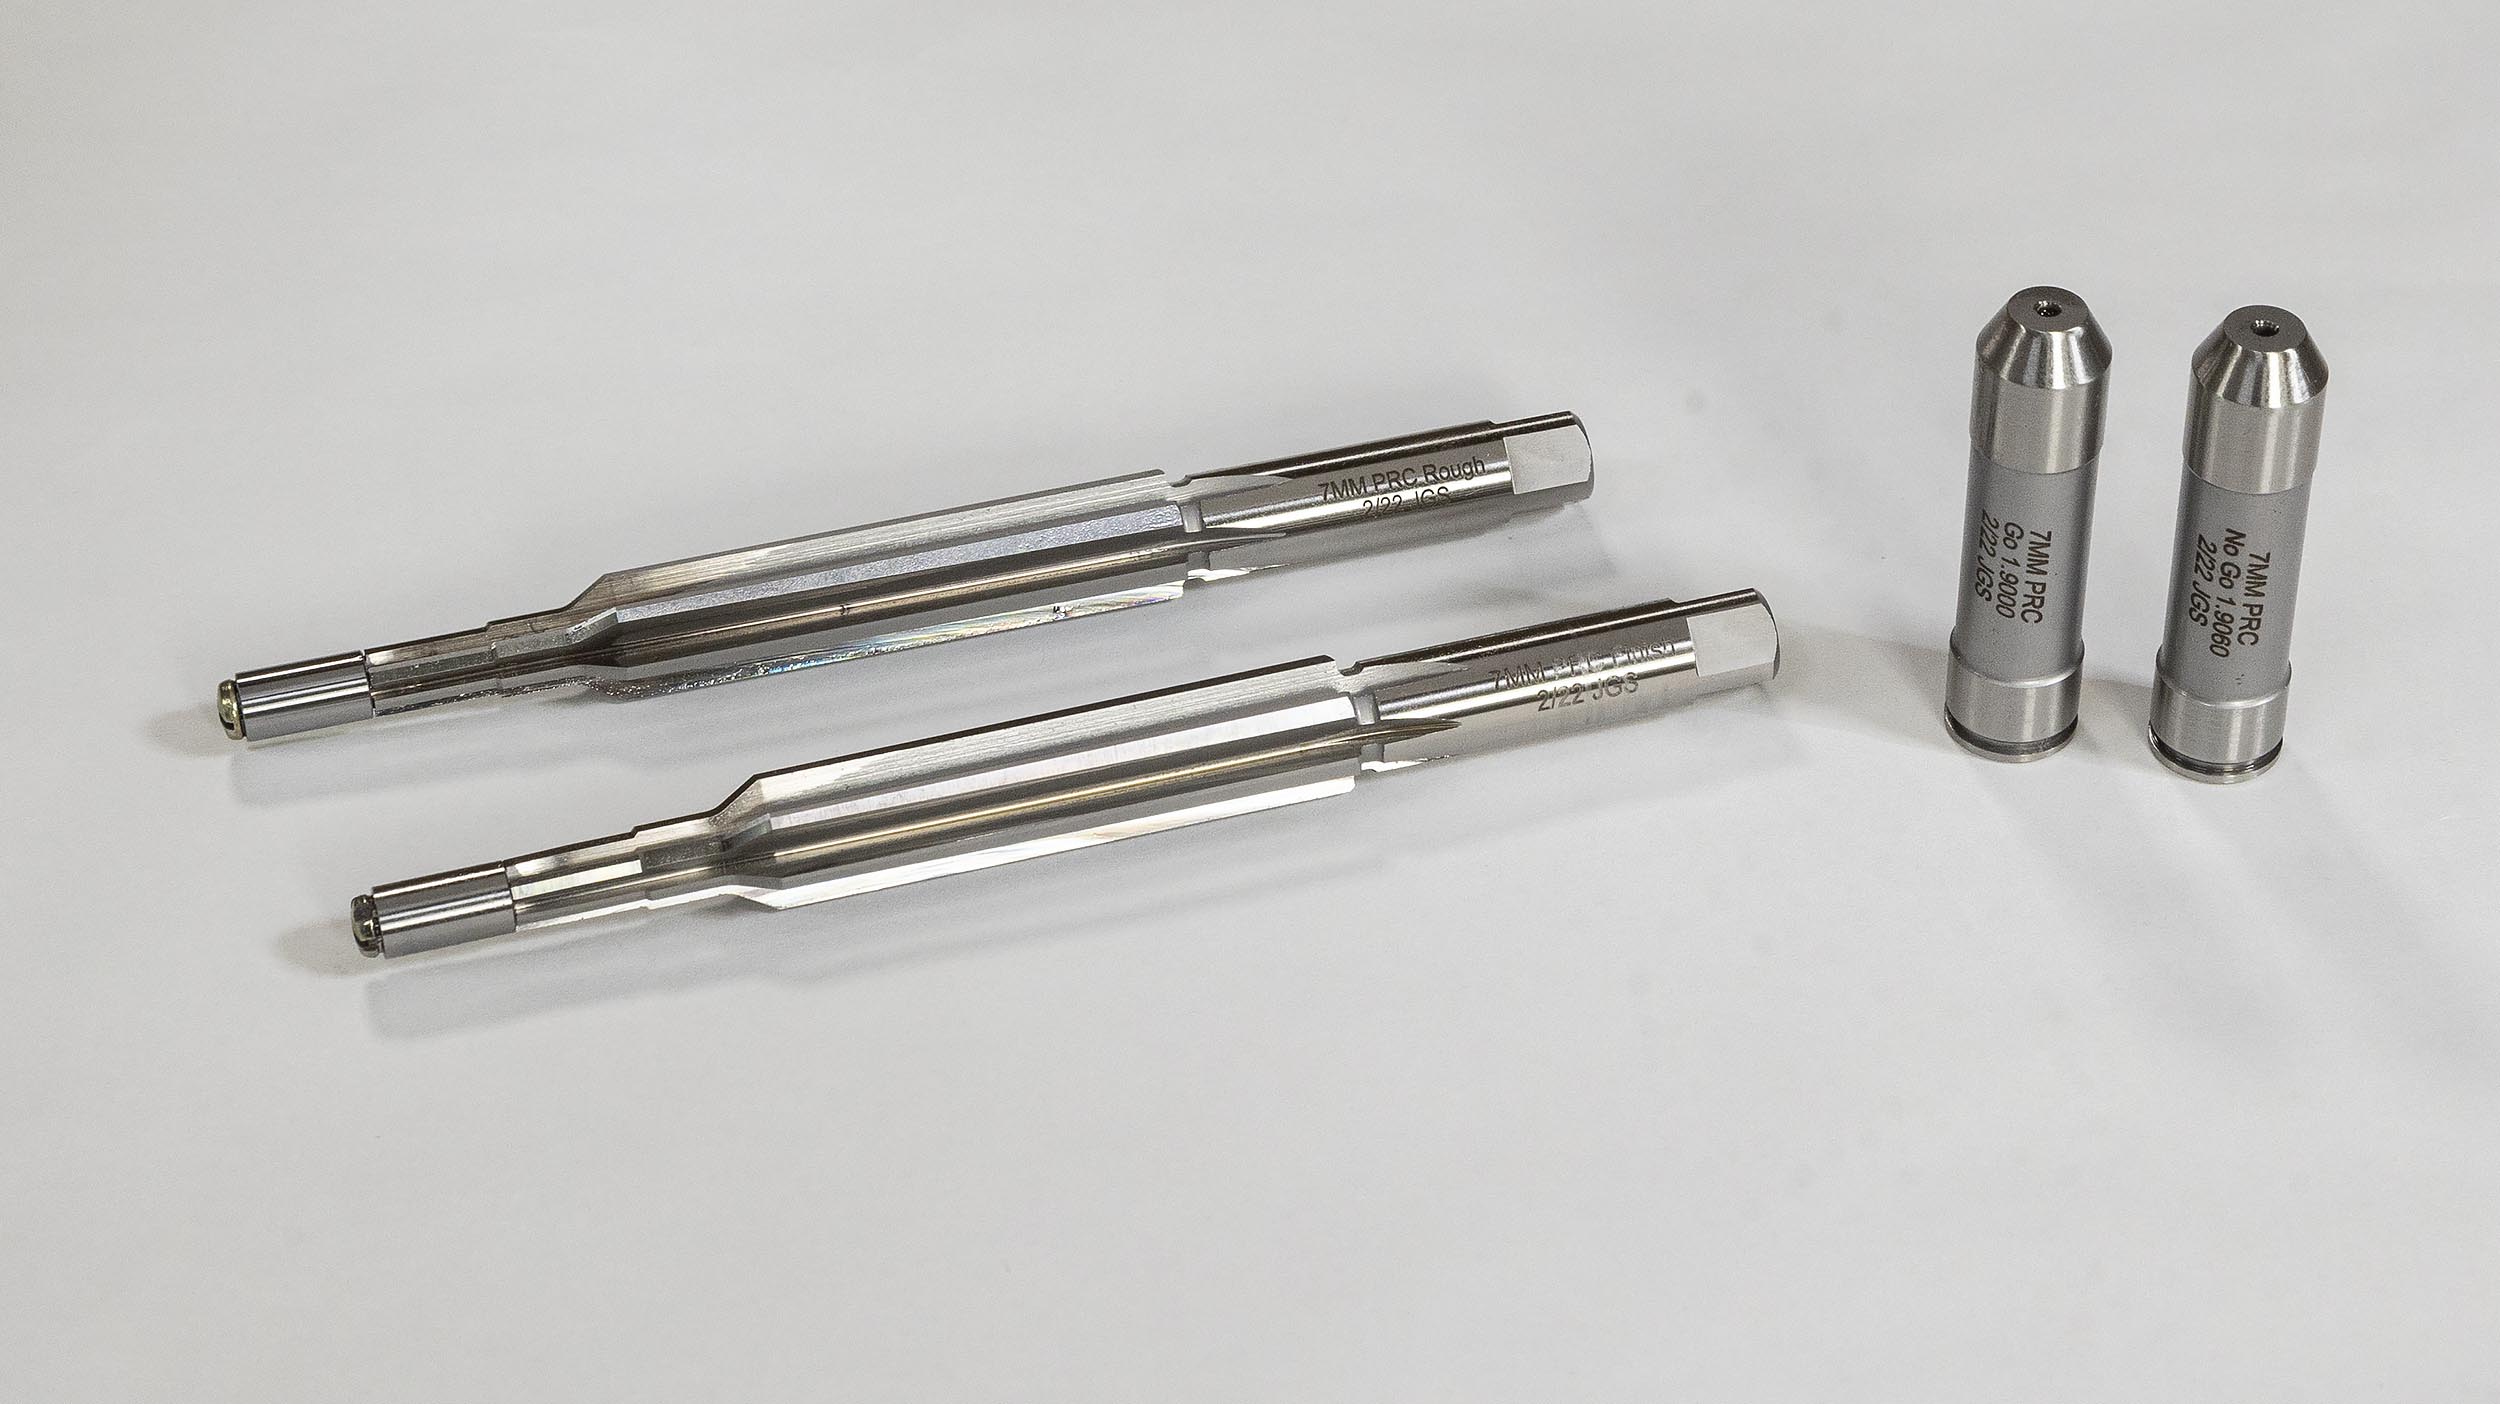
A part of the Hornady Rifle Builder’s kit (technical preview) that was sent out were the following from JGS:
- Rougher reamer, 7mm PRC
- Finisher reamer, 7mm PRC
- Go Gauge, 7mm PRC
- No-Go Gauge, 7mm PRC (Go Gauge spec + 0.006″)
For this build, I used the finisher reamer, and the “Go” gauge (using scotch tape on the back of gauge for a 0.002″ No-Go gauge).
Based on my conversations with Bruce Thom of Bat Machine, I built a “machined in place” rigid reamer holder for my Precision Matthews TL-1660 lathe:

This holder was machined from a Morse Taper #4 blank in-place. The advantages of this type of setup are:
- When machined in place (drill and then single point boring bar in headstock during process) perfect alignment is assured
- Rigid tool holding helps to ensure a more high quality cut, less vibration and noise while cutting
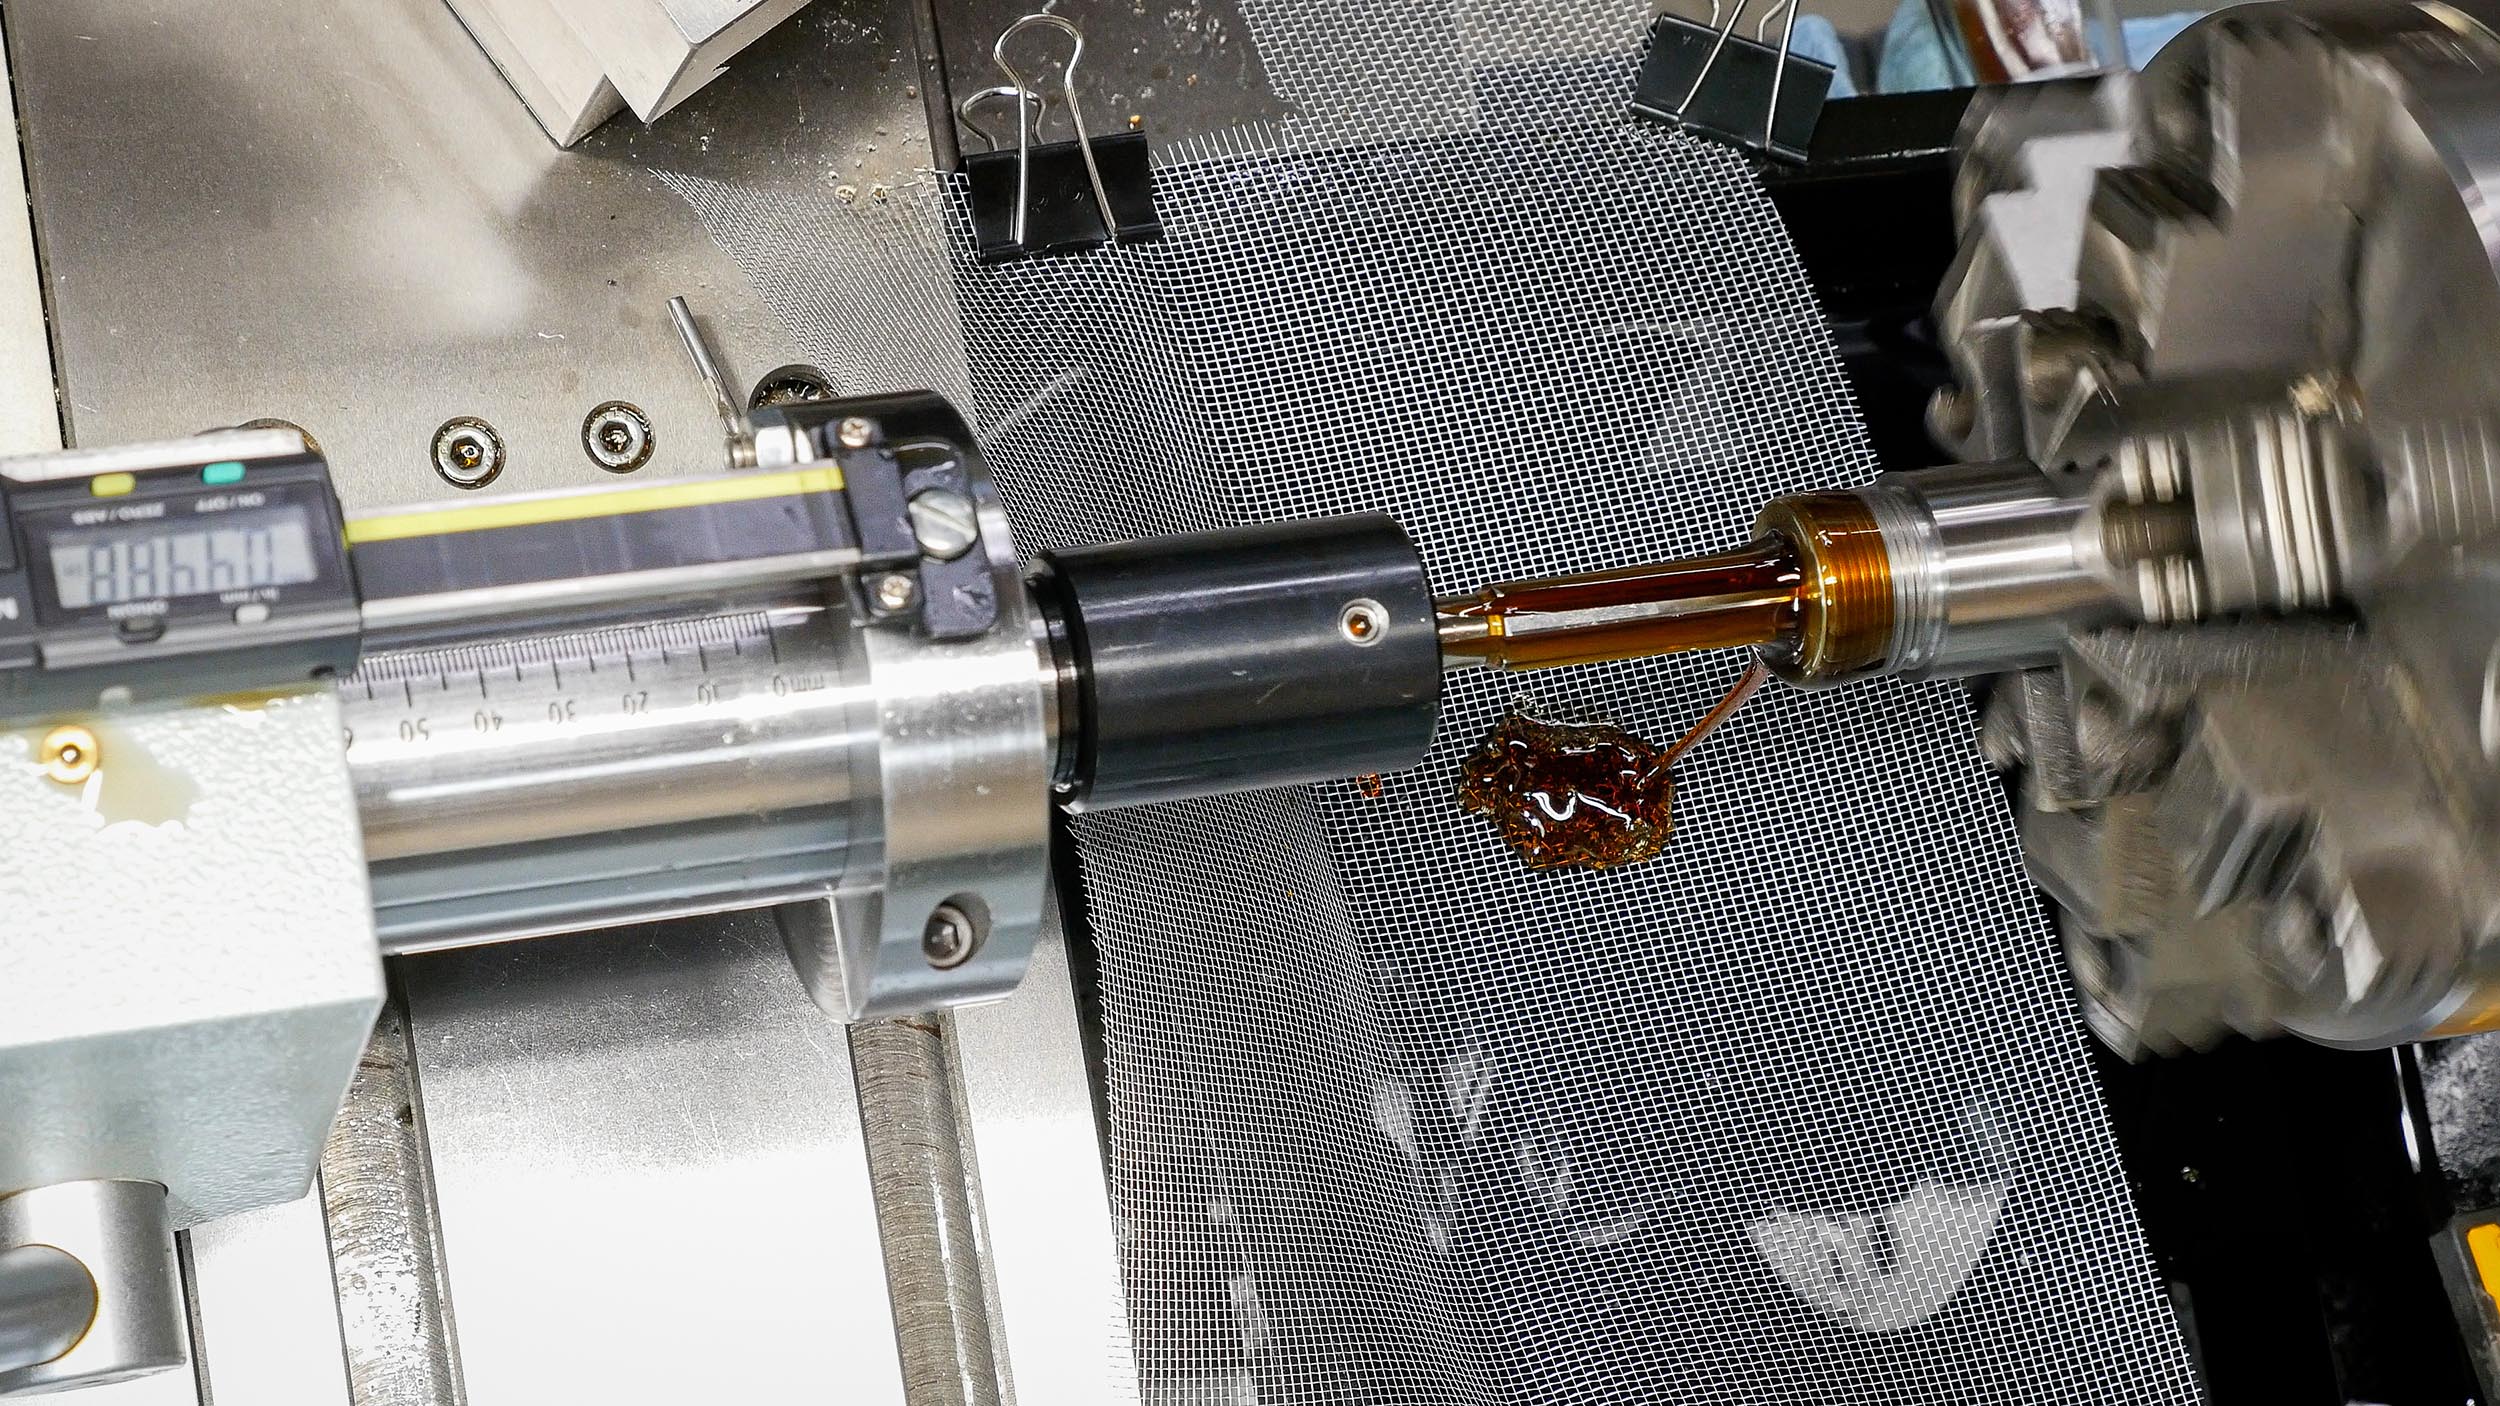
NEW Modular Pressure Flush System (UR Prototype)
I’ve been hard at work designing my own fully modular pressure flush system for chambering rifle barrels. And recently, I completed my first prototype! The idea is a system for pressure flush (also called Muzzle Flush) while chambering that requires no modifications to the lathe, and also allows use of the Lathe’s coolant system for other types of cutting fluid- like water-based cutting fluids that are frequently used for general machining.
Here’s a first look at the prototype:
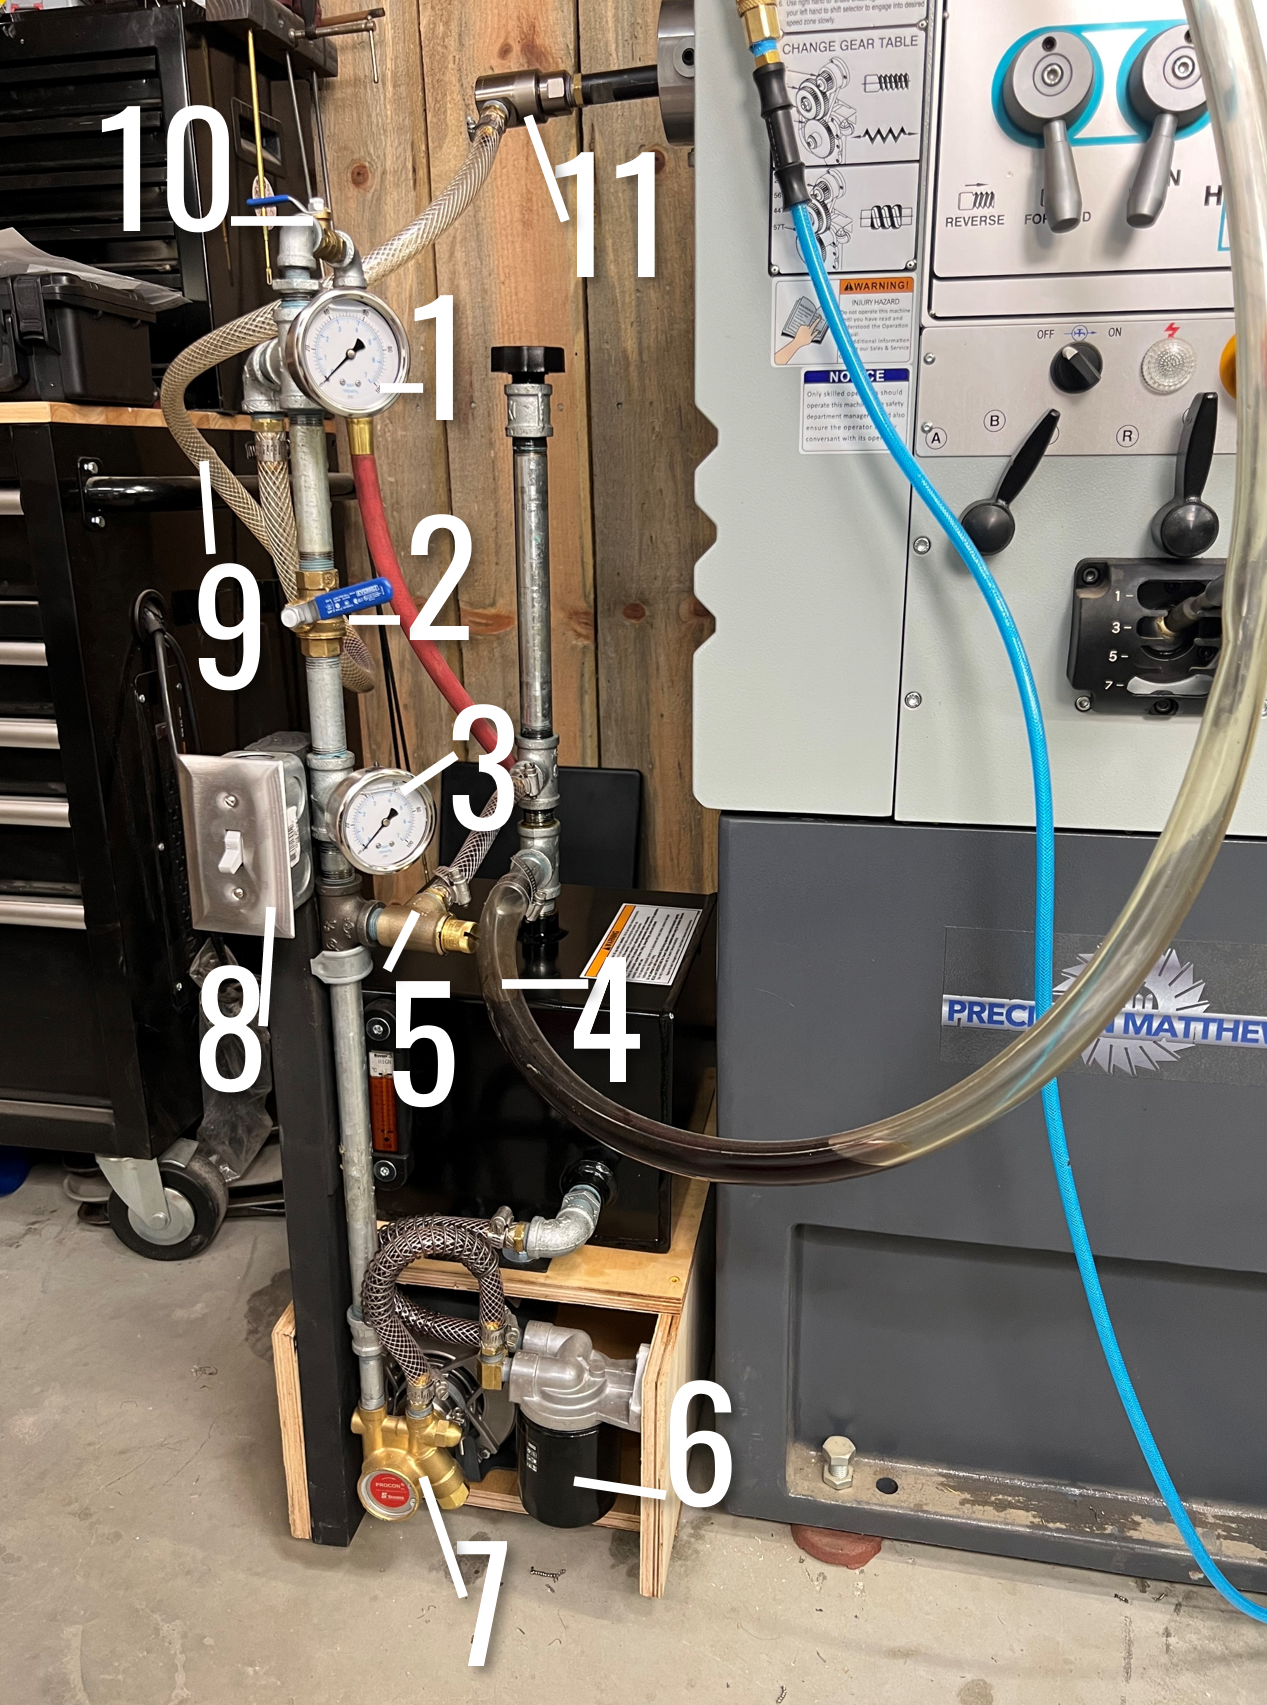
Pictured above:
- Muzzle pressure (final pressure) gauge
- Cutting oil flow regulation ball valve
- Primary pressure (before flow regulation, from pump)
- Return (drain) line
- Pressure regulation bypass valve
- Pre-filter
- Pump
- Pump switch
- Output hose
- Air purge ball valve
- High pressure swivel
This system uses a four gallon oil reservoir with level sight glass. So far this system is working well. I need to implement some changes to address some issues, but so far, so good!
Muzzle-End Barrel Work
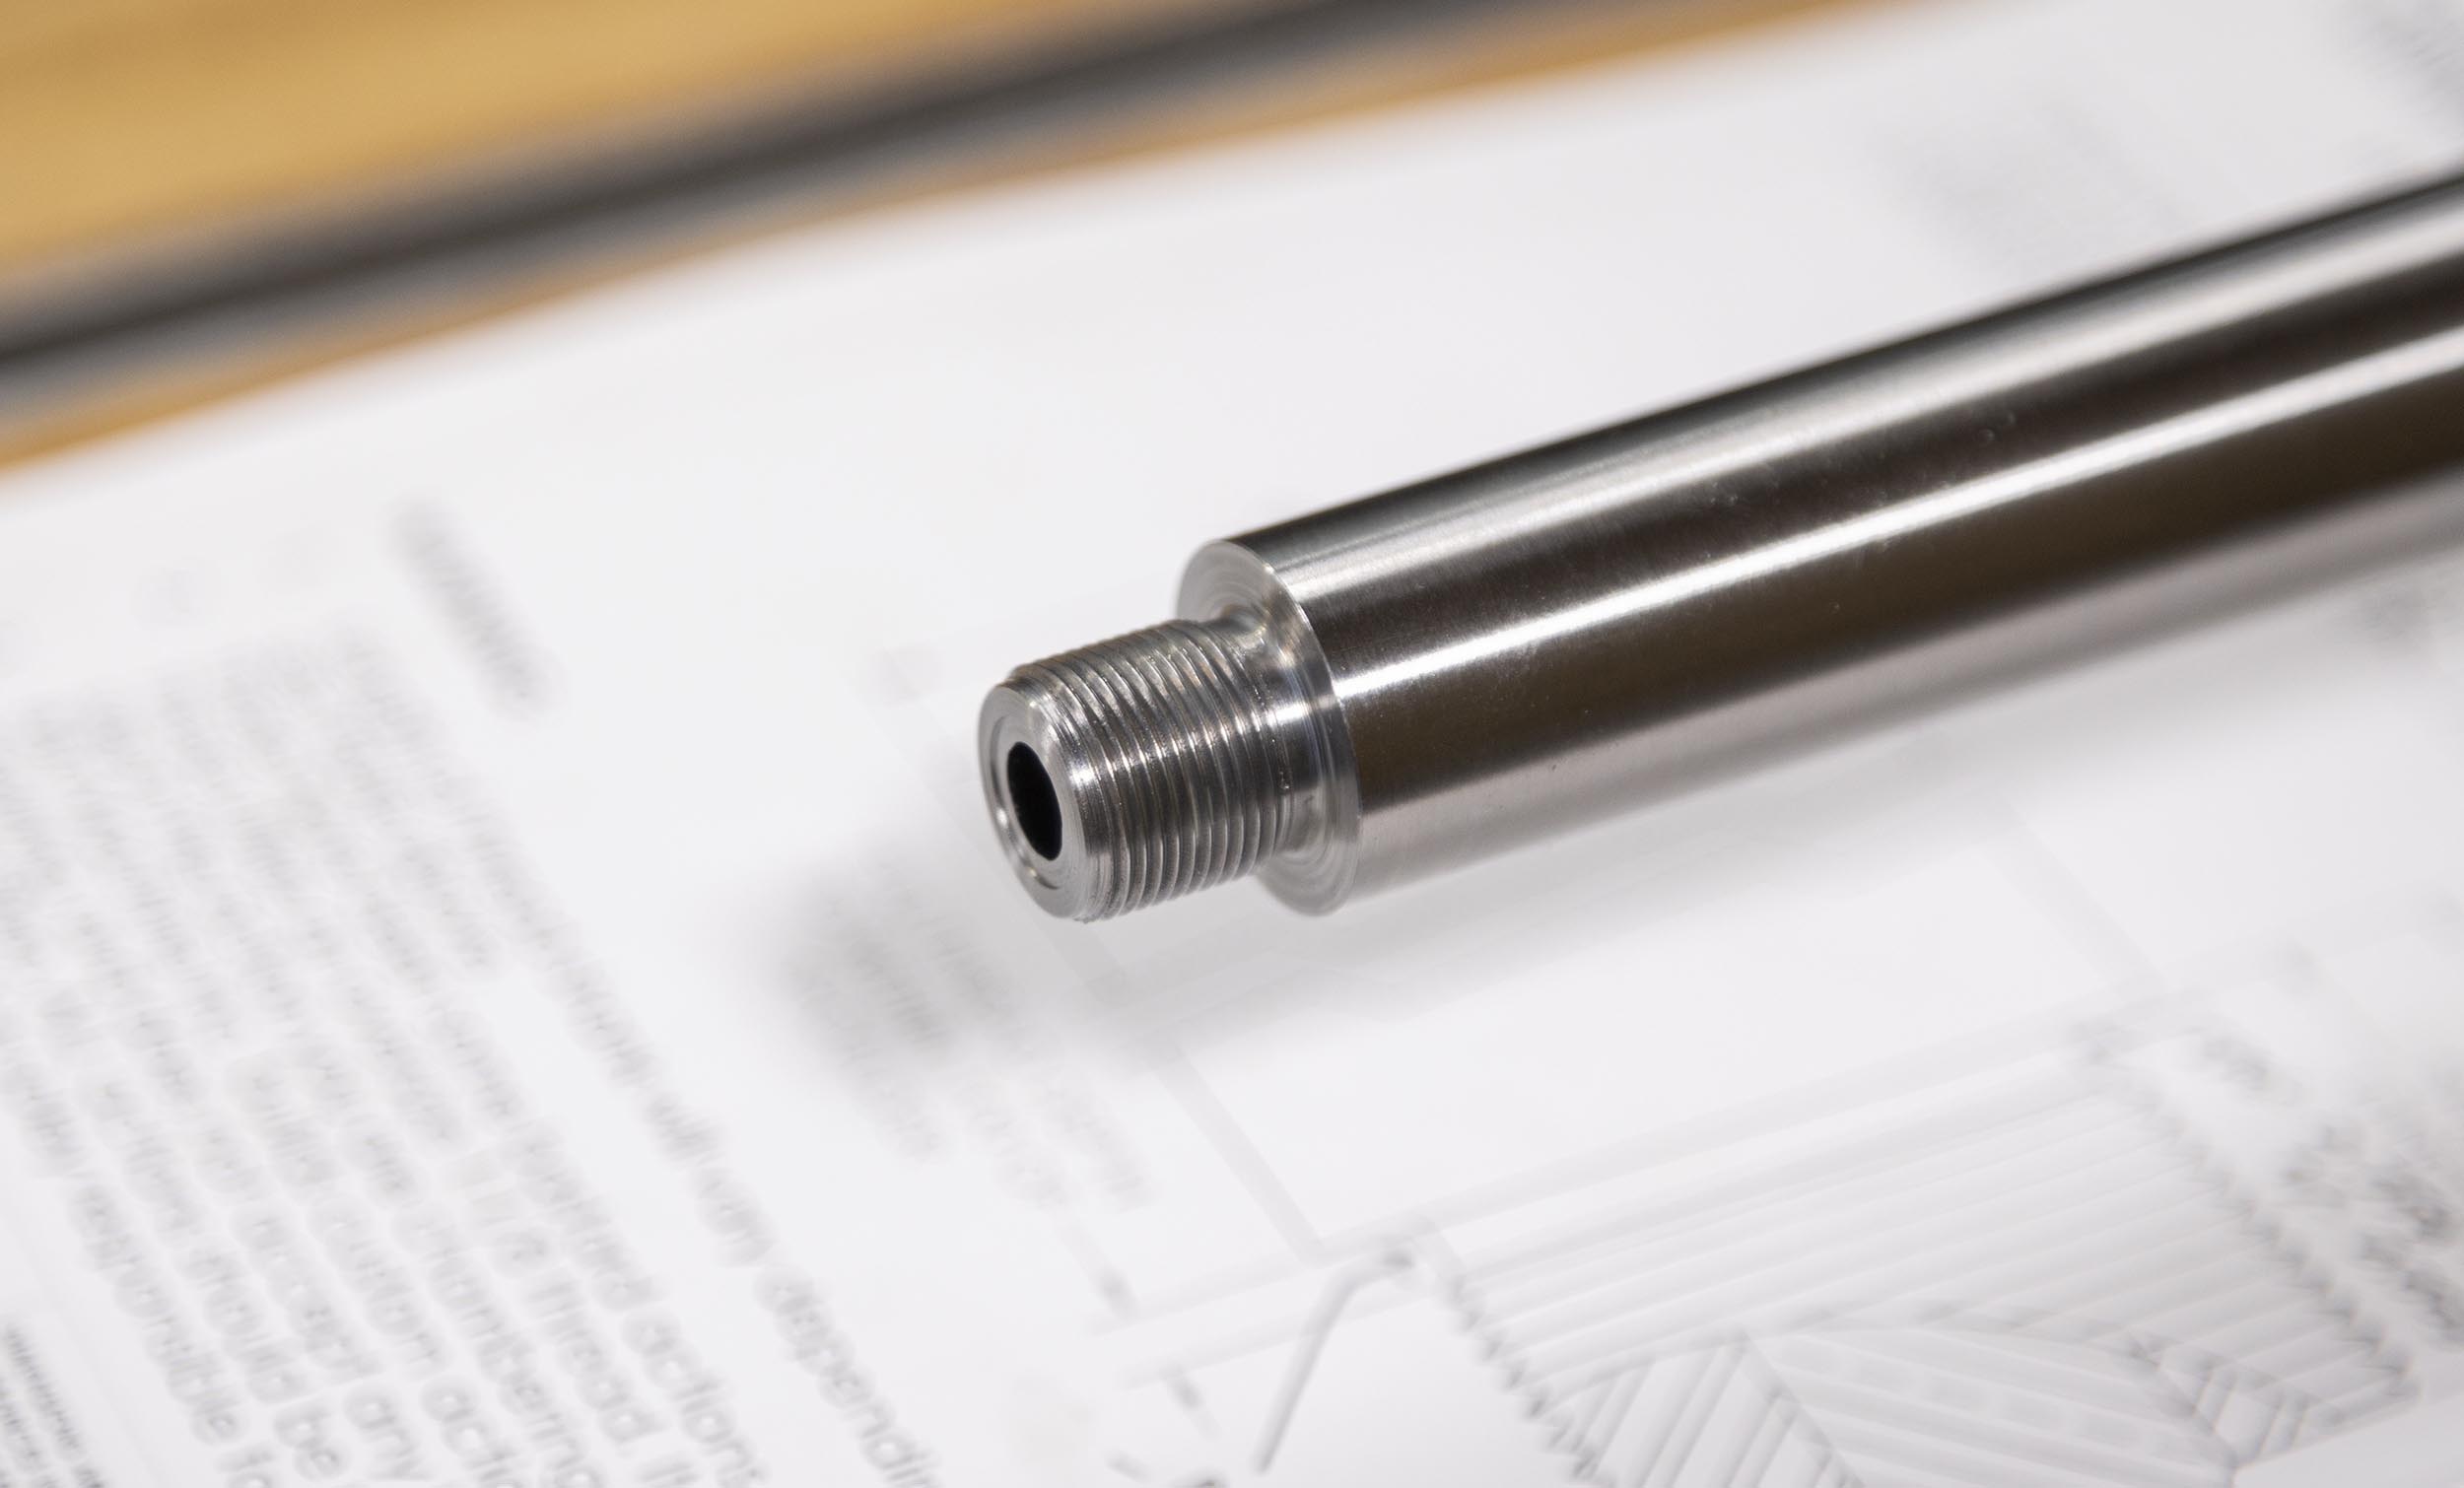
For the muzzle end barrel work, I performed my standard steps:
- Dial-In
- Part off end
- Turn down tenon
- Cut thread relief groove
- Cut step-down on end
- Face to length
- Thread
- Cut recess / crown
Things turned out very nicely!
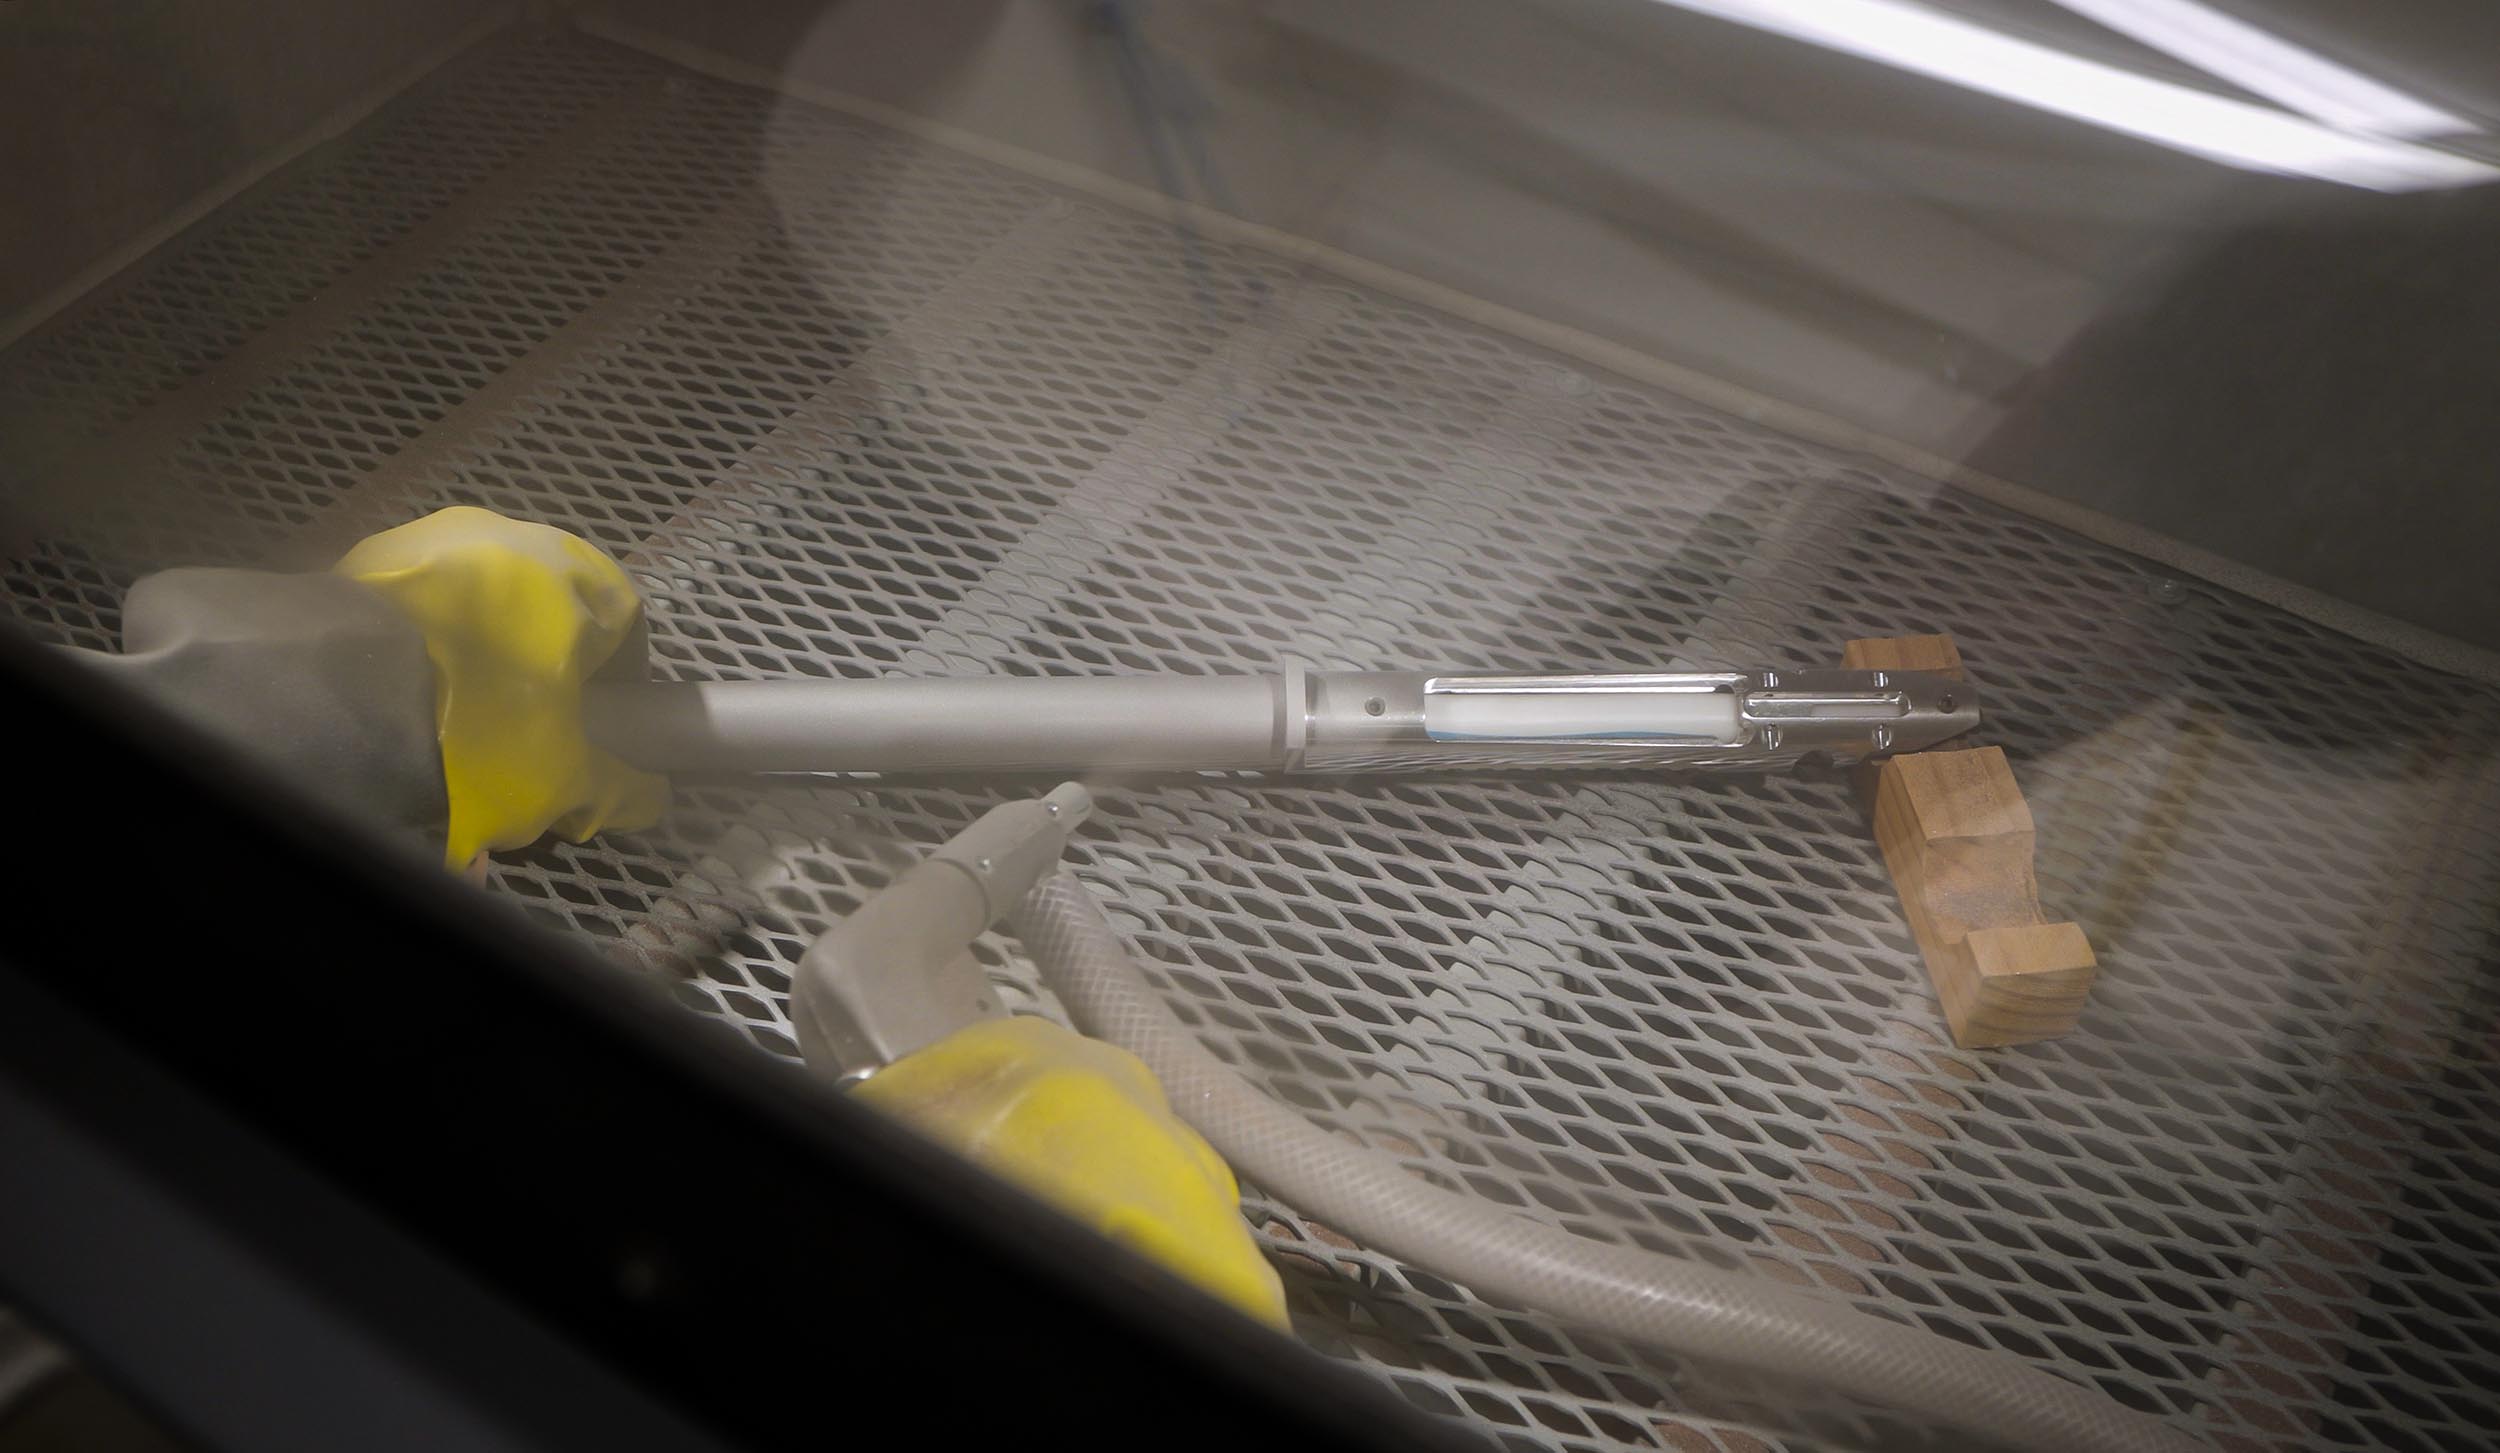
Breech-End Barrel Work
The breech-end work consisted of the following:
- Predial, drill bulk of chamber
- Final dial
- Bore pre-drill true
- Turn tenon
- Thread tenon
- Cut chamber (ream)
- Finish/polish/transitions
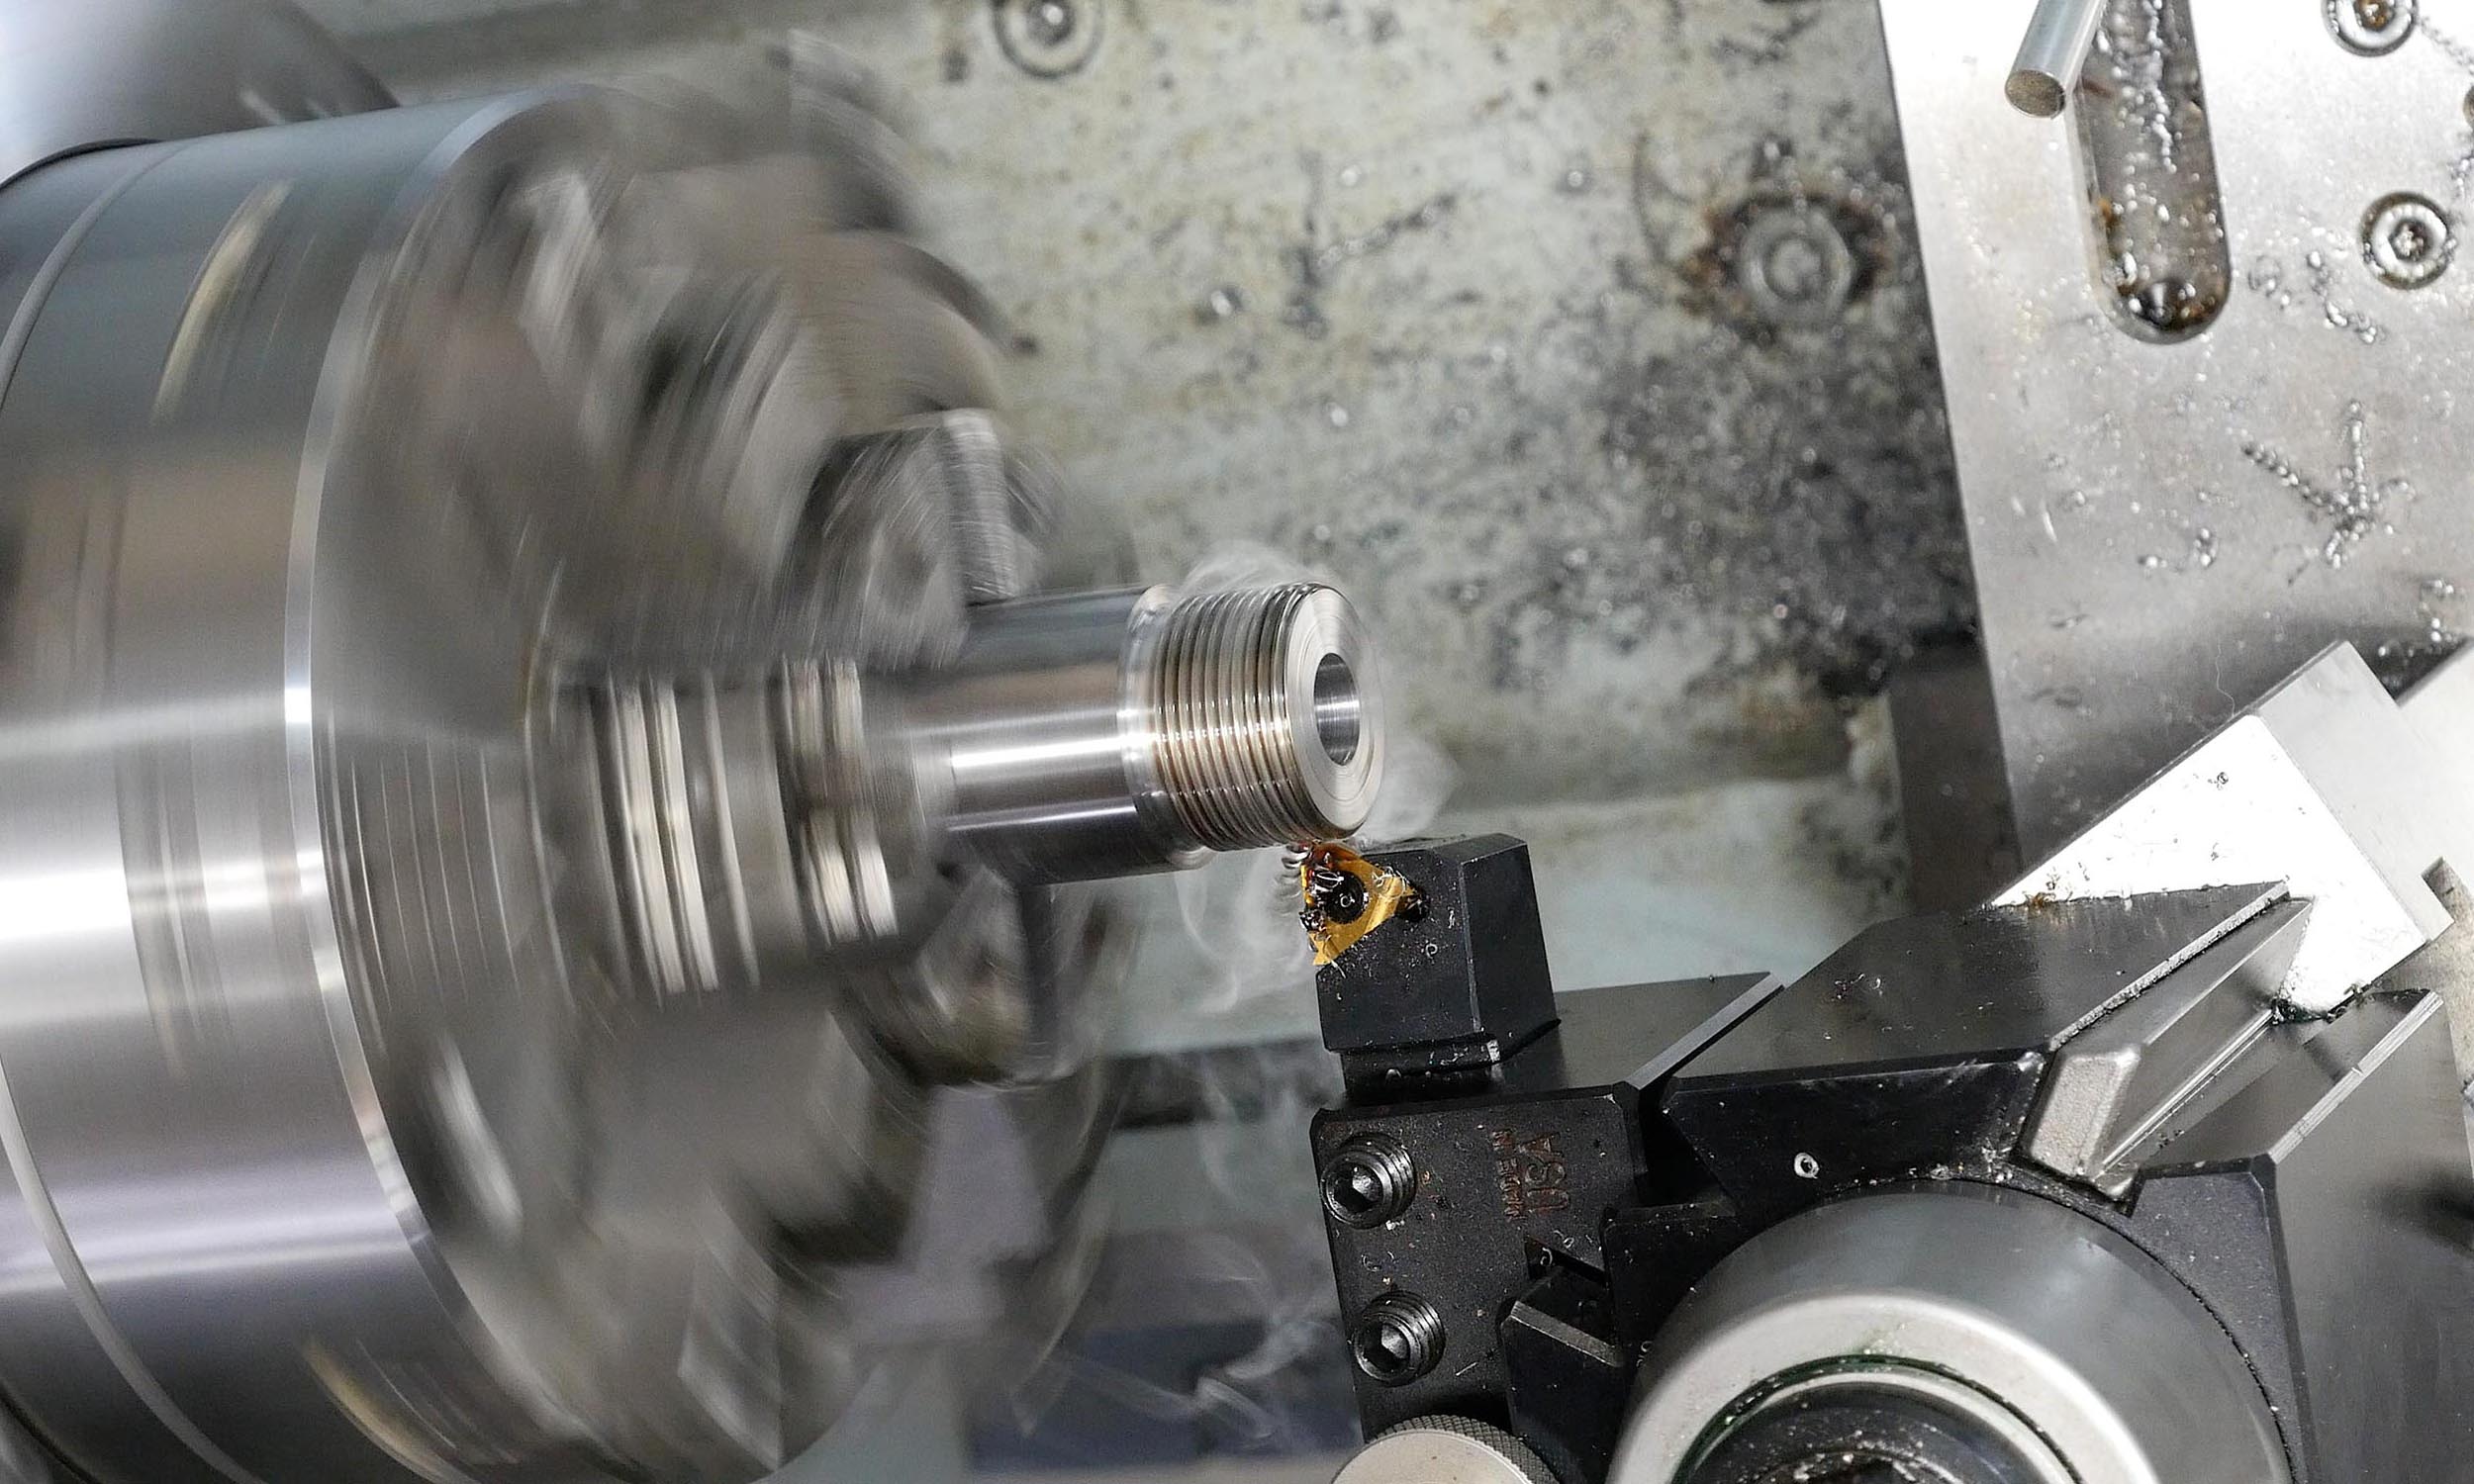
The BIG upgrade here was the pressure flush system! This saved a LOT of time during the cutting of the chamber!
Overall I was super-happy with how this barrel work turned out!
Installing the Barrel

This barrel install went SMOOTH!
I used the SAC Modular Barrel Vise and SAC Modular Action Wrench ( with #4 head, BAT), 1.250” bushing + Drywall Tape. I torqued to 90 ft-lb, checked headspace (right on), done deal!
Ultimate Reloader Cerakote Booth
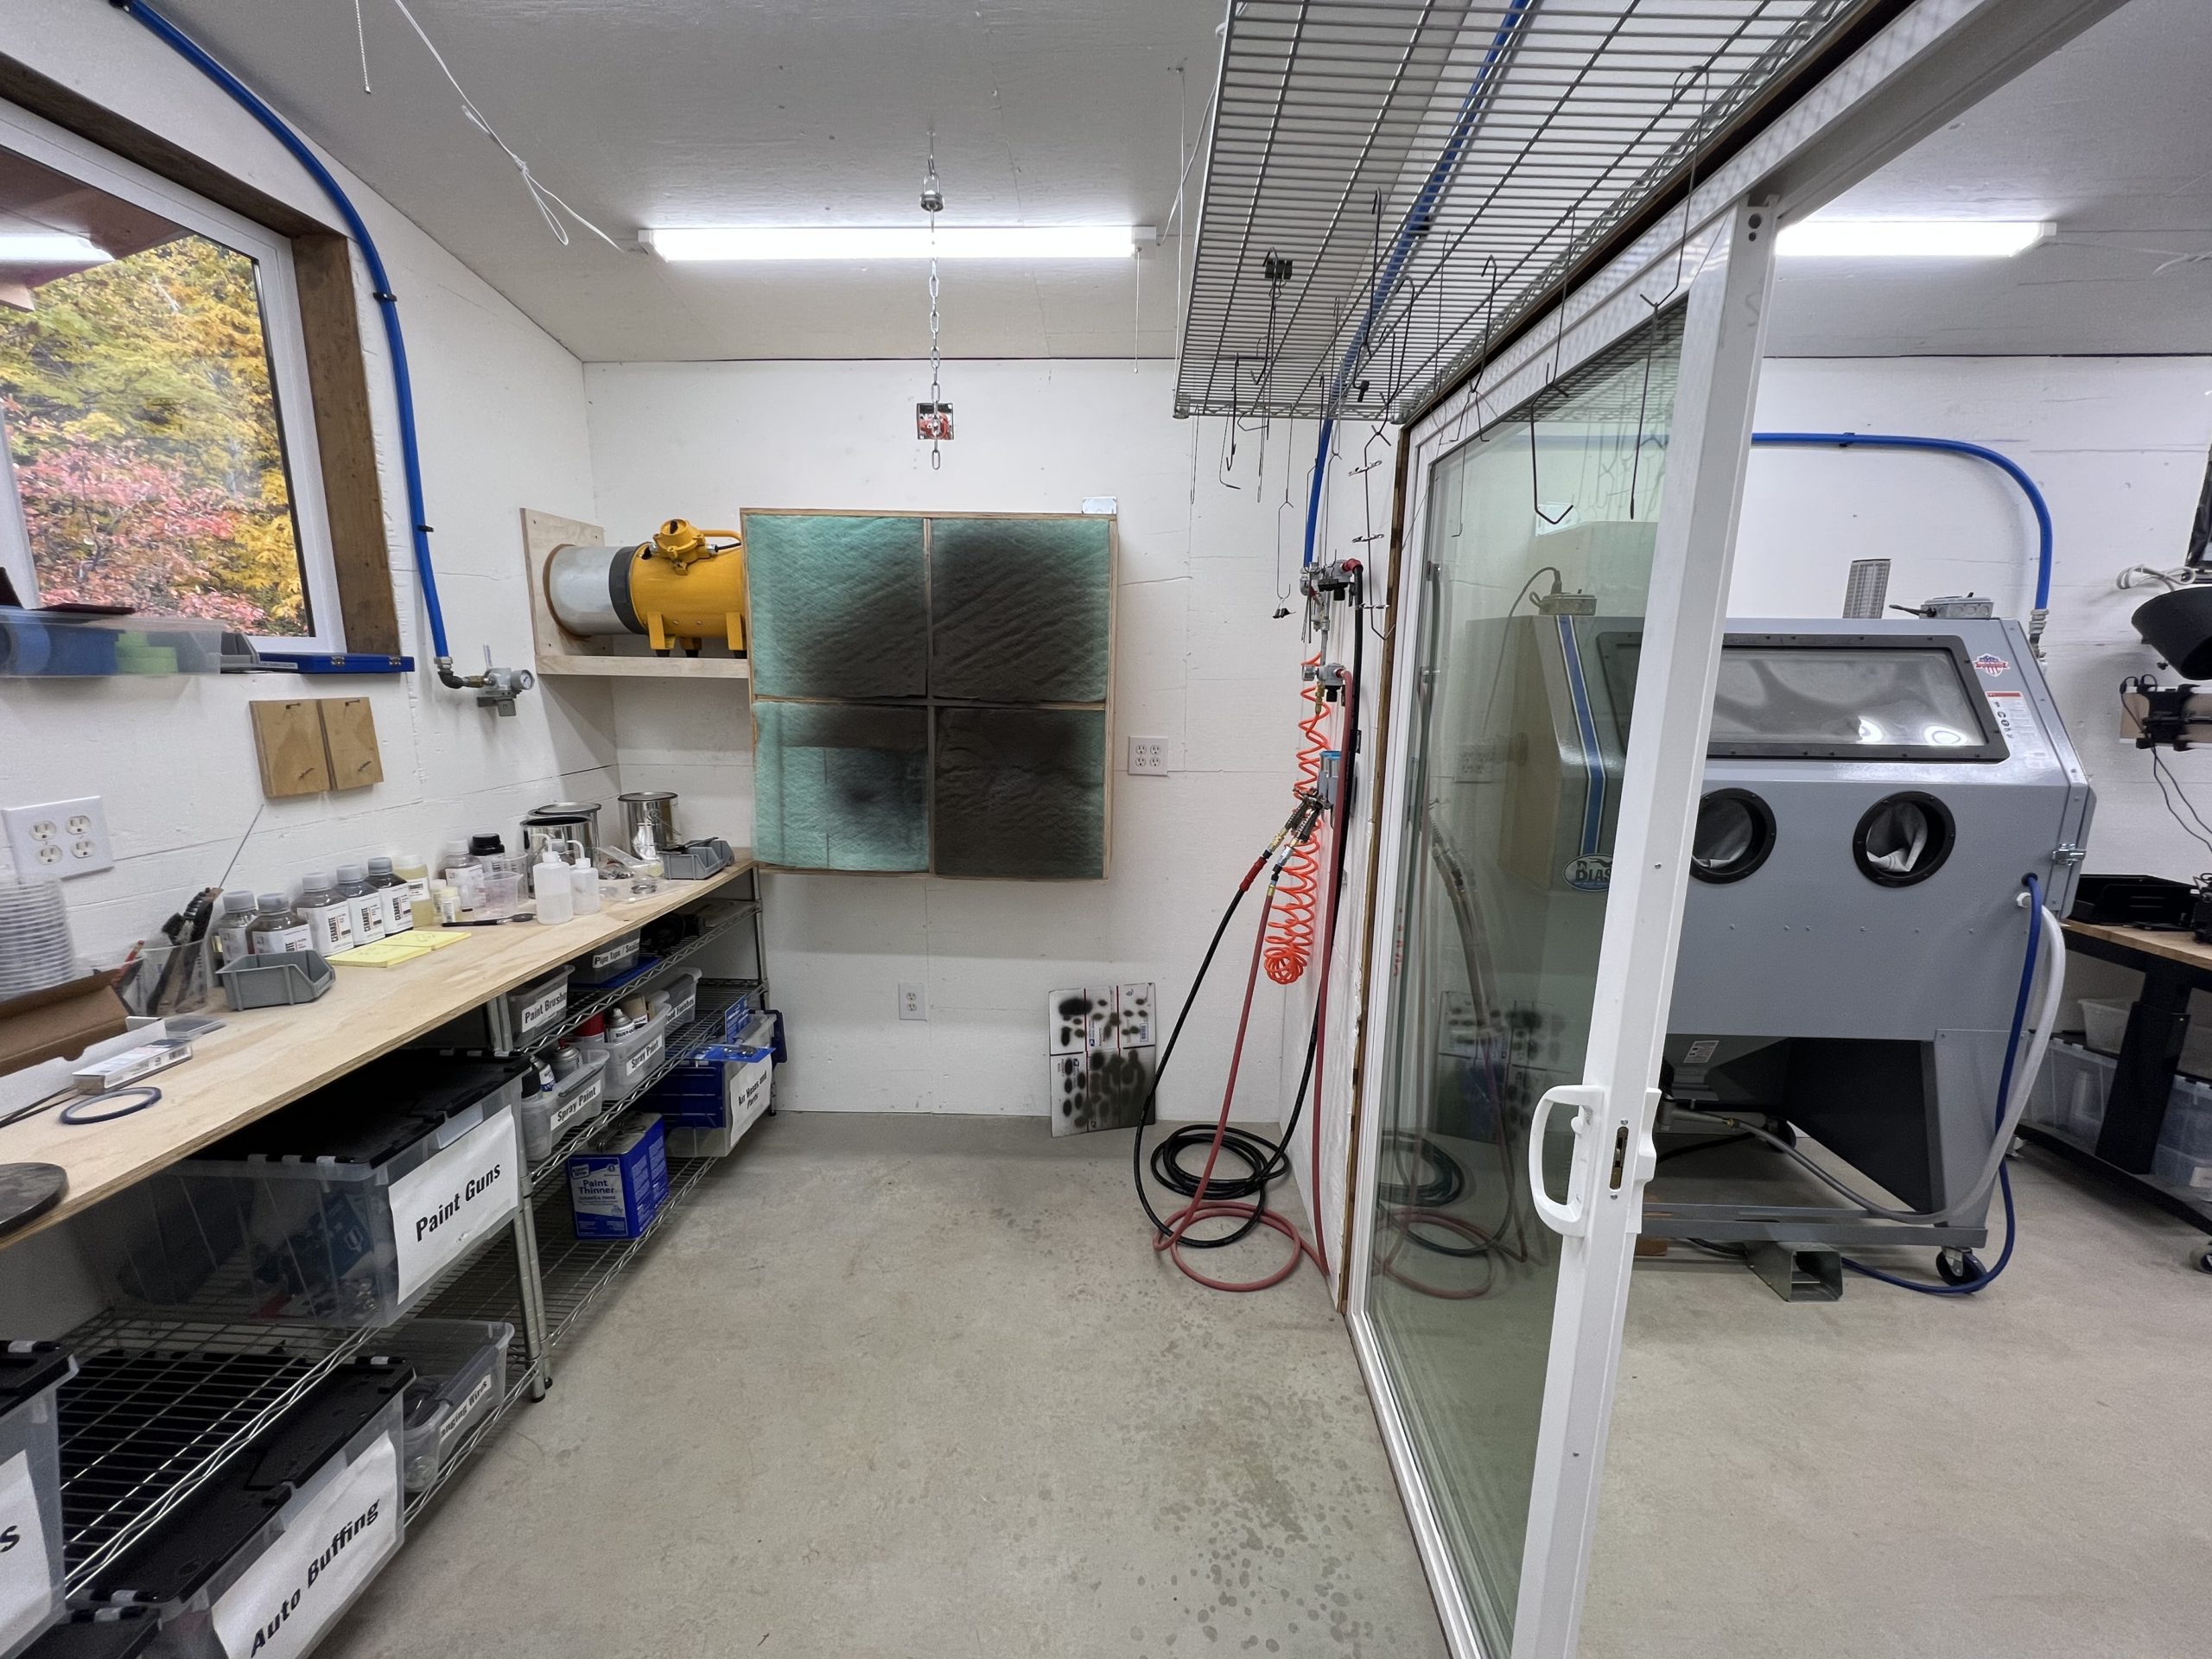
I’ve recently completed a very nice complete Cerakote booth that features:
- Totally enclosed setup (with glass doors on two sides)
- Custom exhaust system with explosion-proof fan, quad filter box
- Filtered booth air intake
- Dual regulated spray gun setup (LPH-80 guns)
- Space-efficient racking setup
- Sand blasting setup with vacuum and LED lighting
Highlight: Light Armor LA-2500 Oven
If you’re looking for a Cerakote Oven that’s not going to break the bank, check out this story I recently published where I take a look at the Light Armor LA2500B! Plus, using the UR100 code at checkout will save you $100.00!

Here’s a quick look at this oven:
Cerakoting the Parts
For this this rifle build, I’m using a single color: H-Series FDE Cerakote, H-265.
Above: Blasting the barreled action with 100 grit aluminum oxide media
The Cerakote prep and application was as follows for this job:
- Degassing/Degreasing
- Masking
- Sandblasting
- Cleaning
- Application of Cerakote
- Curing (300° F) 1 Hour
- Unmasking
- Assembly

Some notes:
- Bolt body and inside of receiver NOT coated
- Two coats applied
- Performed thickness test on test barrel (0.001” coating thickness after curing was verified)
- “Masking Rod” was turned on lathe made from Delrin plastic, this fit inside the action and “masked” off the interior of the receiver. Cut sections of silicone hose from the Cerakote plug kit were used to block off entrances to the side raceway areas
- I applied techniques from Cerakote Certified Applicator Training
- Cerakoting barreled action in-depth will be covered in detail in separate video/story
After discussing this job with Zach at Cerakote, I’m going to try the same process, but with the Cerakote applied with the receiver and barrel separate, not assembled. More on that later!
Laser Engraving Cerakote
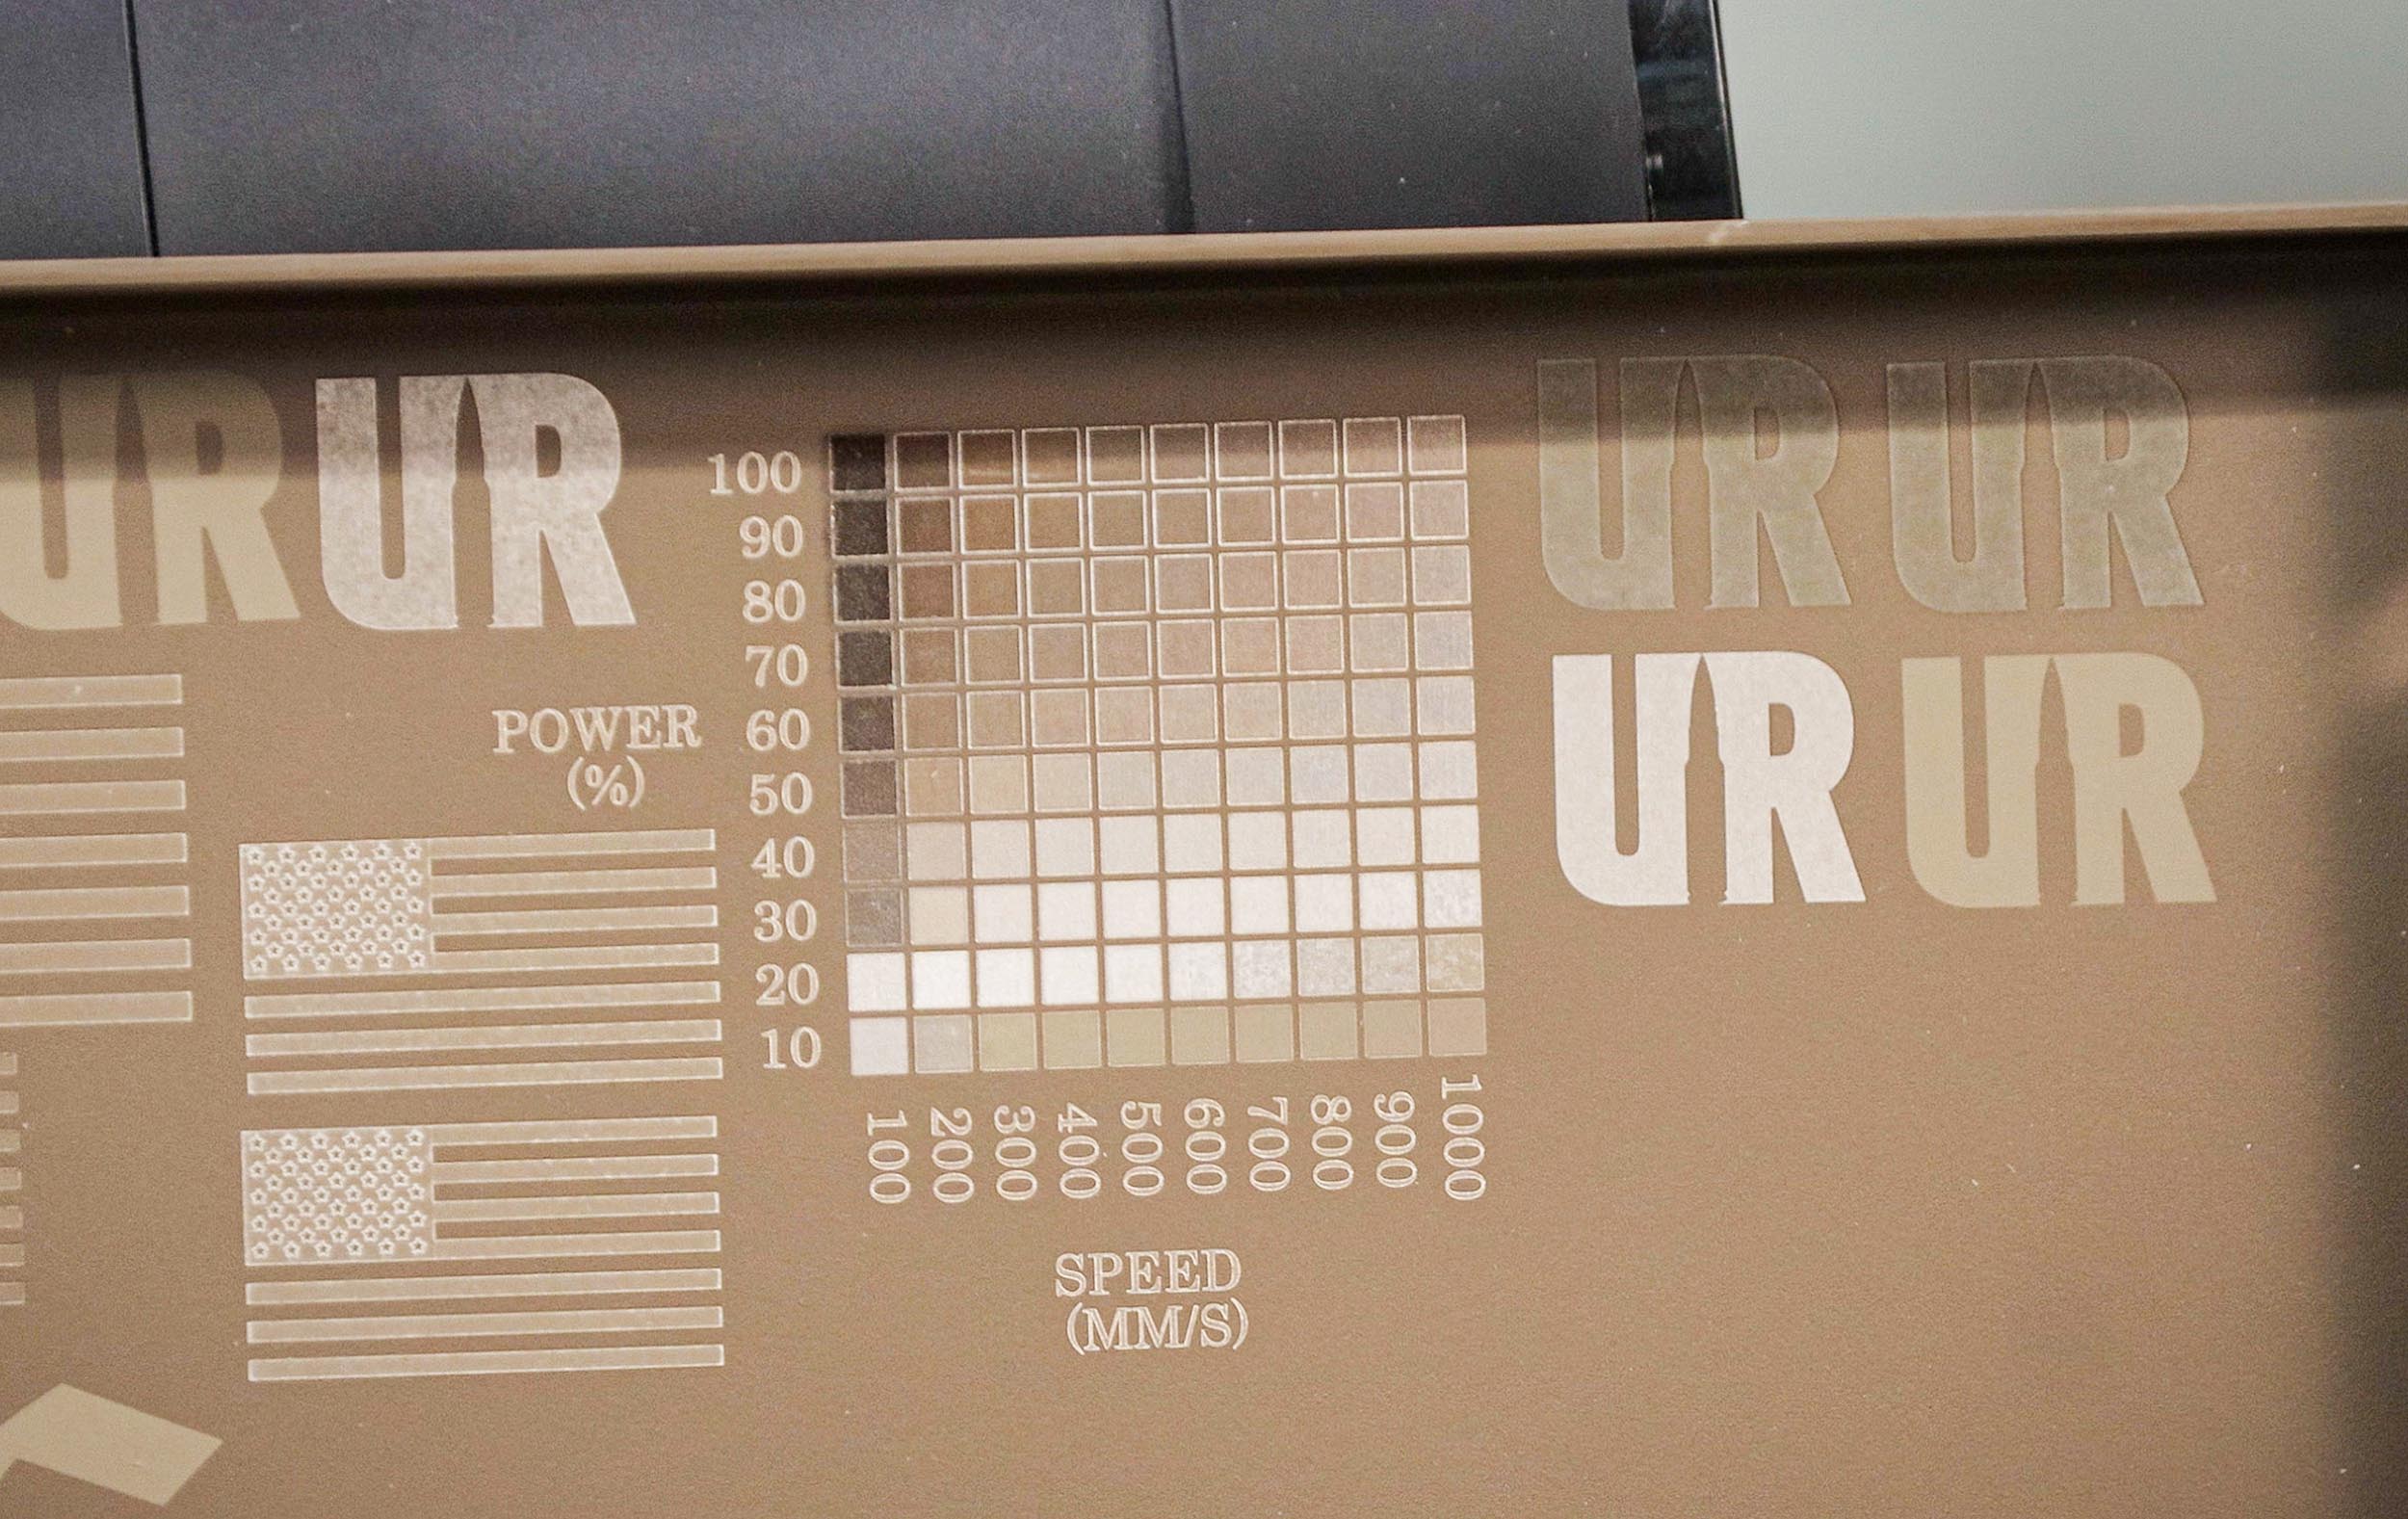
Above: Testing on sample “tray” Cerakoted with the same FDE H-Series product
The interesting thing about Cerakote, is that it can be “burned” with a laser to change its color (lighter and/or darker in most cases).
This is like magic because of:
- The detail that you can get
- The speed with which you can burn patterns onto firearms
- The ability of the laser to burn over areas of seams and contours that would be VERY difficult to mask
- The lack of visible edge buildup you can get when spraying with masks
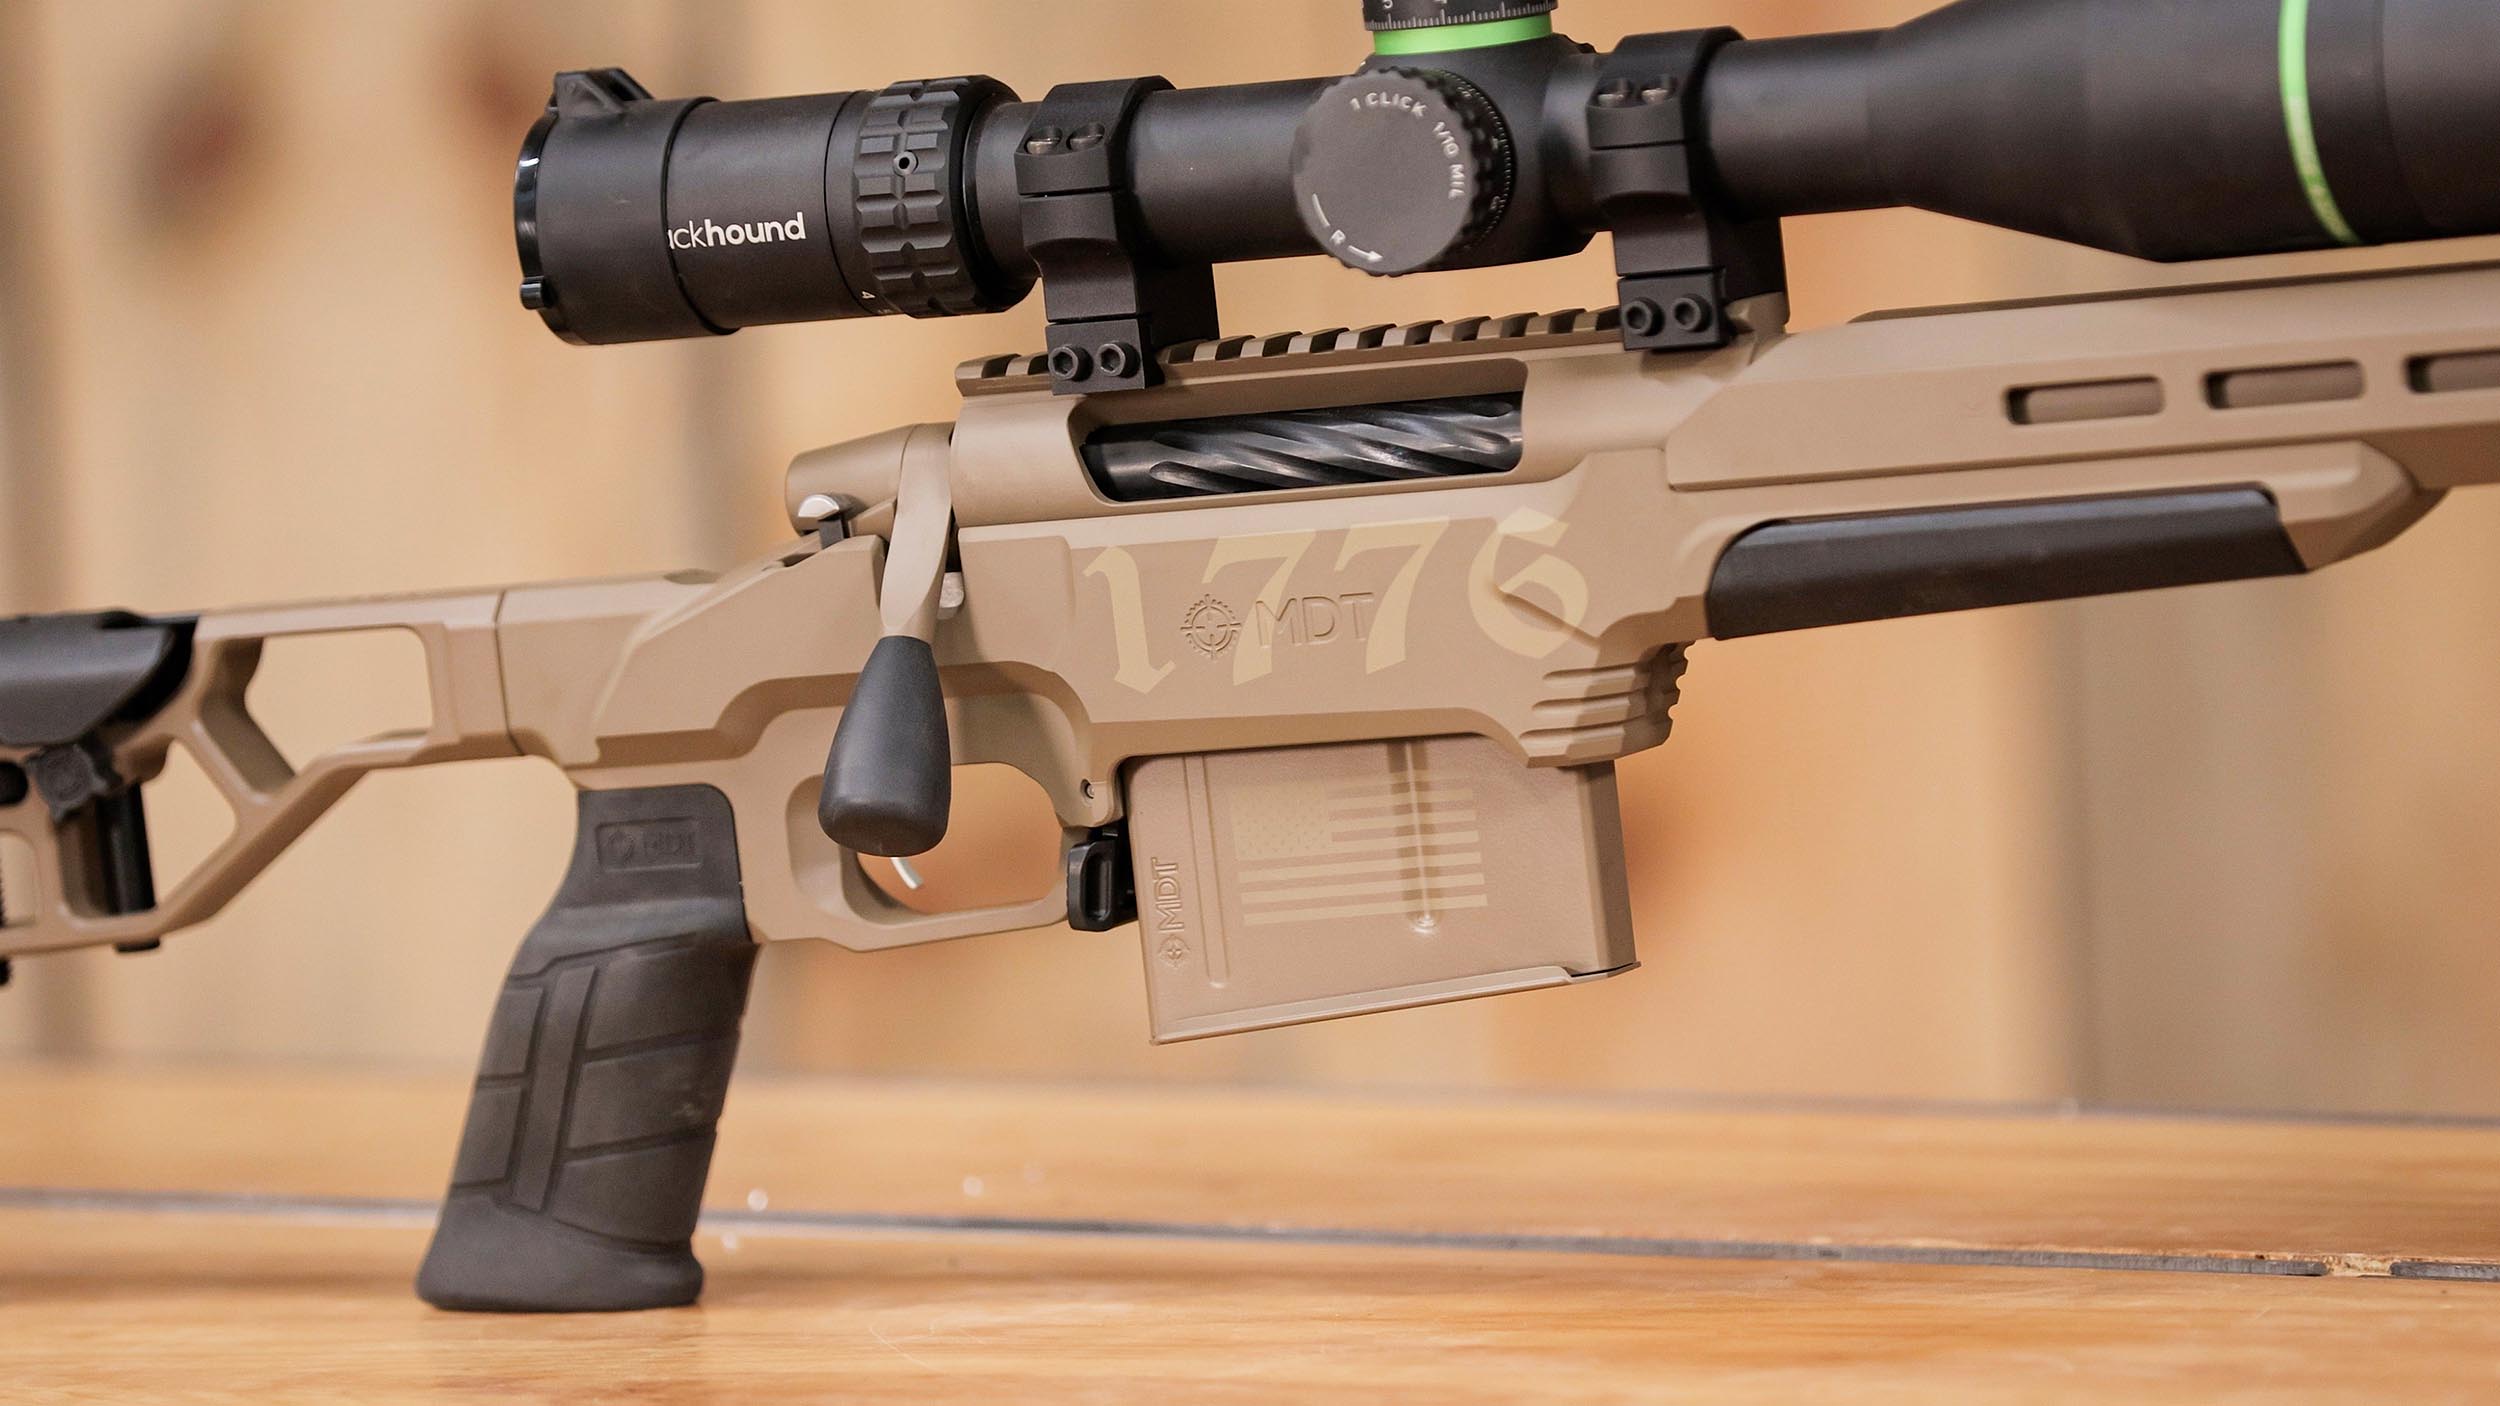
Here’s how things turned out: (1776 is over factory MDT FDE Cerakote, American flag is over Cerakote I applied to MDT magazine)

Blackhound Emerge 4-32x56mm Scope
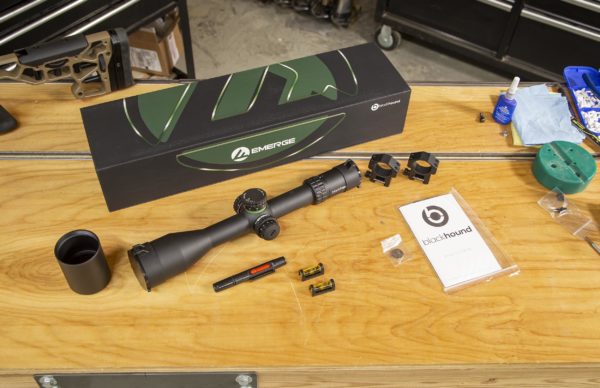
For this build, I’m trying something different for optics (just like with the other 7mm PRC build). This time it’s the Blackhound Emerge 4-32×56 FFP MIL Rifle Scope Illuminated Reticle, Zero Stop and Parallax.
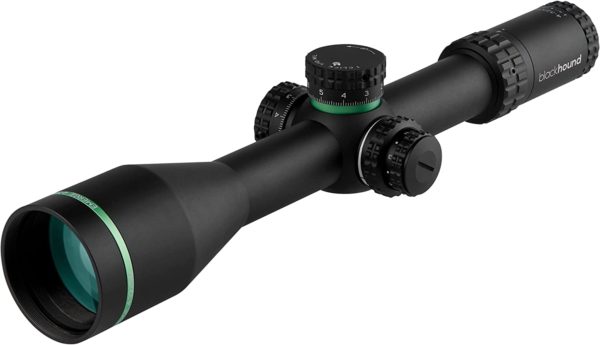
This scope is really clear, and the reticle looks clean! I’m looking forward to putting this scope through its paces as I reach out to long range with this scope!
The Finished Product
The rifle turned out awesome, and I’m thinking this will be an amazing long-range target setup, perhaps time for some ELR type shooting here soon! And the first three rounds on paper went into an amazingly small group:
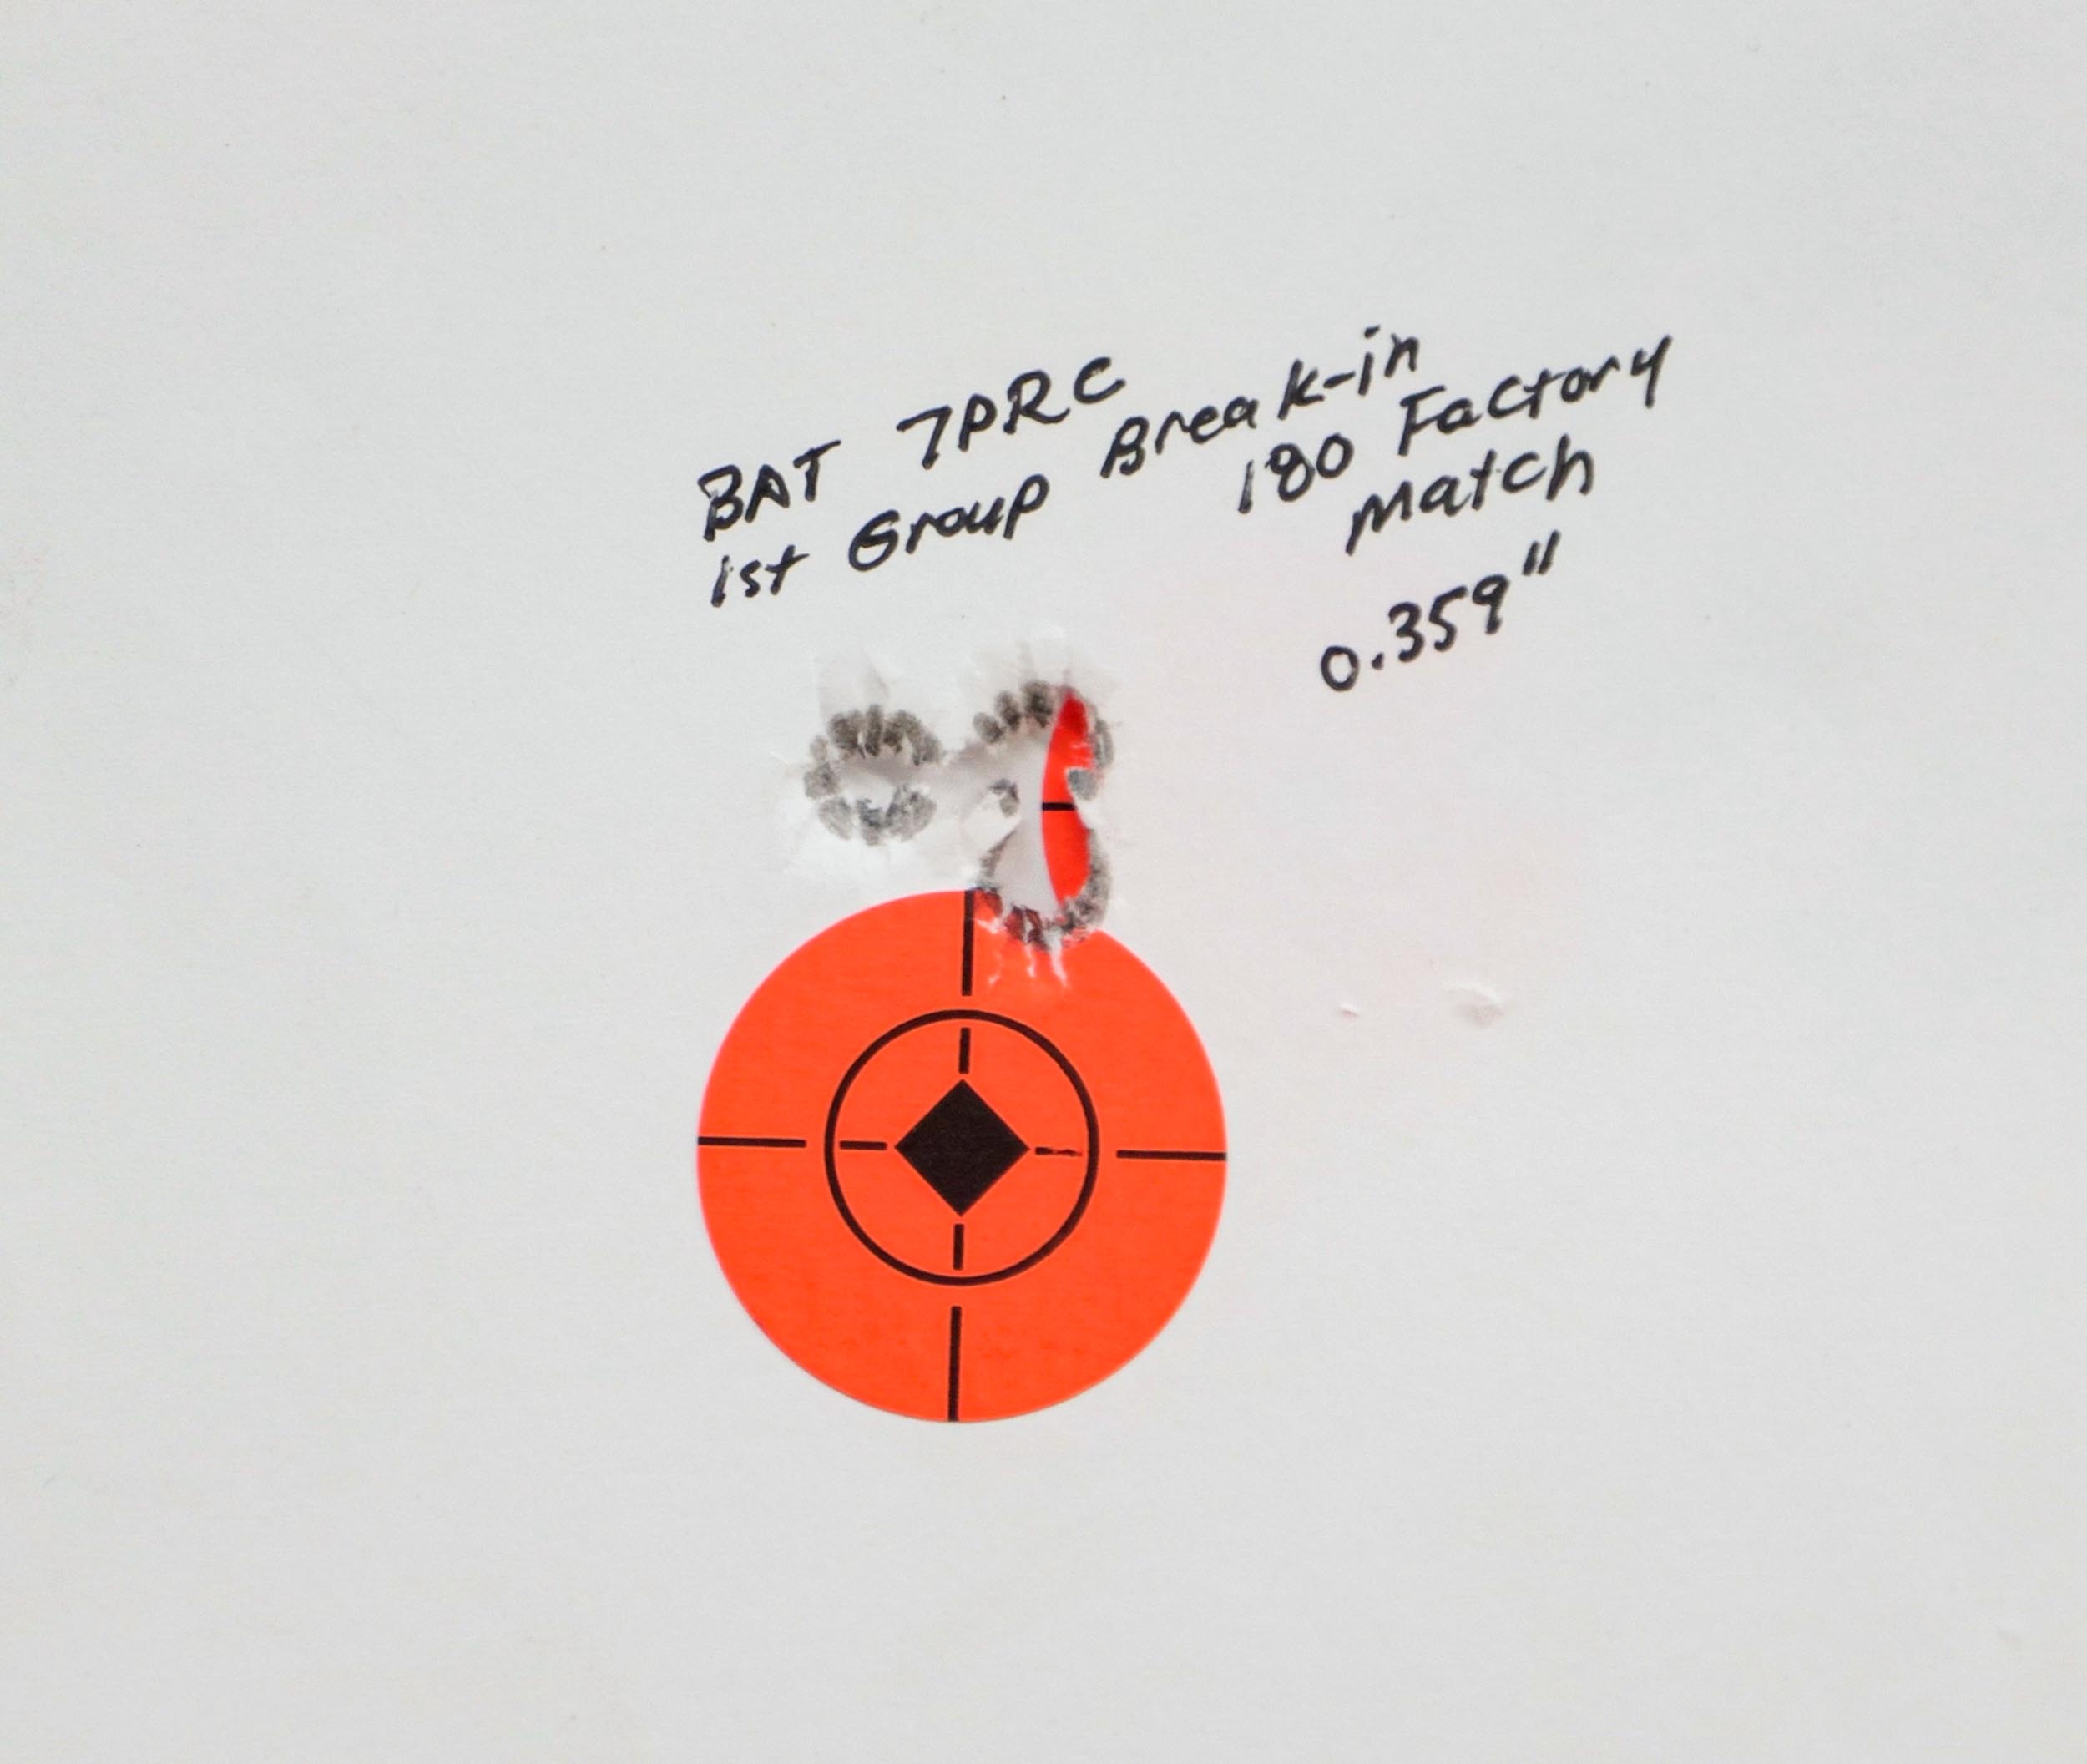
Now THAT is satisfying!
Get the Gear (and other links)
- Bat HR Action (Long Action) with magnum bolt face bolt
- Bartlein 7mm 5R Barrel Blank 1:8
- MDT ESS Chassis System
- Blackhound Emerge 4-32×56 FFP MIL Rifle Scope Illuminated Reticle, Zero Stop and Parallax
- Precision Matthews TL-1660 Lathe
- Precision Matthews PM-949TV milling machine
- SSG True Bore Alignment System (TBAS)
- SSG Range Rod (see bottom of page HERE)
- JGS Reamers and Gauges
- Light Armor LA2500B Oven (UR100 code saves you $100!)
- H-Series FDE Cerakote, H-265
- Cerakote Certified Applicator Training
- SAC Modular Barrel Vise and SAC Modular Action Wrench
Don’t miss out on Ultimate Reloader updates, make sure you’re subscribed!
Thanks,
Gavin


