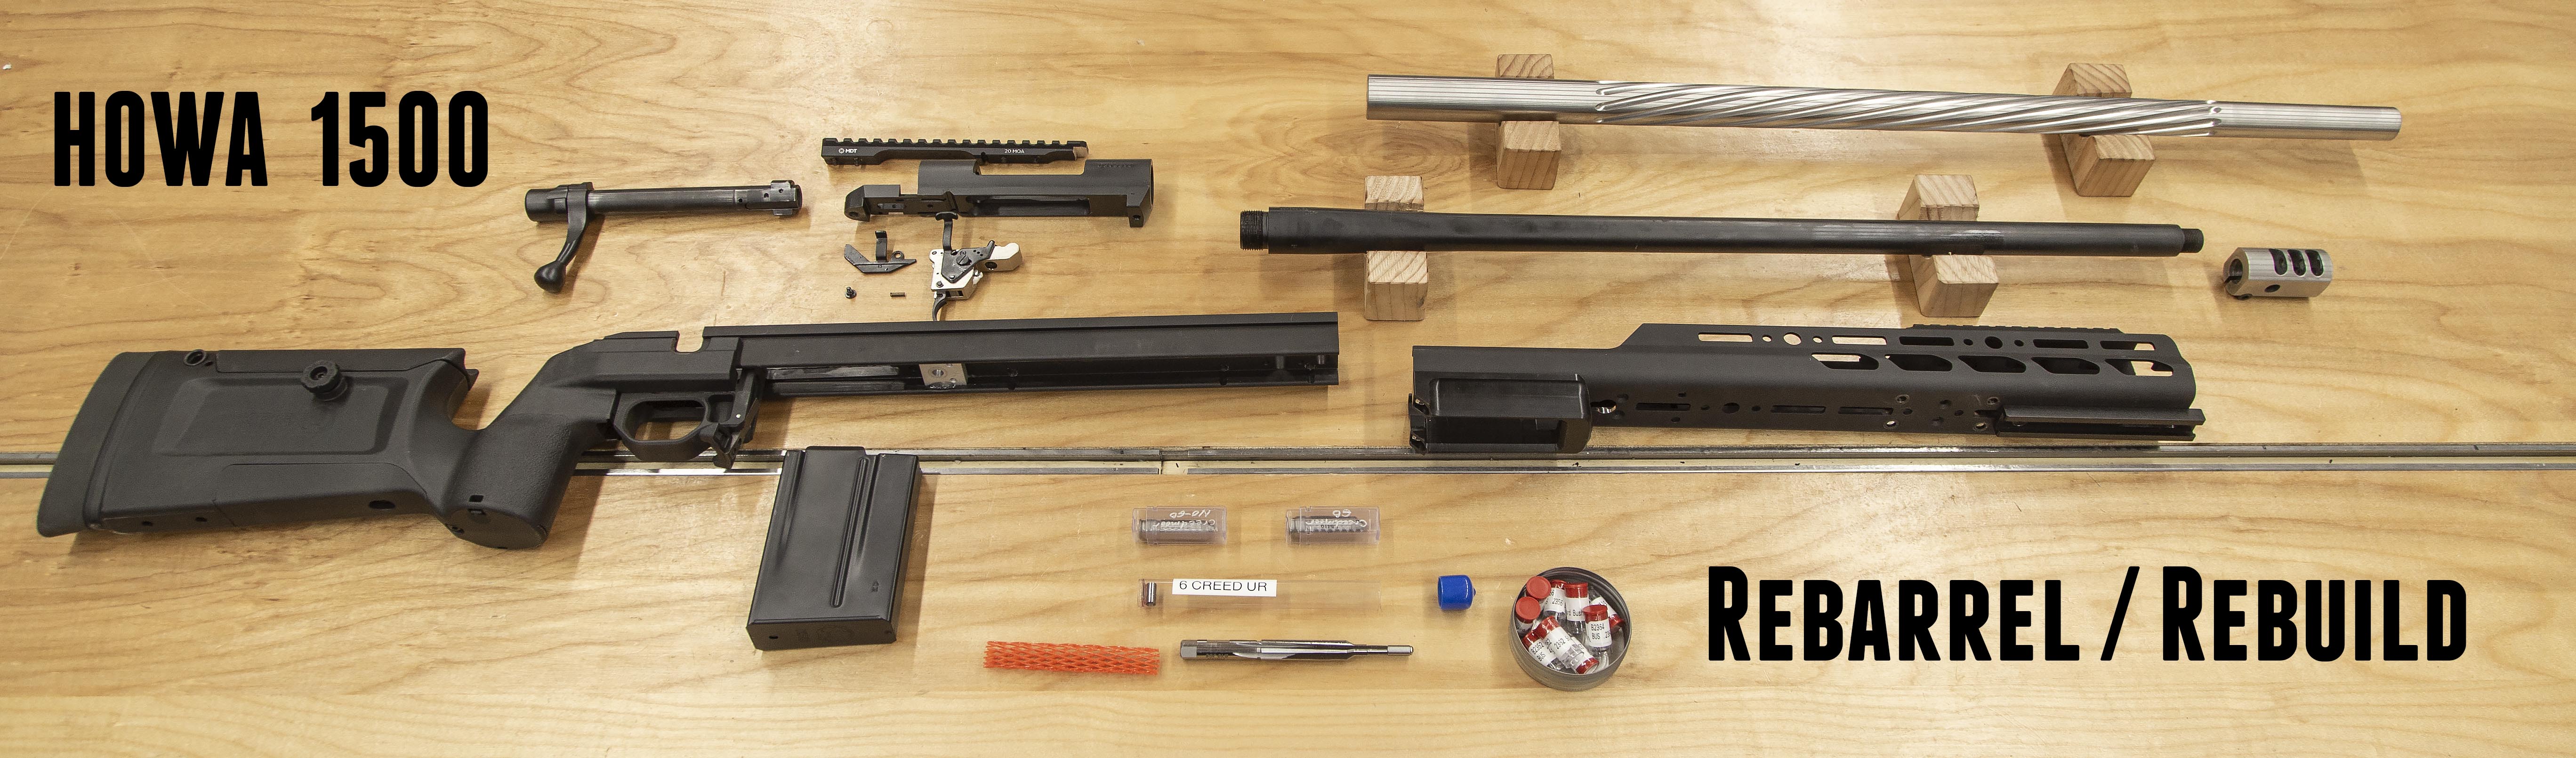
A while back I put together a rifle for PRS competition that “checked all the right boxes” for what I was looking for. 6mm Creedmoor is flat shooting and has manageable recoil, I wanted to try a HOWA 1500 action, and a KRG Bravo stock would have the ergonomics and features I was looking for. The only issue: I couldn’t get the rifle to shoot (see this story for a detailed walk-through of some diagnosis steps I performed).
After these investigations, I decide to re-barrel the HOWA 1500 using custom reamer geometry and an International Barrels match-grade barrel blank. This article will cover the process of rebuilding this HOWA 1500, including the rebarelling process.
Disclaimer
Ultimate Reloader LLC / Making with Metal Disclaimer: (by reading this article and/or watching video content you accept these terms)
- The content on this website (including videos, articles, ammunition reloading data, technical articles, gunsmithing and other information) is for demonstration purposes only.
- Do not attempt any of the processes or procedures shown or described on this website.
- All gunsmithing procedures should be carried out by a qualified and licensed gunsmith at their own risk.
- Do not attempt to repair or modify any firearms based on information on this website
- Ultimate Reloader, LLC and Making With Metal can not be held liable for property or personal damage due to viewers/readers of this website performing activities, procedures, techniques, or practices described in whole or part on this website.
- By accepting these terms, you agree that you alone are solely responsible for your own safety and property as it pertains to activities, procedures, techniques, or practices described in whole or part on this website.
Cartridge Specifics from Load Development and Testing
During my previous load development and accuracy troubleshooting, I had worked up a “best load” that had very similar characteristics to the Hornady 6mm Creedmoor 108 grain ELD-M factory match ammunition.

From my load development, you can see here how inconsistent things were:
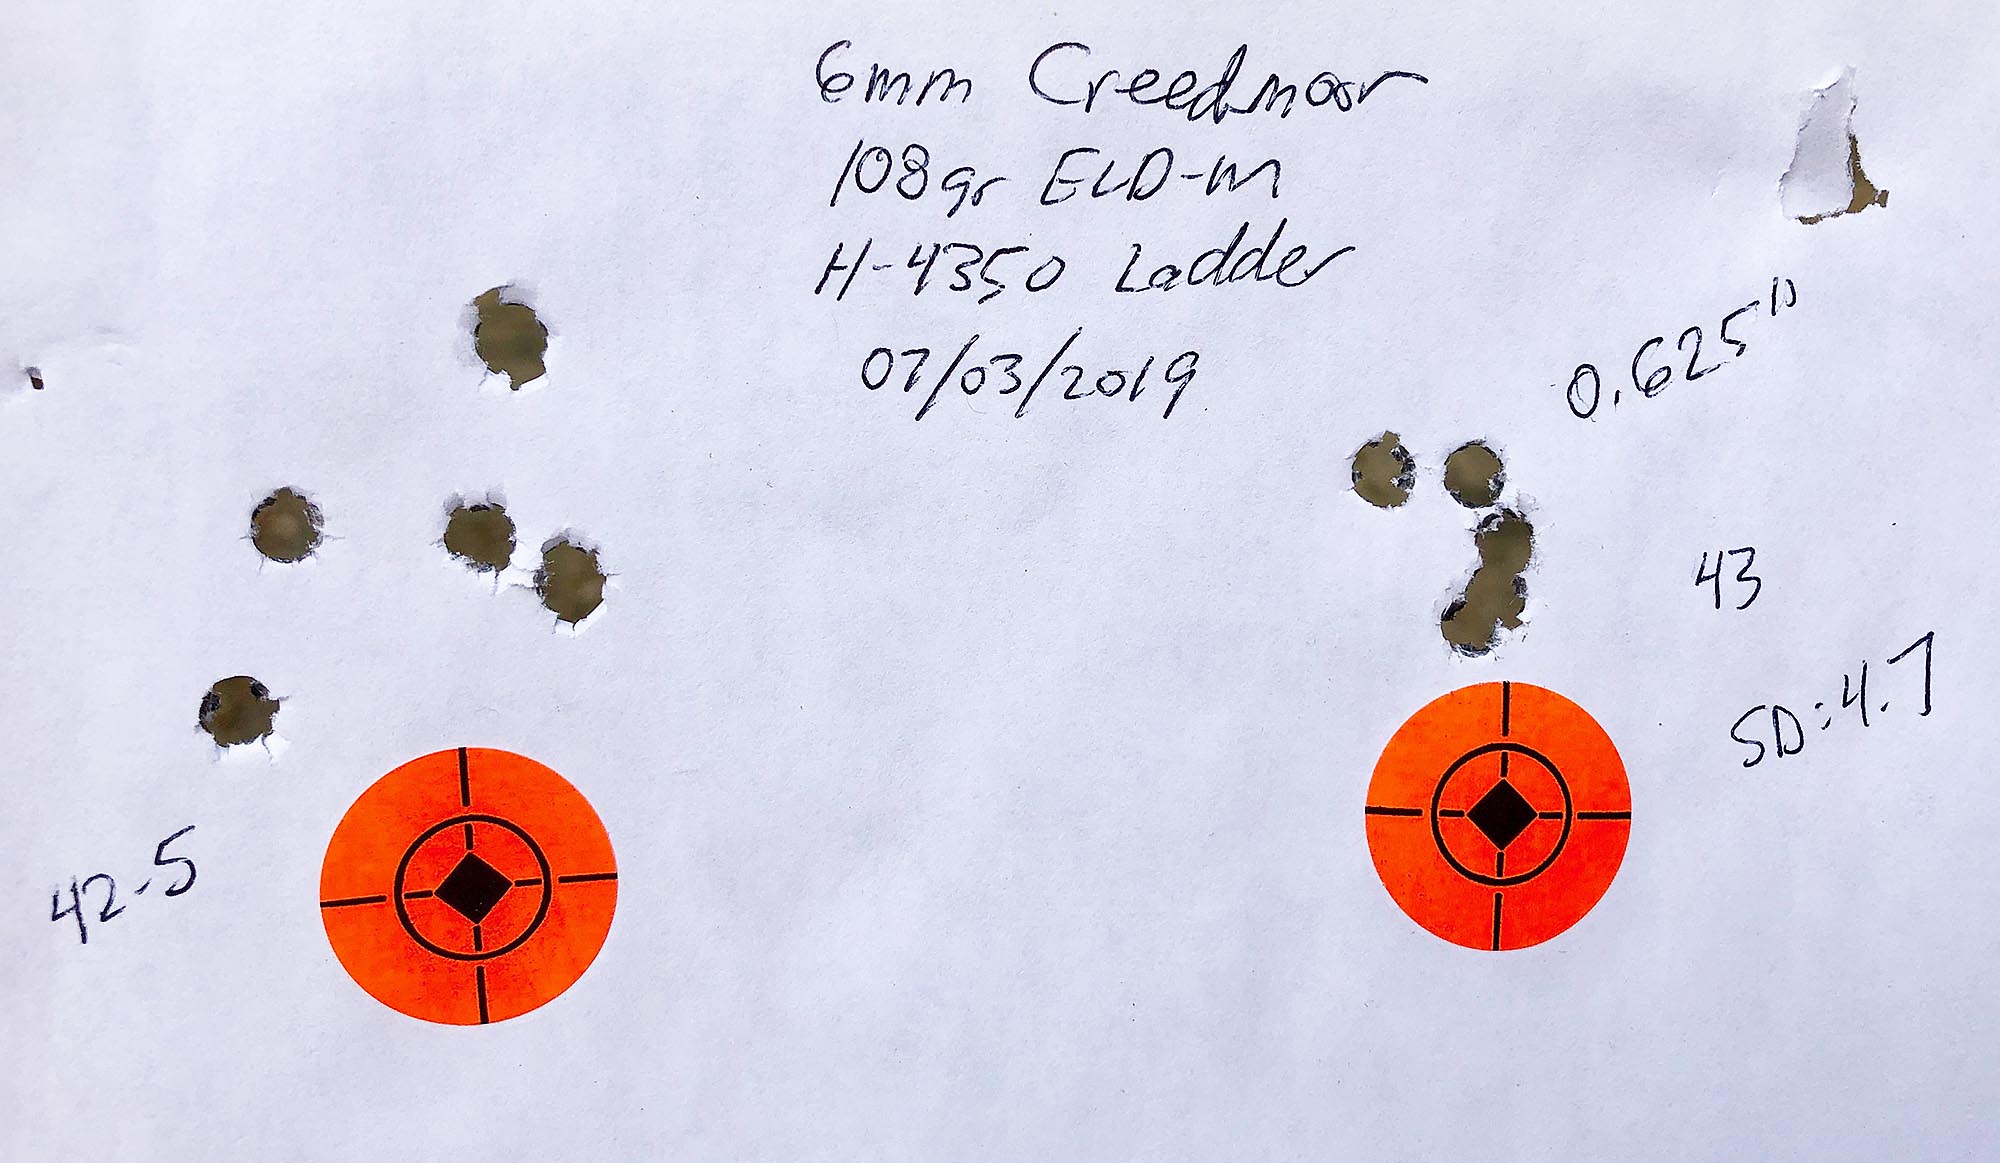
I decided after talking with several PRS competitors shooting 6mm Creedmoor that I would use the Hornady 108 grain ELD-M bullet, and the seating depth for the Hornady factory ammunition (which also produced some of the best results with my handloads) as my “reference” for the chamber geometry I would use for the rebarreling job.
6 CREED UR: Custom Reamer Geometry
I reached out to Jason Duncan at JGS Precision to see if JGS would want to partner with me on this rebarreling project, and he said “absolutely”! So I sent a few dummy rounds to Jason, and after taking several measurements and talking with me on the phone about factors like accelerated throat erosion (specific to 6mm Creedmoor) we decided on a custom freebore/throat geometry that would be optimized for the loads I would use. I decided to call this reamer/chamber geometry “6 CREED UR”.
Here’s the reamer (click/tap to enlarge)

In contrast to the generous freebore of the factory HOWA 1500 rifle, this custom reamer geometry would enable shorter bullet jump which can lead to enhanced precision and accuracy.
Here’s the reamer print from JGS Precision for 6 CREED UR: (click/tap to enlarge).

Note: Do not use this reamer geometry for your rifle project. Use your own dummy rounds and measurements to spec your own custom reamer
A while later I received the custom piloted reamer, and some 6mm bushings that enable the front of the reamer to be guided with a slip fit that’s free of slop. A key factor for achieving a chatter-free chamber finish!
International Barrels Match-Grade 6mm Barrel Blank
Over the years I’ve heard a lot of great things about International Barrels, and I thought it was time to give one of their match-grade barrel blanks a try! For this project, I worked with International Barrels to spec out the following blank for the HOWA 1500 rebuild:
- 1:7.5″ twist rate
- 416R stainless steel
- 24″ finished length (27″ blank)
- M24 contour
- 6mm bore
- 4 groove
- Button rifled, hand finsihed, match-grade
- Custom spiral fluting
![]()
Above: International Barrels blank (foreground) and HOWA 1500 factory barrel take-off (background), click/tap to enlarge.
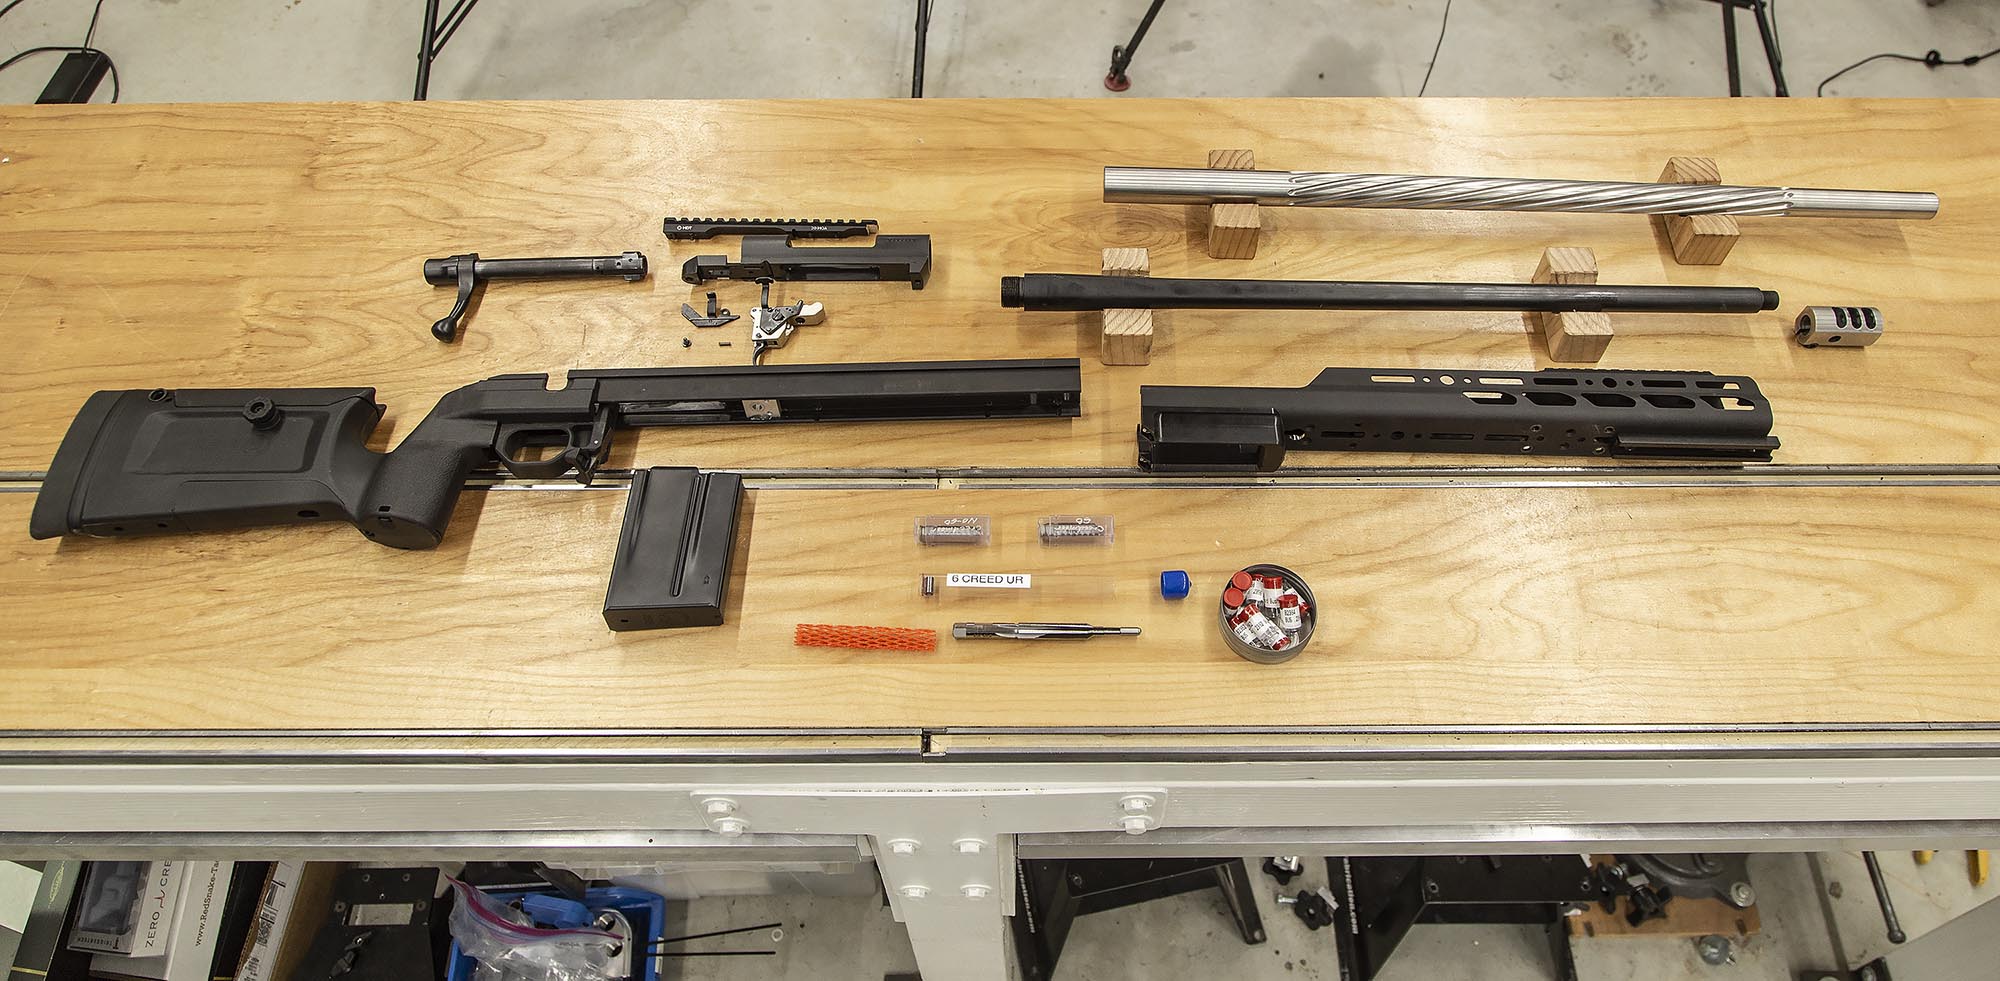
Here you can see all of the components for the rifle rebuild after the tear-down process. (click/tap to enlarge)
Time to get to work!
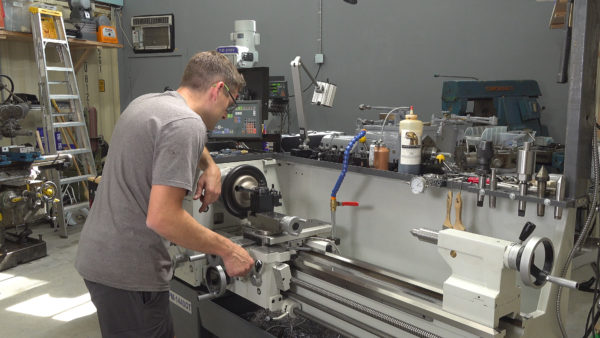
My Lathe
For this build, I’m using a Precision Matthews PM-1440GT. I believe this is the best gunsmithing lathe you can by new in the USA (Taiwanese made, not chinese, 2″ through-spindle capacity, Japanese high-precision spindle bearings, etc):
Also, I’ll be using the custom outboard spider that I built- you’ll want to check out that story!
Chambering: Spotlight on Metric Threading
I’ve covered rifle barrel chambering multiple times on the channel, please see these other stories for end-to-end coverage of my techniques:
- 6.5 PRC Light-Weight Build Part 1: Action, Chambering, Fitting
- 300 PRC Custom Build: Chambering and Machining the Barrel
- 224 Valkyrie Remington 700 Build P2: Barrel Prep and Alignment In the Lathe
- 224 Valkyrie Remington 700 Build P3: Chambering and Machining
- Winchester 70 Rebarrel Part 2: Start to Finish Process
Since this was the first time I’ve threaded a barrel tenon for a metric action (HOWA 1500 actions use M26 x 1.5mm threading) I thought I’d focus on that for this article.
Metric Threading with the Precision Matthews PM-1440GT
As Bill Marr from rifleshooter.com reminded me: “Don’t forget to change gears for metric threading BEFORE you dial in your barrel”! Why? Because you’ll need to remove the side cover to change gears, and that requires removing the outboard spider which can’t be done while the barrel is installed in the lathe! Likewise, you’ll need to remember to switch the gears back for english threading before setting up the barrel for muzzle threading. So that’s where I started with this project!
Here’s an excerpt from the Precision Matthews PM-1440GT manual covering the setup specifics: (I’ve highlighted the settings used for this 1.5mm thread pitch setup)
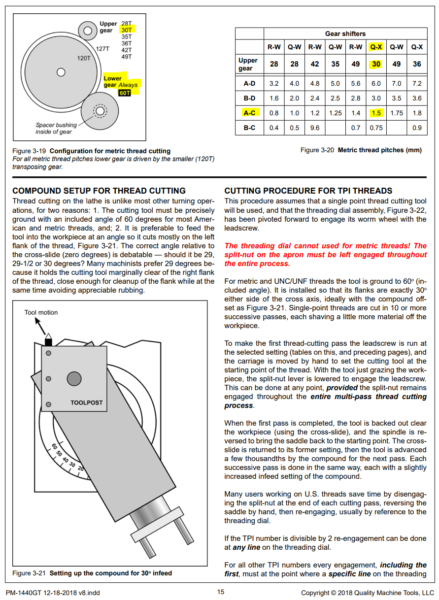
The big difference for metric threading (on a lathe with an English leadscrew like the PM-1440GT) is that you can’t use the half-nut lever to engage and disengage the carriage from the leadscrew. You have to leave it engaged while threading (see the note in the manual page above). Is this difficult? NO!
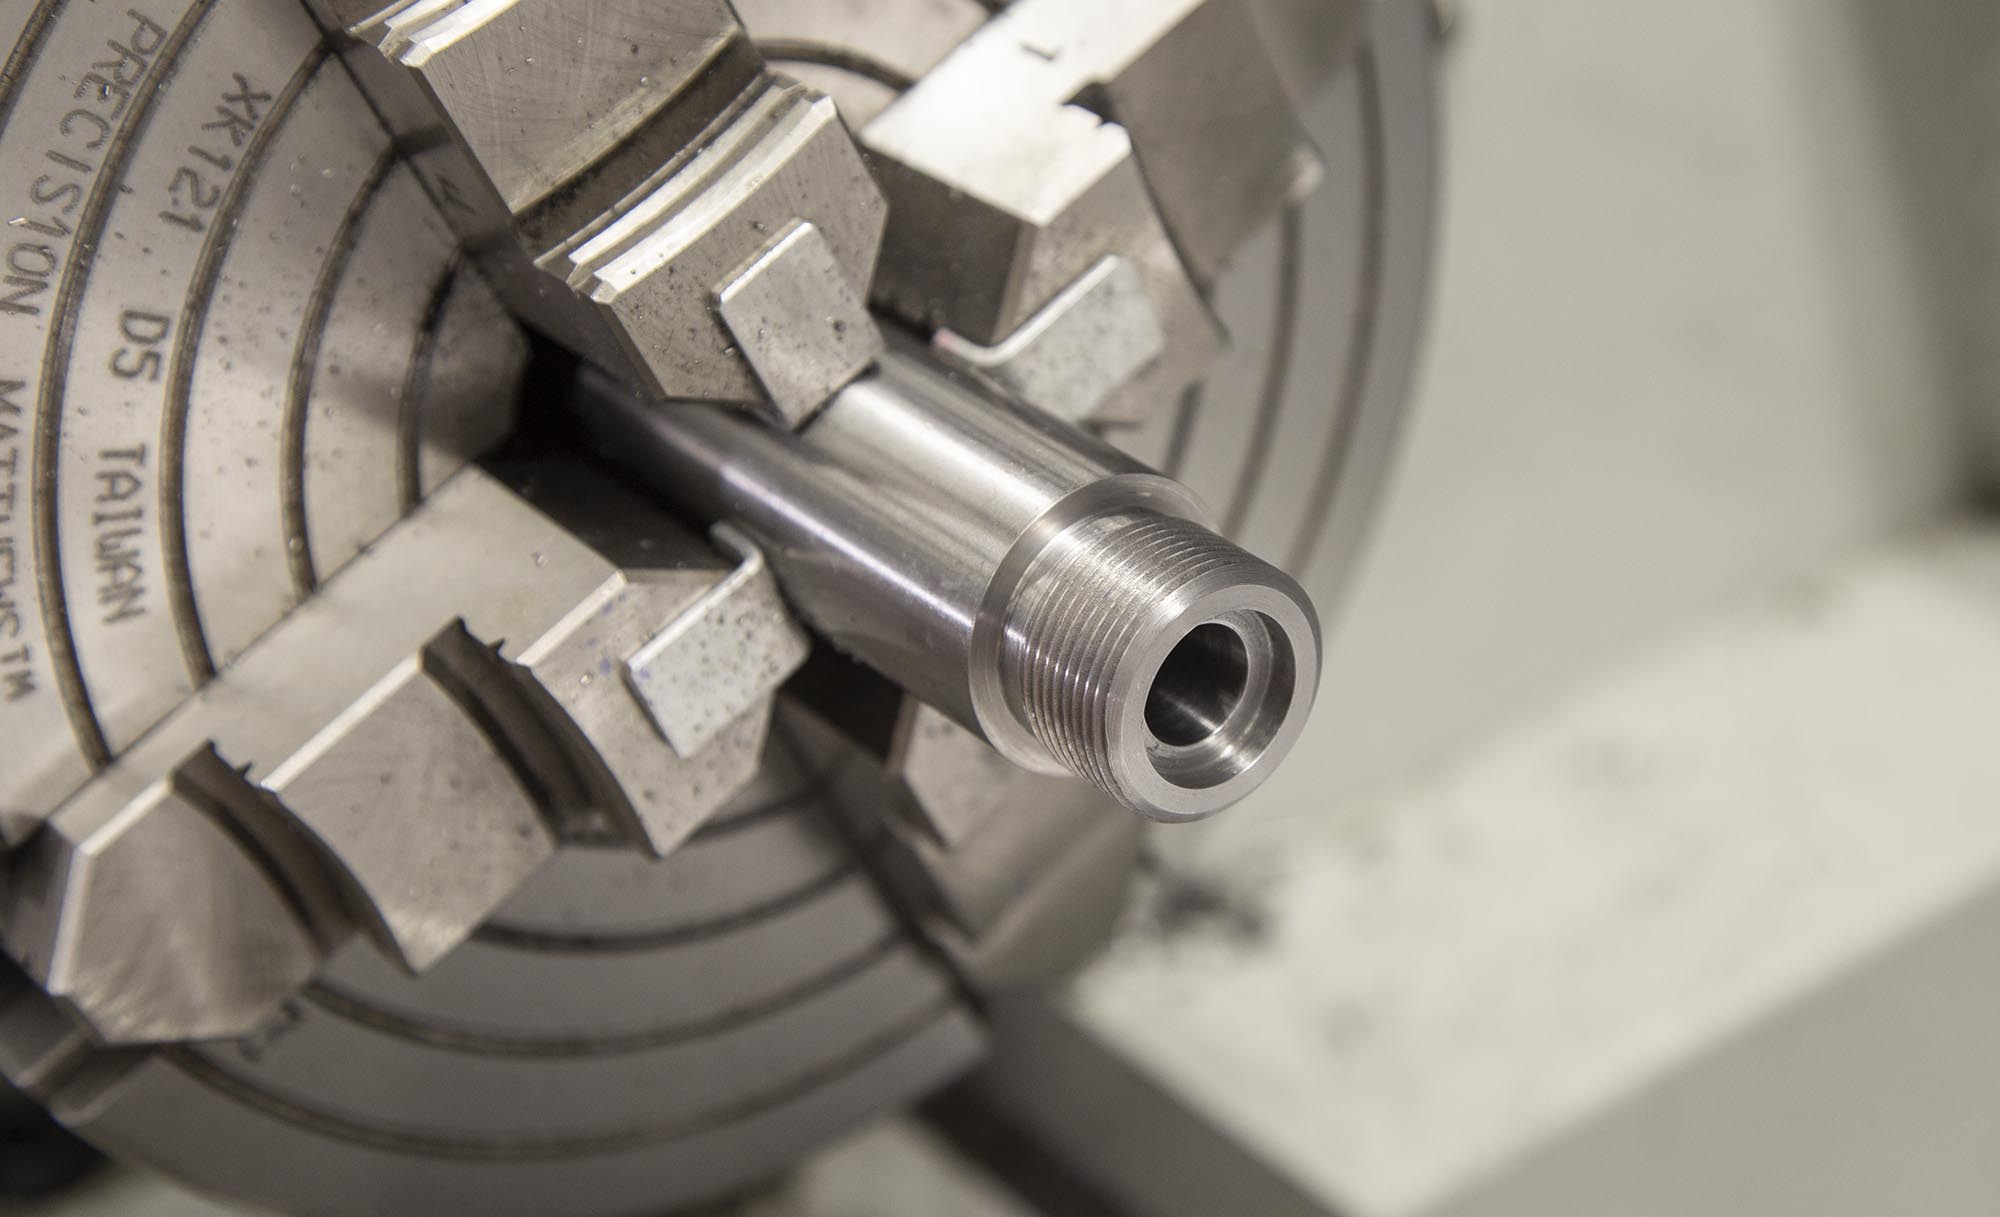
Here’s a picture of my lathe setup for metric threading: (click/tap to enlarge)

Some notes about this setup as labeled in the above image:
- Compound is set to 29° – most of the chip will be taken from the left side of the thread, and the right side will “clean up” with each pass
- I’m using the new cross slide depth-stop that I designed recently, this enables quick “resets” of the cross slide after each pass
- I’ve removed the half-nut lever so that I’m not tempted to disengage the halfnuts while threading
As shown in the video, the process for threading this way is straightforward, but different from “conventional” English threading on a lathe like this.
Here’s the initial setup:
- Change gears and shift levers/knobs as appropriate for 1.5mm threading
- Dial in barrel, turn down tenon to appropriate diameter
- Mark tenon with blue Dychem layout fluid
- Set cross slide stop for optimal cross slide position, zero DRO X-axis value
- With machine running, turn in compound until tool is approx 0.001″ – 0.002″ into cut
- Engage halfnut lever, stop spindle (using brake if needed) when tool reaches thread relief
- Confirm thread pitch being cut with a thread pitch gauge
If everything looks good, it’s time for a set of successive single point threading passes until the threads are cut to the appropriate depth.
For each threading pass, the following is performed: (half nut lever is engaged the entire time)
- With cross slide against stop, the compound is advanced (inward) for the next cut
- Spindle is started in “forward”
- Cut pass is performed
- Spindle is stopped when tool reaches thread relief
- Cross slide is backed out
- Spindle is started in reverse, run until tool is beyond the barrel tenon (to the right of tenon) then stopped
- Cross slide is moved against stop (0.0000″ for X is confirmed on DRO)
This all sounds complicated, but it’s not really. Practice makes perfect! Here’s the completed threaded tenon: (click/tap to enlarge, picture taken after counterbore was cut and chambering completed)
Chambering Setup
What’s interesting about the HOWA 1500 platform, is how similar it is to the Remington 700 in some aspects:
- You can typically use the same action wrench
- The “print” and math for machining calculations is very similar (protruded bolt nose, counterbore)
Since these aspects are so similar to the Remington 700, I won’t cover them in-depth here, but I will share my build sheet (click/tap to enlarge, for reference only, don’t use these numbers for your build)

For this chambering job, I used the following reamer holding and depth monitoring setup: (click/tap to enlarge)
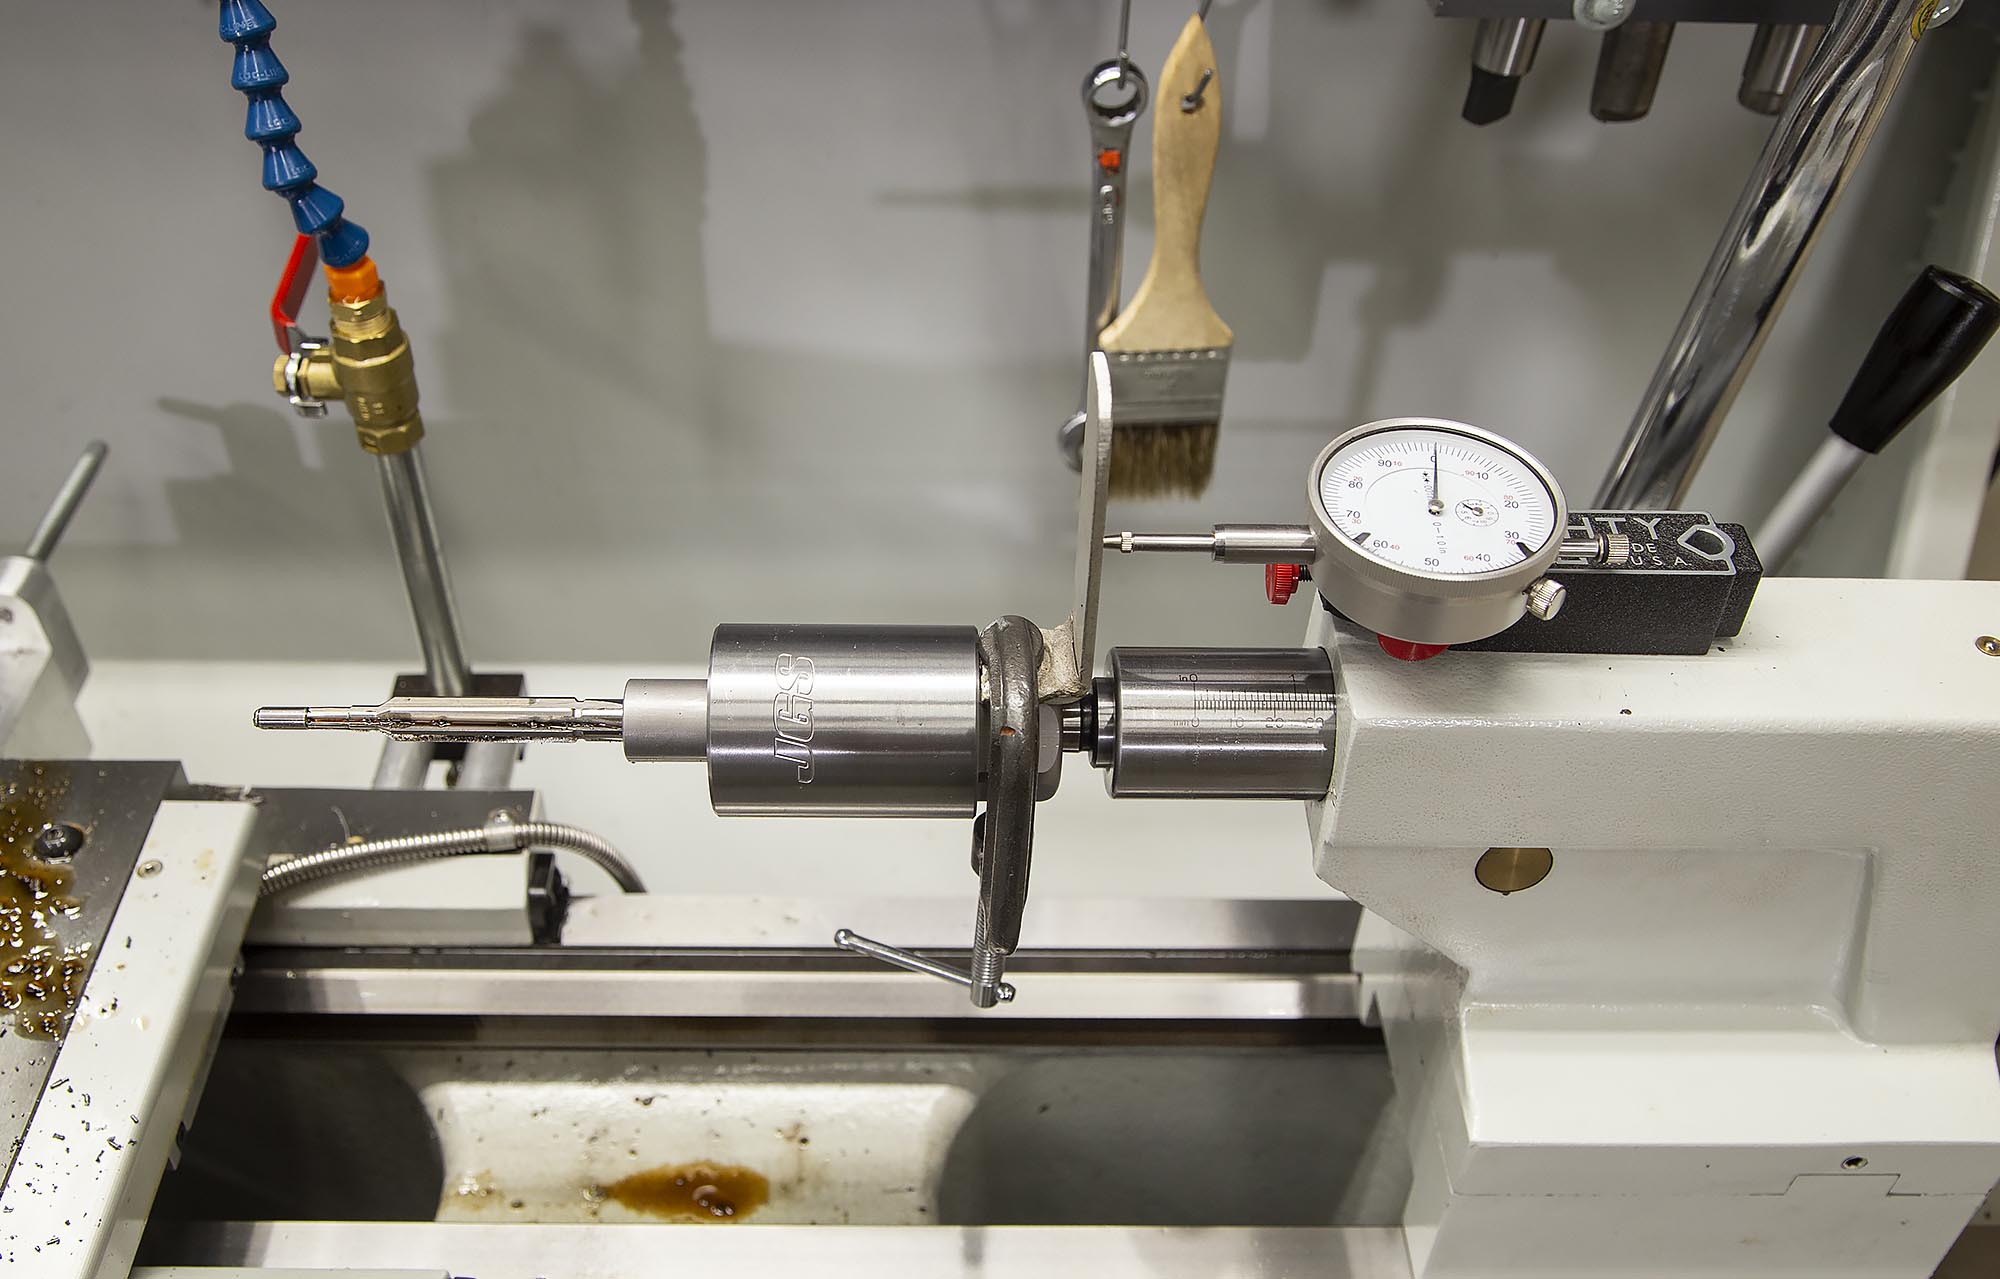
Above we have:
- JGS Precision floating reamer holder with depth-stop (clamped on) for dial indicator
- JGS Precision 6-flute piloted chambering reamer (6 CREED UR custom geometry)
- Mighty Mag with 1″ travel 0.001″ graduated dial indicator (to monitor tool movement and corresponding cuts for chamber)
This chambering job went very smoothly with no chatter whatsoever (a 4 groove barrel is inherently compatible with a 6 flute reamer).
I checked headspace while chambering (and after barrel tightening) with Forster Go and No-Go gauges:
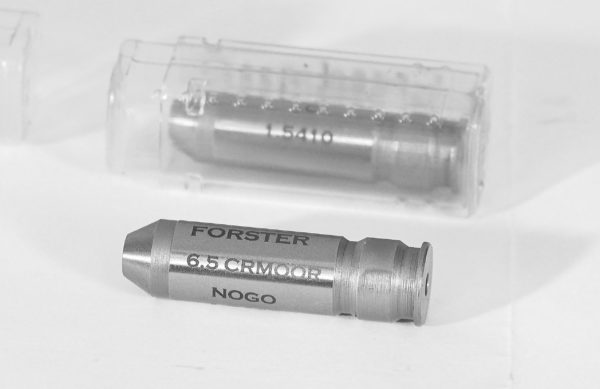
After the barrel was installed, headspace was PERFECT! I love it when a plan comes together.
Barrel Break-In

After some re-bedding work and fine-tuning, it was time to go back to the range with this rifle and perform a break-in. For this rifle, I used my “match barrel break-in routine”:
- Shot 1 shot, clean (3x)
- Shot 3 shots, clean (3X)
- Shot 5 shots, clean (3x)
- Shoot normally!
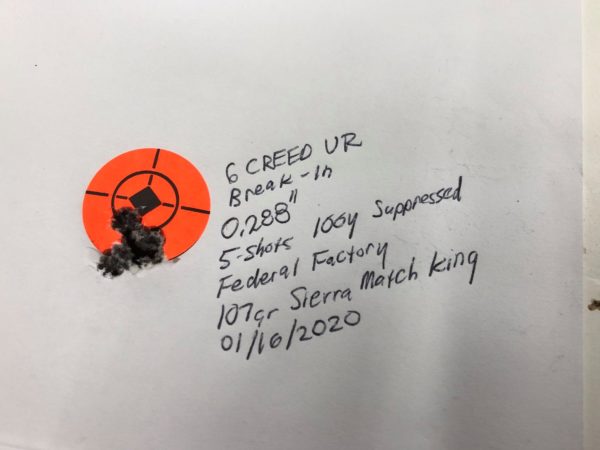
During break-in I shot Federal Premium factory ammunition loaded with Sierra Match King 107 grain bullets, and look at how well this ammunition performed!
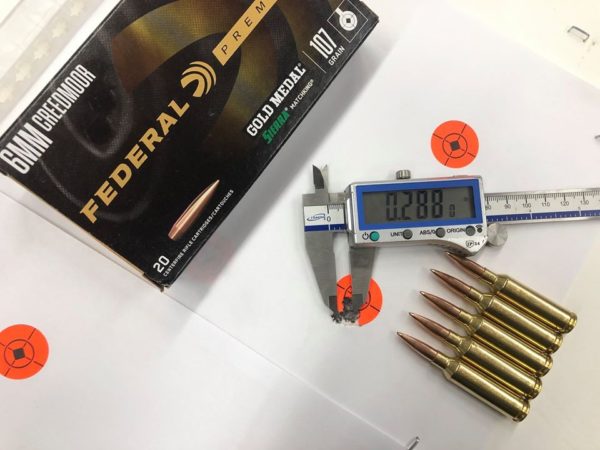
WOW! I had multiple sub-1/3″ 5-shot groups at 100 yards shooting this ammunition suppressed during break in. Above was the best group, measuring just 0.288″!
I can only say one thing about this rebuild: “MISSION ACCOMPLISHED”!!! I could tell right away that this rifle had been transformed, and it was very exciting to see shots stacking on each other at 100 yards during break-in. Redemption for a rifle that almost made me pull my hair out at times! If factory ammunition shoots this well out of this rifle, I can’t wait to see how my hand loads will perform…
What’s Next
I’m not quite done with this rifle! Here’s what’s next:
- Upgrade the Trigger: Install and test the Timney 609 1.5lb – 4lb drop-in trigger
- Investigate remaining bedding issues (still have barrel movement when torquing front action screw)
- Validate previous load development and tweak as needed
- Take this rifle out to 1000 yards
Don’t miss out on Ultimate Reloader updates, make sure you’re subscribed!
Thanks,
Gavin


