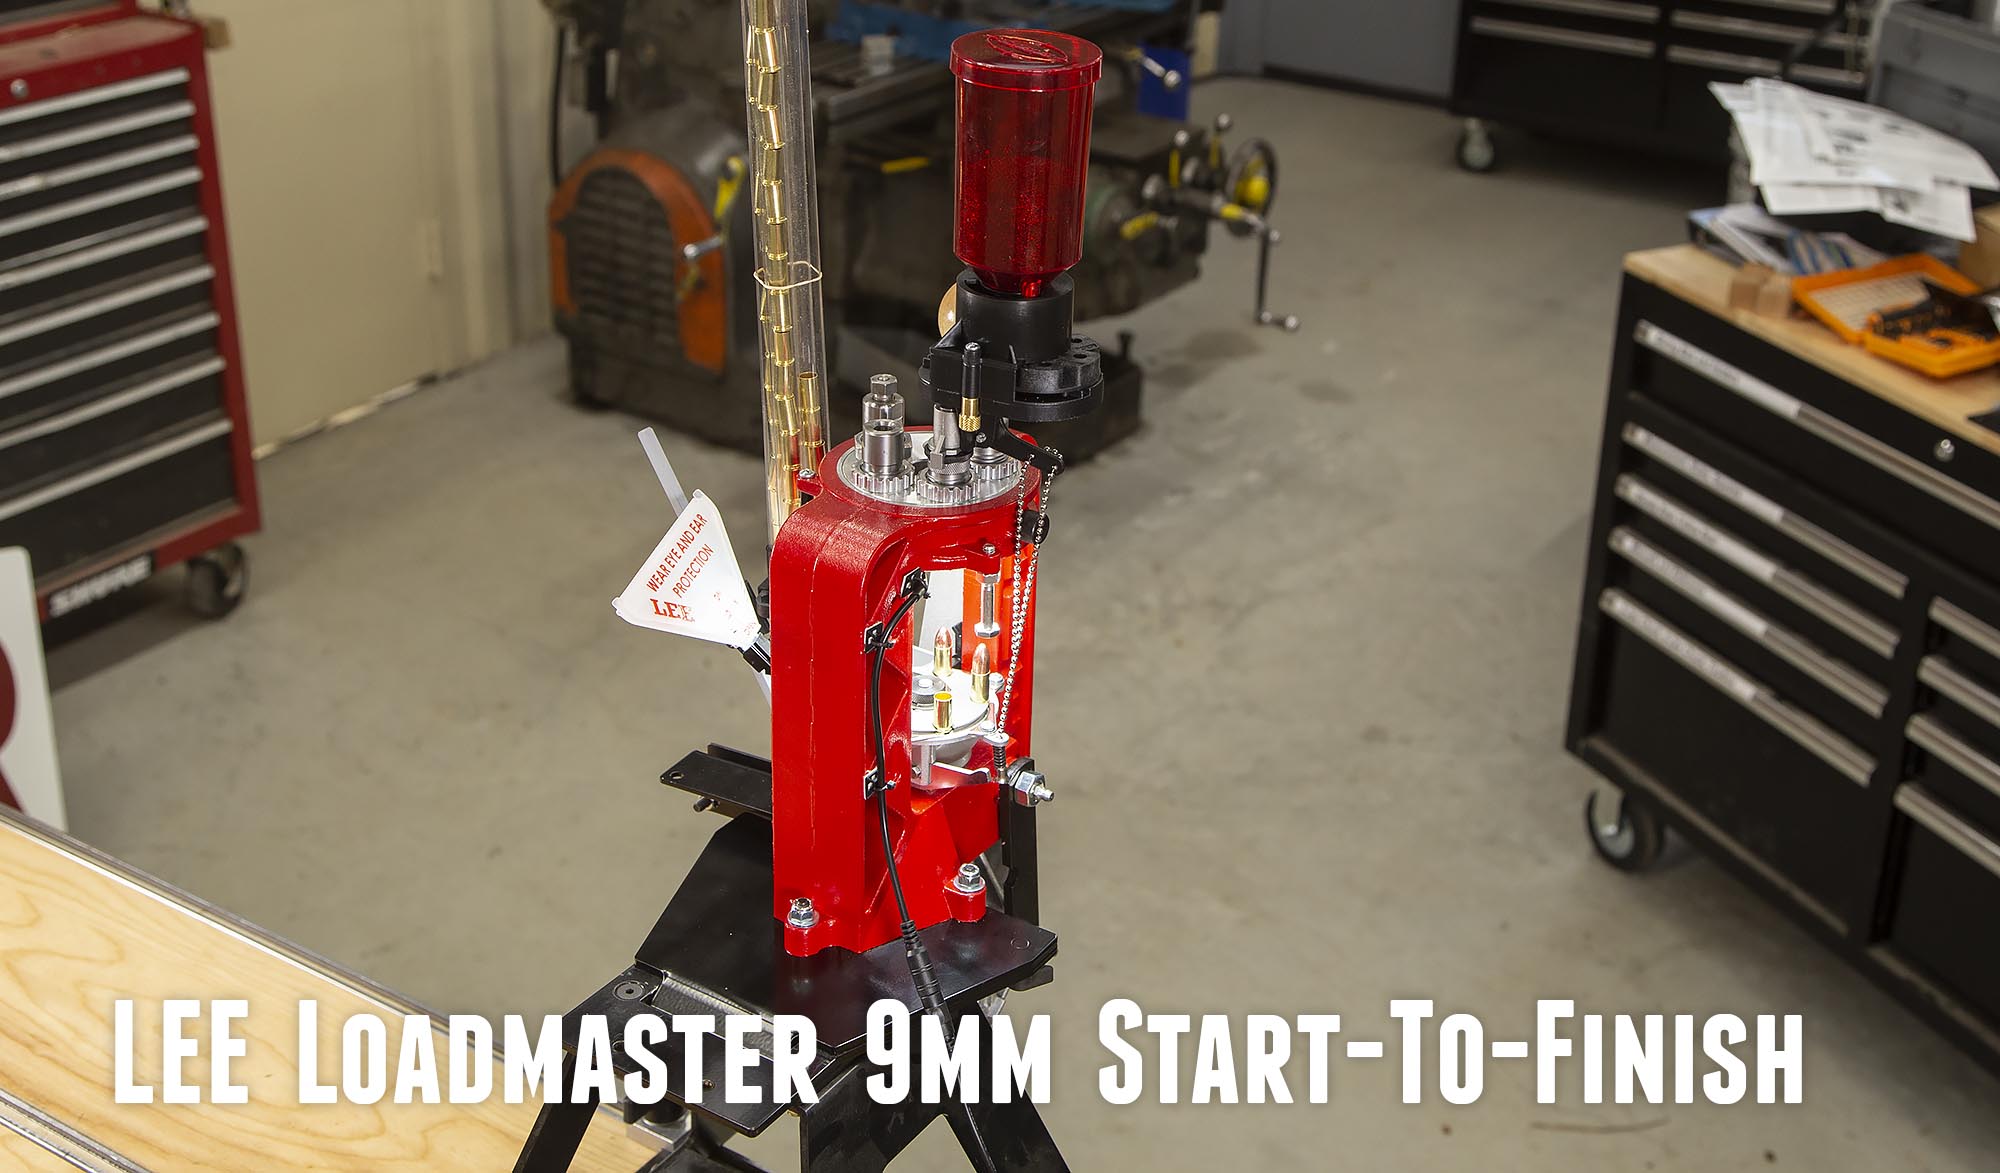
It’s time to take another look at the LEE Loadmaster! I’ve been working with this press since 2008, but haven’t yet shown an unboxing/setup story for it, and now is that time! Furthermore, we’ll do some upgrades while we’re at it!
LEE Loadmaster: What’s In the Box

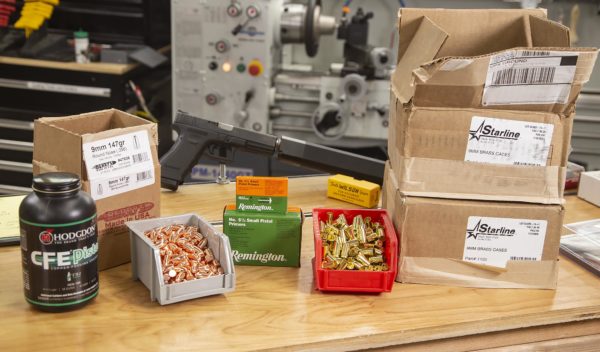
The LEE Loadmaster comes with most everything you’ll need to load a particular cartridge: exceptions would include components and other tools/supplies that are not caliber specific. The picture above shows the contents of the box for the 9mm Parabellum Loadmaster setup, from right going clockwise:
- Press assembly with toolhead and shellplate pre-installed
- Completed cartridge bin bracket
- Primer flip tray
- Explosion shield (recommended when using primers other than Remington or CCI)
- Case feed parts
- Owner’s manual and printed materials
- Pro Auto Disk powder measure
- Completed cartridge bin
- 3-die set (sizer-deprimer, expander/charging die, seating/crimping die)
- Die lock ring wrench
Setting Up the LEE Loadmaster
Mounting the Loadmaster
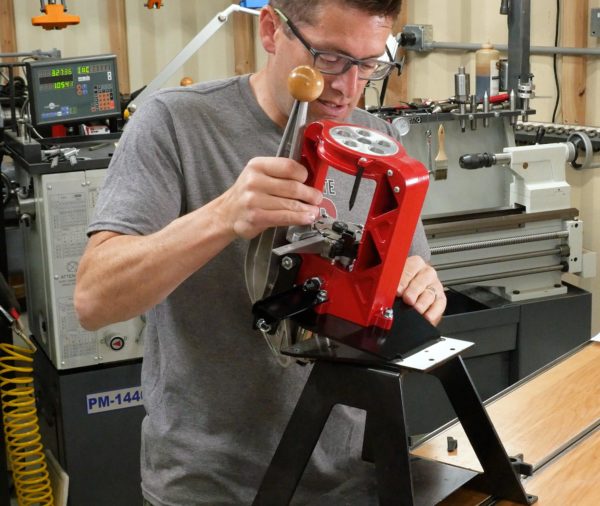
The first thing you’ll want to do is mount the Loadmaster to either a stand, or your bench! There are a few good options here:
- You can bolt it directly to your bench (it may sit low for optimal ergonomics this way)
- You can use Lee’s Bench Plate system (can quickly attach/detach press from bench)
- You can use Lee’s reloading press stand
- You can use an aftermarket mount (I use the Inline Fabrication Ultramount system pictured above in my shop so I opted for that)
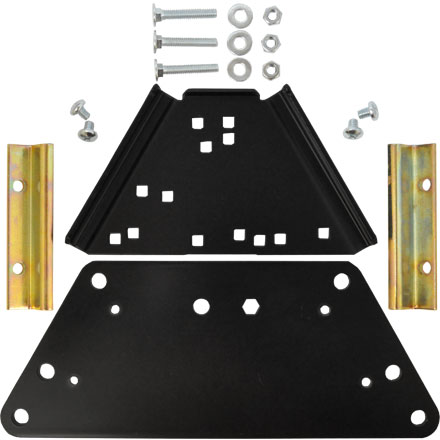
LEE Bench Plate
Bench Plate Kit by LEE RELOADING PRODUCTS
Includes 1 base block; drilled to fit all current Lee presses. Special elevator bolt hardware included. Powder coated, thick steel mounts quickly and securely to any bench or tabletop. Wide steel plate distributes load, adding rigidity to the lightest bench top.
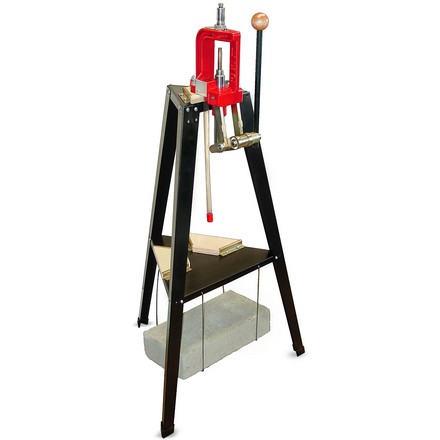
LEE Reloading Press Stand
Reloading Stand by LEE RELOADING PRODUCTS
Introducing the Lee Reloading Stand; Perfect for the reloader with limited working space or an overwhelmed workbench. The sturdy powder coated steel stand places your press at the perfect counter stool or standing height. Three-leg design assures absolute stability regardless of the floor condition. Rubber tipped legs suitable for any surface even carpeting. The thick steel top is fitted with the patented, quick change Lee Bench Plate System with pre-drilled steel base block to fit all Lee metallic presses. There’s more, the stand includes a sturdy steel shelf with two bench plate receivers that will neatly and securely store your extra presses or mountable accessories. Included with the stand is one storage bin for component or tool storage, which clips on to the steel bin bracket provided with the stand. Each leg has eight mounting holes that allow you to accessorize your stand with a multitude of bins, shelves or accessory racks. Includes drawing to customize and make your own extended work surface. Concrete block not included.
Dimensions 39″ high x 26″ wide x 24 deep
Press Assembly and Setup
Press setup and assembly is straightforward, and should only take about 30-60 minutes after mounting the press (depending on your familiarity with the reloading process). Here are the steps to setup the press: (outlined in great detail in the owner’s manual)
- Install explosion shield (if not using Remington or CCI primers)
- Install case feeder block and related linkage components
- Install an adjust dies
- Setup powder measure (using supplied chart to determine Autodisk setting) including return chain
- Test load cartridges (run 20-50 through the press)
- Finish case feed assembly (feed plate and drop tubes)
Getting Ready To Load: Components/Data
I decided it was time to develop a 9mm subsonic load, and here it is!
Use load data at your own risk. Ultimate Reloader is not responsible for errors in load data on this website. Always cross-reference load data with manufacturer’s published data.
- Bullet: Berry’s 147 grain plated 9mm Round Nose
- Powder: Hodgdon CFE-Pistol, 4.2 grains
- Primer: Remington 5 1/2 Small Pistol (Magnum, USE AT YOUR OWN RISK)
- Case: New Starline 9mm
- COL: 1.150″
What impressed me about this load was how consistently it shot, check out the chronograph data (captured with Caldwell G2 Chronograph)
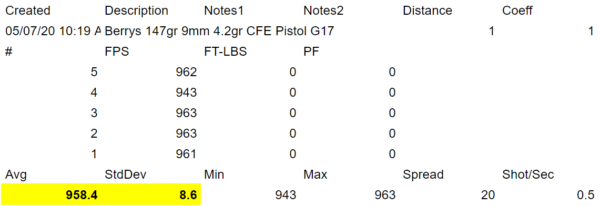
I’ve been SUPER-IMPRESSED with the chronograph data I’ve been seeing using Berry’s plated bullets lately, amazingly consistent shooting bullets! What’s more: Hodgdon listed this exact load at 963 FPS, with my results matching very closely!
KMS Squared UFO-LM Press Light
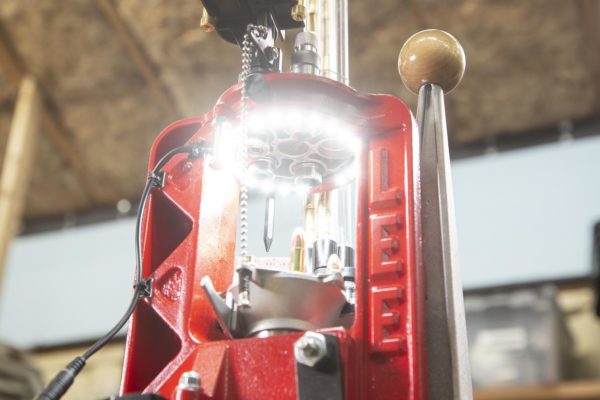
After using the UFO press lights on my other presses, I had to get one installed on this new Loadmaster before I started loading, what a GREAT way to see what you’re doing, and to enhance reloading safety. Due to the design of the LEE Loadmaster, you can easily see into the cases while loading, and this press light makes things MUCH better yet! You can get yours here: KMS Squared UFO-LM Press Light (new model).
Die Stations
Default Die Setup
The Loadmaster can be setup in a wide variety of ways regarding die station utilization. Here’s how I setup my Loadmaster for this story:
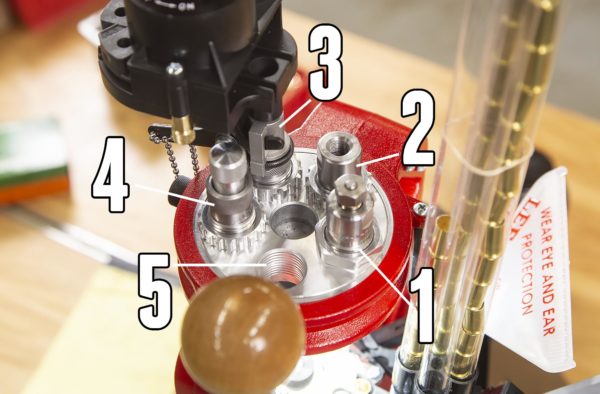
Above we have:
- 44 Magnum sizer/de-primer (used for decapping only)
- 9mm Sizer with decapping rod removed (for primer alignment) + priming
- Powder charging and expanding
- Bullet Seating/Crimping
- Empty
There are some other great options for die station utilization with this press as follows.
Separate Seating Crimping
- 44 Magnum sizer/de-primer (used for decapping only)
- 9mm Sizer with decapping rod removed (for primer alignment) + priming
- Powder charging and expanding
- Bullet Seating
- Bullet Crimping
Powder Check
- 44 Magnum sizer/de-primer (used for decapping only)
- 9mm Sizer with decapping rod removed (for primer alignment) + priming
- Powder charging and expanding
- Powder check die
- Bullet Seating/Crimping
Bullet Feeder
- 44 Magnum sizer/de-primer (used for decapping only)
- 9mm Sizer with decapping rod removed (for primer alignment) + priming
- Powder charging and expanding
- Bullet Feed Die
- Bullet Seating/Crimping
Full Progressive Loading with the Loadmaster

Once the press is setup, you’ll do the following while loading in full-progressive case-fed mode:
- Place bullet on charged case
- Pull the handle
- Repeat
Pretty awesome eh?
During your loading session you’ll need to stop and take care of the following as needed:
- Refill primer flip tray when it empties (can see primers through translucent housing, slats in primer trough)
- Refill powder hopper when low
- Twist loaded case drop tubes into place when one empties, reload all when all are empty (holds 90 9mm cases total)
There’s a LOT more to say about the LEE Loadmaster, and you’ll find that information right here on Ultimate Reloader: LEE Loadmaster Stories.
If you’re looking to buy a LEE Loadmaster, you’ll everything related at Midsouth Shooters Supply!
Be sure to catch the Ultimate Reloader Progressive Press Shootout coming this summer (2020). Don’t miss out on these Ultimate Reloader updates, make sure you’re subscribed!
Thanks,
Gavin


I tinkered with one and did all the upgrades over a 3 year perriod. Never could get it to run consistently. I’d get one good run and then after it sat for a week it was off the races to get it tuned in again. Being a designer, I find it to be one of the worst designed piles of crap I’ve ever seen. I keep it around to remind me to never do that again.
I have had a Loadmaster almost since it was released. I have always had good luck with the Loadmaster except for one short period when they updated the primer system and it took a while for them to get it right. They have always been extremely helpful and provided free information and always replaced any parts that may have failed for free. Over the years I have converted the handle from the ball to a “D” handle with a roller, added lighting and a low primer sensor. I have loaded many thousands of rounds and could never be persuaded to pay the huge prices for alleged premium presses that seem to have the same kind of primer problems that Lee once had. After about 20 years, my Loadmaster is still very tight and accurate. In addition to the modifications it also resides on an Inline Fabrication press stand. If you are a “designer” I am not sure I would want one of your designs. This is an excellent press for less than half what most true progressive presses sell for.
Hey Gavin: Enjoyed this video and have a question for you re: types of bullets used. I have this press and really enjoy it to no end. I ran into a problem when I changed over to using lead cast bullets over the copper coated. For some reason I’m having a problem with the reloaded rounds not Chambering correctly and my 45 acp will not fire a round? When I drop the slid it won’t go into battery? I’ve check the over all length and run them through the lee sizing die?
Please Help
JR
Hey there Gavin: You should show two more items to add to your set up to really make the Load Master hum. First the use of the CASE COLLATOR. Wow you just fill the top of the collator give a shack and the tube are full. Second add the Bullet feeder. It was unbelievable just how fast you crank out the reloads. After I installed mine and set it up Katey bare the door I could crank out about 100 rounds in roughly 12-15 min.After I had added those two item it really showed the potential of this machine at a price that would not break the bank.
Again thanks for everything you do for the reloading community.
Cheers
JR
I want to load Shell shock Technology cases with their dies. Can that be done on the lee load master?
This press can be difficult for some to master. It requires comprehension of the written & video instructions given to the owner by Lee. Realistic output from this press is 4-500 per hour. So compare it to a Dillon 550 not a 6/750.
To get 25,000 per year for your lifetime without frustration here are a few tips.
1- Assume the carrier & dies will require alignment. This is very easy to do. Following the directions loosen the carrier bolt and align a full shell plate with the dies. This is easily done in a minute or less. Do this often, every 500 or so.
2- Clean the entire primer system every 500 cases. Using a Qtip and alcohol is the common method. I
3- Clean under the shell plate every 500 rounds. Primer gunk is magical at gummying things up.
4- Tighten shell plate often during your loading session. If you add primers verify shell plate.
5- Anytime you replace a turret verify the priming system. The depth of the primers is influenced by dies contacting shell plate. Also carrier alignment with the turret needs verified.
6a- The Plastic Priming system requires replacement every 20-30,000 primers. Lee will send them to you at your freight expense. Keep a spare on hand.
6b- Use a die in station #2 to center cases. Some like a sizing die, a trim die, or a Lyman M die.
7- Only lubricate per instructions.
8- When setting up powder measure set the powder die up without the powder measure. Set it up like you plan to use a funnel. Get your crimp perfect. Now remove funnel adapter & thread on powder measure.
9- The bullet feeder does not really save time if you have some dexterity. You must pick up & stack bullets to load bullet feeder. So, think about this one.
10- Seat and crimp separately. The dies pressing down in more locations balances the shell plate. This improves priming & COAL.
11- Install dies per instructions so you have die pressure on the Shell plate. Die contact with shell plate is good.
12- The indexing rod is a wear piece. Have a spare NEW one on hand. They last 25,000 or so cycles.
13- This press will not seat primers slamming at the bottom of the down stroke to size brass. With handgun brass slow gentle pressure to form will ensure priming. With rifle size as part of your case prep.
14- Do not slam the lever arm forward to seat primers at the top of the stroke like on every other press manufacturer’s design. This press does not work that way. All this will do is tilt or flip primers and spill powder from cases. Slowly push the indexer into the carrier to rotate the shell plate.
15- Lee has revised & improved the priming systems, indexing arms & shell plates over the years. Get the current designs.
16- Don’t get this press If you want to change calibers every few hundred rounds. Consider a Turret, Breech Lock Pro or a Dillon 550. Pro
17- A 500 round session will require you reverify the press and clean parts. If you deprime off the press and then clean your brass the press stays cleaner. With the Lee APP this really becomes quick & easy. Or use a single stage.
18- Loading 25,000 + per year for many years is very realistic. You will replace parts annually. The carrier wears out. You will know when parts need replaced. Lee sends these to you but you pay postage. You can also have your LM replaced by Lee for 1/2 the current retail price of a new one.
Dillon owners love getting free parts regularly & sending their press in at their cost and paying the Factory to refurbish it. Lee is there you as well. They just do not cover abuse & neglect like Dillon does.
Remember there are many silent happy Loadmaster owners. They sell quickly used on eBay. Many shooters need more than 500 per hour and buy a different brand of press.