
I’ve been curious about 6.5x47mm Lapua (the cartridge) for quite a while! This handloaders-oriented cartridge is similar to other cartridges like 6.5 Creedmoor, but offers some advantages that I’ll explore in this article, and future articles. I’ve also wanted to try Triebel Reamers (from Germany), and to build a barrel for Uintah Precision’s UPR-10 platform. All of this comes together in this story!
Disclaimer
Ultimate Reloader LLC / Making with Metal Disclaimer: (by reading this article and/or watching video content you accept these terms)
- The content on this website (including videos, articles, ammunition reloading data, technical articles, gunsmithing and other information) is for demonstration purposes only.
- Do not attempt any of the processes or procedures shown or described on this website.
- All gunsmithing procedures should be carried out by a qualified and licensed gunsmith at their own risk.
- Do not attempt to repair or modify any firearms based on information on this website
- Ultimate Reloader, LLC and Making With Metal can not be held liable for property or personal damage due to viewers/readers of this website performing activities, procedures, techniques, or practices described in whole or part on this website.
- By accepting these terms, you agree that you alone are solely responsible for your own safety and property as it pertains to activities, procedures, techniques, or practices described in whole or part on this website.
*Note: In the video I mention in the video this is a “handloader’s only cartridge”. There is an exception: Lapua does offer factory ammunition for 6.5x47mm!
**Note: This Uintah Precision UPR-10 upper is their “old style” (the uppers and new rifles have been updated/improved since when this one was manufactured)
About the Uintah Precision UPR-10
From the Uintah Precision website:
The Uintah Precision UPR10 is a true bolt action upper for your DPMS LR-308 pattern lower or semi-auto rifle. The UPR10 brings the accuracy of a bolt action rifle to the familiar AR pattern of firearms, guaranteed to shoot 1 MOA or better with factory match ammo. Build out a dedicated lower or pin the UPR10 to a rifle you already have.
Accurate, modular, familiar – Uintah Precision UPR10.
Every proprietary component of the UPR-10 upper assembly is made and assembled in The United States. This complete barreled upper assembly is ready to fire once bolted onto your AR-10 rifle.
*Every UPR10 upper purchase includes a FREE 3.5lbs, single stage, drop in trigger . It will automatically be added to your order!
My video covering the UPR-10 chambered in 6.5 Creedmoor:
About 6.5x47mm Lapua

If you want to learn about 6.5x47mm Lapua, a great place to start is the Cartridge Guide on AccurateShooter.com that the 6.5 Guys helped to create. I used this cartridge guide to “ramp up on” the specs for the cartridge, the history of the cartridge, some load data, and more. Very helpful!
From the cartridge guide:
The 6.5x47mm Lapua was developed in 2005 as a precision cartridge for 300m CISM rifle matches. Lapua (of Finland) and Swiss rifle-maker Grünig & Elmiger created this new cartridge to match the “pure accuracy” of the 6mmBR, but with even better ballistics. Following its debut as a 300m match cartridge, the 6.5×47 has proven to be a popular “jack of all trades”. Shooters have adopted this efficient, mid-sized cartridge because it offers excellent accuracy, mild recoil, good ballistics, and ample barrel life (plus it feeds well from a magazine). The 6.5×47 Lapua has won two NBRSA 600-yard Nationals. Tactical competitors have found the cartridge delivers great accuracy with much less recoil than a .308 Win. A versatile cartridge that can harvest deer, win benchrest matches, and ring steel in practical rifle competitions, the 6.5×47 cartridge has qualities that appeal to many shooters.
Another great resource for information related to the 6.5x47mm are the many 6.5x47mm articles on the Precision Rifle Blog published by Cal Zant.
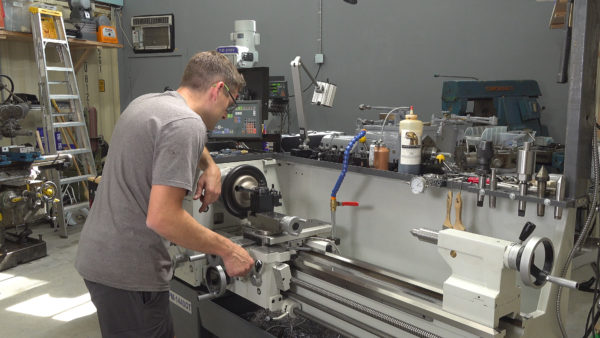
My Lathe
For this story, I’m using a Precision Matthews PM-1440GT. I believe this is the best gunsmithing lathe you can by new in the USA (Taiwanese made, not chinese, 2″ through-spindle capacity, Japanese high-precision spindle bearings, etc):
I also built a custom outboard spider that I built- you’ll want to check out that story.
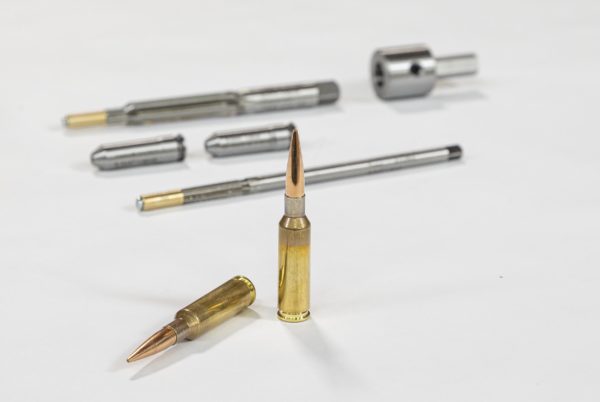
First Try: Precision Reamers and Gages from Triebel Gun Tools
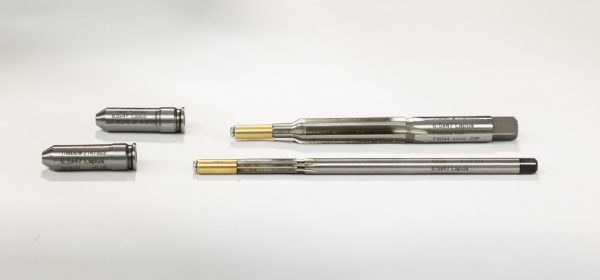
For this build, I used some tools from Triebel Gun Tools (from Germany, a new Ultimate Reloader partner).
Here’s the tools from Triebel I used for this build:
- Finisher reamer minimal (tight chamber) 6.5×47 Lapua
- Freebore reamer minimal 6.5×47 Lapua
- Pilot Busings (brass)
ø: 6.46 mm
ø: 6.47 mm
ø: 6.48 mm - Headspace Gauge GO 6.5×47 Lapua
- Headspace Gauge NO GO 6.5×47 Lapua
These tools are top quality in every way! I love to try new tools and processes, and these were great to use for this build.
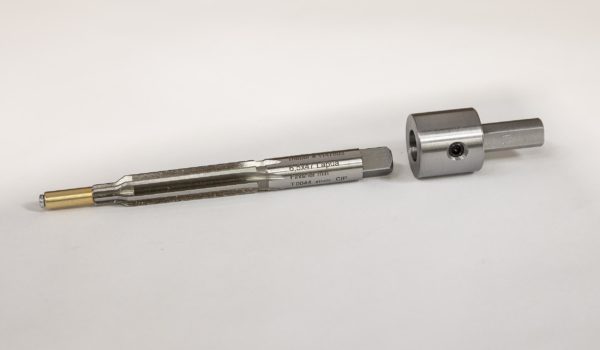
I machined a reamer shank adapter to go from the Triebel 12mm shank diameter to the common US 7/16″ shank diameter supported by my reamer holder systems.
Barrelling an UPR-10
Prep Work

I started this job with the following “prep work”:
- Removed handguard, barrel nut, and barrel from Uintah Precision UPR-10
- Removed barrel extension
- Inspected and took measurements from take-off barrel (6.5 Creedmoor)
- Read chamber print, made careful notes
- Sketched specifics for chambering job
Here’s the tenon print for these rifles: (click/tap to enlarge)

Part of the analysis and work-up was optimizing the chamber for the load I intended to use:

Chambering Part 1: Chamber Minus Throat

For this first part of the chambering job I used my standard chambering methodology taken from Gordy Gritters and Fred Zeglin’s chambering book.
Some specifics for this chambering pass:
- Using Triebel 6.5x47mm chambering reamer (minus throat) with my 12mm to 7/16″ shank adapter
- Used a combination of headspace gage protrusion measurement and screwing on thread extension with headspace gage and bolt in place to monitor depth
- Used “scotch tape trick” from Gordy Gritters to accurately cut chamber exactly 0.002″ “too deep” to allow for crush when tightening barrel extension onto barrel
Chambering Part 2: Throat
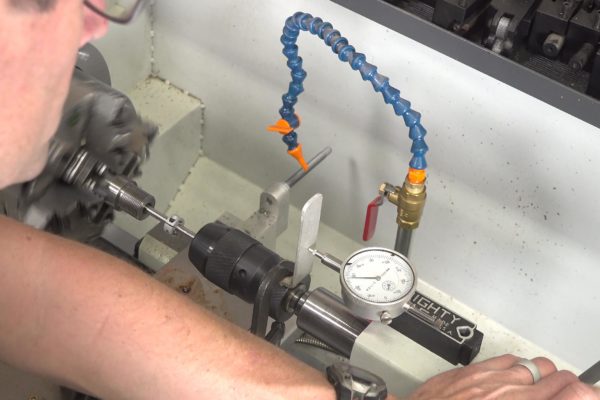
In the picture above you can see the modified drill depth stop that I used to precisely monitor cutting depth (measuring gap between the drill stop and the end of the tenon).
I stopped reaming when a dummy cartridge seated to the optimal length was fully seated in chamber:

Above: Dummy Cartridge Protruding too far mid-way through throat reaming process
This protrusion was compared with the protrusion measured with a piece of virgin brass (without bullet). When the protrusion values were equal, I knew I was at my target depth. I went “just beyond” this value to allow some bullet jump.
Finished Rifle

After the breech-end barrel work, I finished the rifle by doing the following:
- Cut the barrel down in the bandsaw for a 24″ overall length
- Threaded the muzzle end of the barrel (See my 224 Valkyrie bolt-action build for a detailed walkthrough)
- Bored out the barrel/handguard nut (my barrel shank measured 1.235″, oversize for this rifle platform)
- Torqued down the barrel extension onto the barrel
- Tested headspace (dead-on!)
- Installed barrel into upper receiver
- Installed handguard
Break-In Test Load
For break-in, I used the following load:
- Case: new Lapua 6.5x47mm, small rifle primer
- Bullet: Berger 140 grain Hybrid
- Powder: Varget (34 grains, 35 grains, 36 grains)
- Primer: Federal Small Rifle
Disclaimer: Use load data at your own risk. Ultimate Reloader is not responsible for errors in load data on this website. Always cross-reference load data with manufacturer’s published data.
Initial Results

Like I normally do, I tracked some initial results while breaking in this barrel. I followed my normal barrel break-in process:
- 1 shot, clean
- 1 shot, clean
- 1 shot, clean
- 3 shots, clean
- 3 shots, clean
- 3 shots, clean
- 5 shots, clean
- 5 shots, clean
- 5 shots, clean
One of the first 3-shot groups measured just 0.293″:

But when I moved to 5-shot groups, I saw some horizontal (windage) shot dispersion that looked suspicious:

The above group was good (measuring 1/2 MOA), but I thought it could be better if I tightened up the windage dispersion. So I decided to use a setup that’s worked well on other ARs: my Mystic Precision Bipod. This bipod can stabilize the upper so that it doesn’t “rock” as much on the lower.
Here’s me shooting the rifle with the updated setup:

…and the next 5 shots when into a smaller and more “round” group!

Now things are looking good! I’m really looking forward to seeing how this rifle will shoot with some load development!
Also, make sure to check out my future 6.5x47mm stories when they get published, including a benchrest build featuring a BAT Model B action, Wheeler Accuracy LRB stock, Bix-N-Andy trigger, and more. That will take things “next level”.
Don’t miss out on Ultimate Reloader updates, make sure you’re subscribed!
Thanks,
Gavin


