We’d talked at length about F-Class and Gavin had even built his own 7 PRCW competition rifle. It was time to get Gavin out on the range.
Disclaimer
Ultimate Reloader LLC / Making with Metal Disclaimer: (by reading this article and/or watching video content you accept these terms). The content on this website (including videos, articles, ammunition reloading data, technical articles, gunsmithing and other information) is for demonstration purposes only. Do not attempt any of the processes or procedures shown or described on this website. All gunsmithing procedures should be carried out by a qualified and licensed gunsmith at their own risk. Do not attempt to repair or modify any firearms based on information on this website. Ultimate Reloader, LLC and Making With Metal can not be held liable for property or personal damage due to viewers/readers of this website performing activities, procedures, techniques, or practices described in whole or part on this website. By accepting these terms, you agree that you alone are solely responsible for your own safety and property as it pertains to activities, procedures, techniques, or practices described in whole or part on this website.
Three Simple Skills
Mentorship can open a wide variety of opportunities, particularly expediting learning.

I like to break down F-Class shooting into three simple skill sets: setting up your gear, addressing the gun, and shooting on the target.
Setting Up Your Gear
We set up a reduced F-Class target at 300 yards and began with gear. F-Class targets always look the same and remain stationary. Shooters do the same thing every match, so every piece of their process needs to be the same to ensure good results.
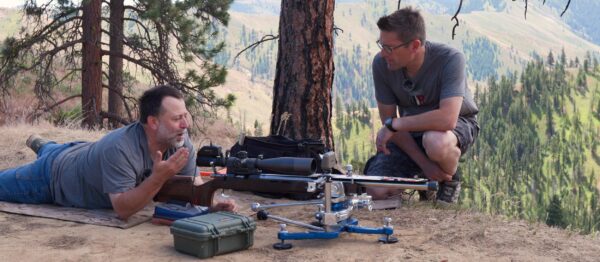
The first step is to make sure the front rest is facing and squared up with the target. Second, ensure the rest’s feet are firmly planted into the ground. I use a mallet to assist with this process. The rear bag will sit where the keel does.
I brought my personal 7 PRCW rifle and added both a TriggerCam and mirage band. Keep in mind that TriggerCams are NOT legal in formal F-Class competition, but can be good training tools. I leveled my scope and got behind the rifle, zooming out to find the target and adjusting the rest so the rifle would stay there. Next, I took my gun and moved it forward and backwards a few times in the rest, then looked back through the scope. If the reticle lands on the target, this confirms that I will be tracking and returning to battery perfectly under recoil. This also means that I will be able to take faster and more accurate follow-up shots, which is especially important in changing wind conditions.
It was time for another adjustment. I zoomed in to the target and made small adjustments to the rest so that the dot in my scope sat in the center of the target with no input from me.
Addressing the Target
Consistency is critical to success in F-Class and all types of precision shooting. In order for the shot to go in the same place every time, you cannot introduce any extra variables. You have to address the gun the same way every time, pull the trigger the same way every time, etc.
Shooting
For this session, we were shooting on a regulation 300-yard target. Shooting at a closer distance reduces the effect wind has on the bullet, allowing a new shooter to focus on consistency.

I started out by explaining some F-Class lingo. If someone says “right one or left one” at an F-Class match, they are referring to a single ring. With such high magnification scopes, it is possible to hold in different parts of the target to account for changing wind conditions. This comes with a caveat, mirage can obscure the rings so they are barely discernible. The more time you spend shooting F-Class, the easier it is to know where to hold.
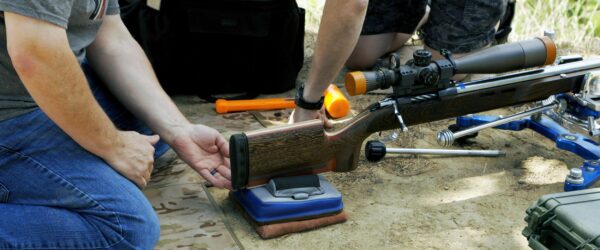
Coming back to consistency, I follow the same firing procedure each time. Keeping my finger off the trigger, I chamber a round and pull the gun back in the rest towards my shoulder. I learned this trick to confirm the gun is properly positioned from a top shooter. Once you take a shot, it is important to stay on the gun, keeping an eye through the scope as you load the next round.
Gavin’s Turn
The rest is controlled by a joystick you manipulate with your non-firing hand. Gavin got behind the rifle and followed the steps I outlined above to get the rifle on target.

He pulled the rifle slightly back into his shoulder, but ensured that there wasn’t any room to push the rifle forward in the rest. He started out dry-firing, getting used to the light four-ounce trigger. He asked a number of questions as we went along: where I put my thumb, how much pressure on the stock, etc. When Gavin was comfortable, I had him put some rounds downrange, aiming dead center.

After an initial group in calm conditions, I asked Gavin to make some educated guesses on where to hold as the wind picked up. We had set up a makeshift wind flag for reference and I had my rifle set on its no wind zero. He moved to the far right target and followed the same procedures as we did earlier to properly set up the gun. The scoring rings were challenging to see. In times like these I often use the subtensions in the scope as a reference. With two canyons between us and the target, I ended up giving Gavin some estimated holds. In an ideal situation, we would be on a calm range with no geographical features between us and the target.
Results
I didn’t bring any loaded ammunition, so I compiled what I thought would be a decent load using components at Ultimate Reloader. After some sighters, I had a group that was about a minute edge to edge.
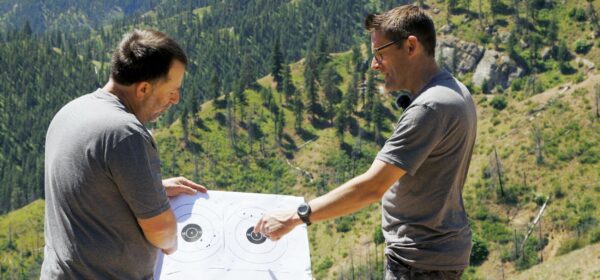
The wind had changed directions by the time Gavin shot his initial group, which was also about a minute edge to edge. Gavin’s last five-shot group was above the black, but had a decent waterline.

This means that the holes are approximately in a straight line so that if moved left or right (to account for wind), they would be centered. It’s important to recognize that some of this comes down to the load. Your load has to be good enough to shoot a straight waterline. This final target also revealed just how much wind there was, even at 300 yards.
Conclusion
This entry session could have been improved with real-time target feedback and a true wind flag. We’re currently planning a trip to a true F-Class range with a Shotmarker electronic target for our next lesson. If you’re curious about what else F-Class John is up to, check out his YouTube channel!
Don’t miss out on Ultimate Reloader updates, make sure you’re subscribed!
Thanks,
John Masek