The trigger is one of the most important components for any handgun, rifle, or shotgun. Trigger dynamics will affect accuracy, high-speed shooting characteristics, gun safety, and more. So it stands to reason that a good understanding of complex trigger dynamics is imperative when making a firearm purchasing decision, evaluating an old firearm, or quantifying changes to a trigger due to gunsmithing. There are many tools to evaluate triggers available today, with most popular tools measuring only peak trigger force. These tools are great, but they only tell part of the story. To really understand what’s going on with your trigger, you need to visualize and quantify travel, force over distance, smoothness, consistency, lock time, peak force, take-up, and other factors.
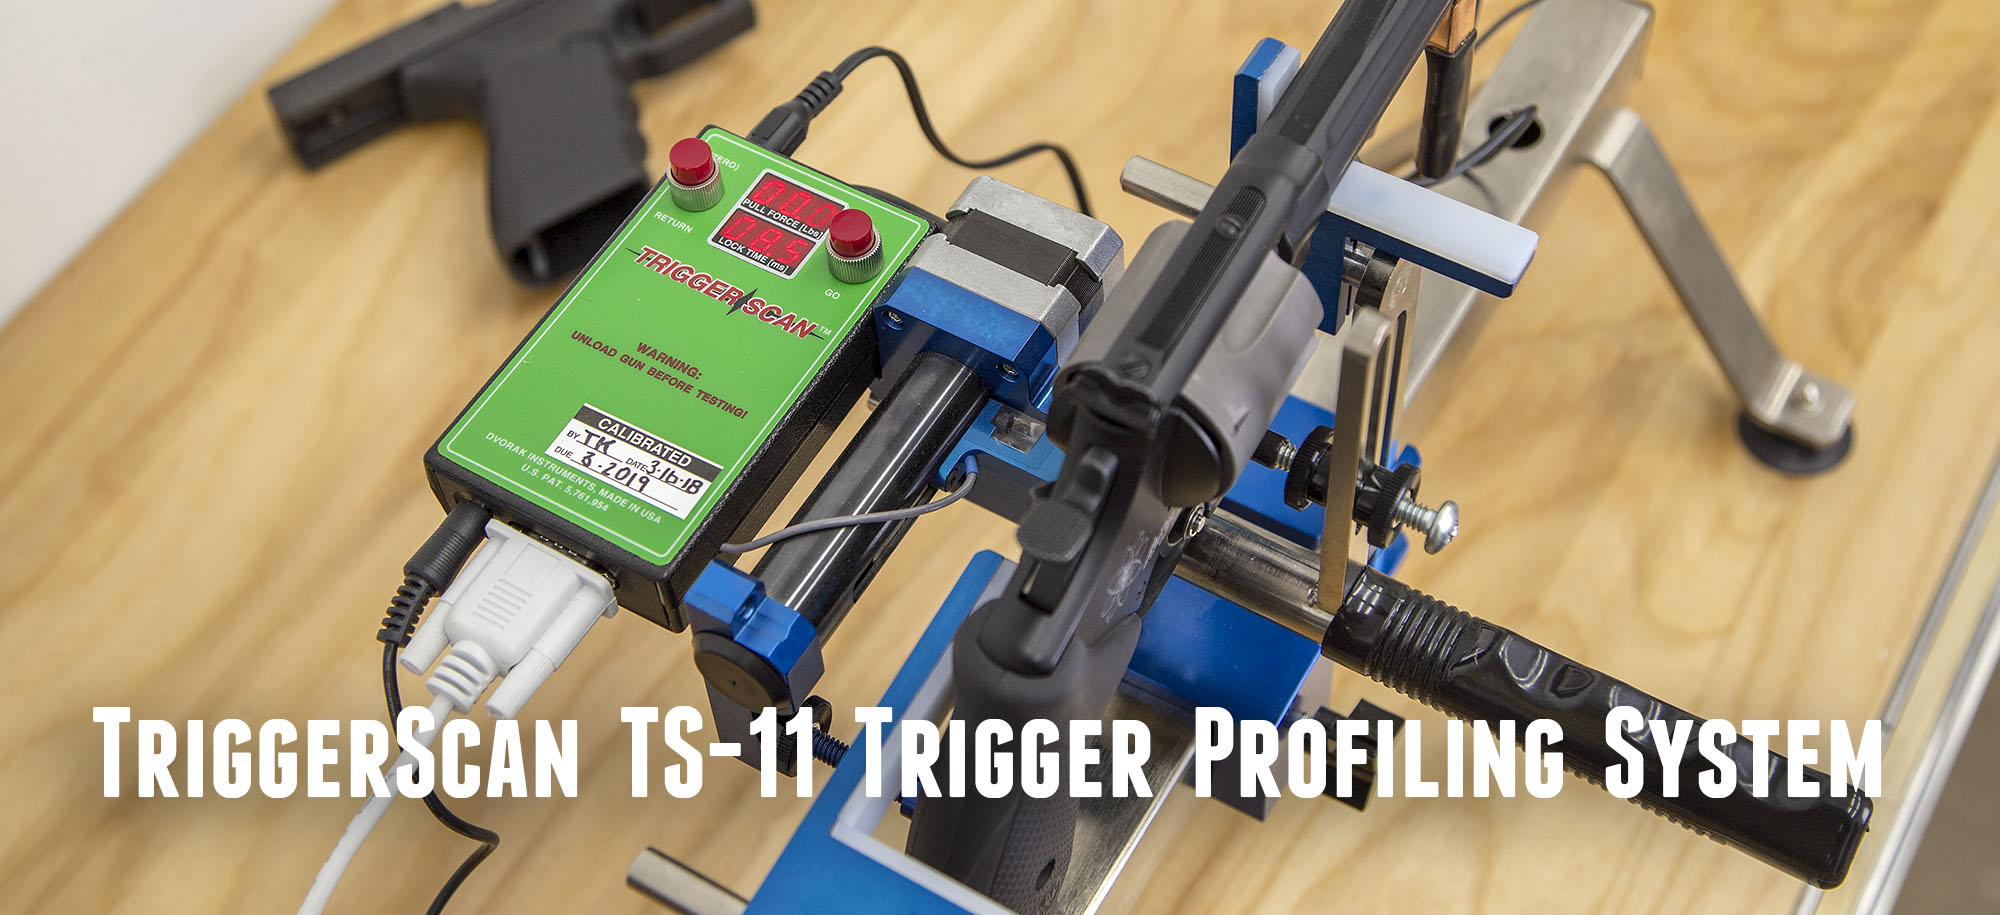
There’s only one tool in the world that can deliver these kinds of insights with laboratory precision: the TriggerScan TS-11 from DVORAK Instruments. I just got one of these amazing instruments in the Ultimate Reloader workshop, and am excited to kick-off what will be many stories related to this system. We’ll start here with hanguns (both semi-autos and revolvers) and work our way through a bunch of interesting scenarios. This is a game-changer!
TriggerScan TS-11 Overview
The TriggerScan TS-11 is a comprehensive trigger testing system that consists of the measurement instrument (brain and motor actuated force-sensing load cell), the firearm support system (bench top rest frame plus multiple lock down points and rests), and the computer interface. The computer interface uses a serial data connection (which you can use a serial-to-usb adapter with) as well as Windows software which is used to perform testing and to analyze results. Here’s the what’s included with the TriggerScan TS-11:
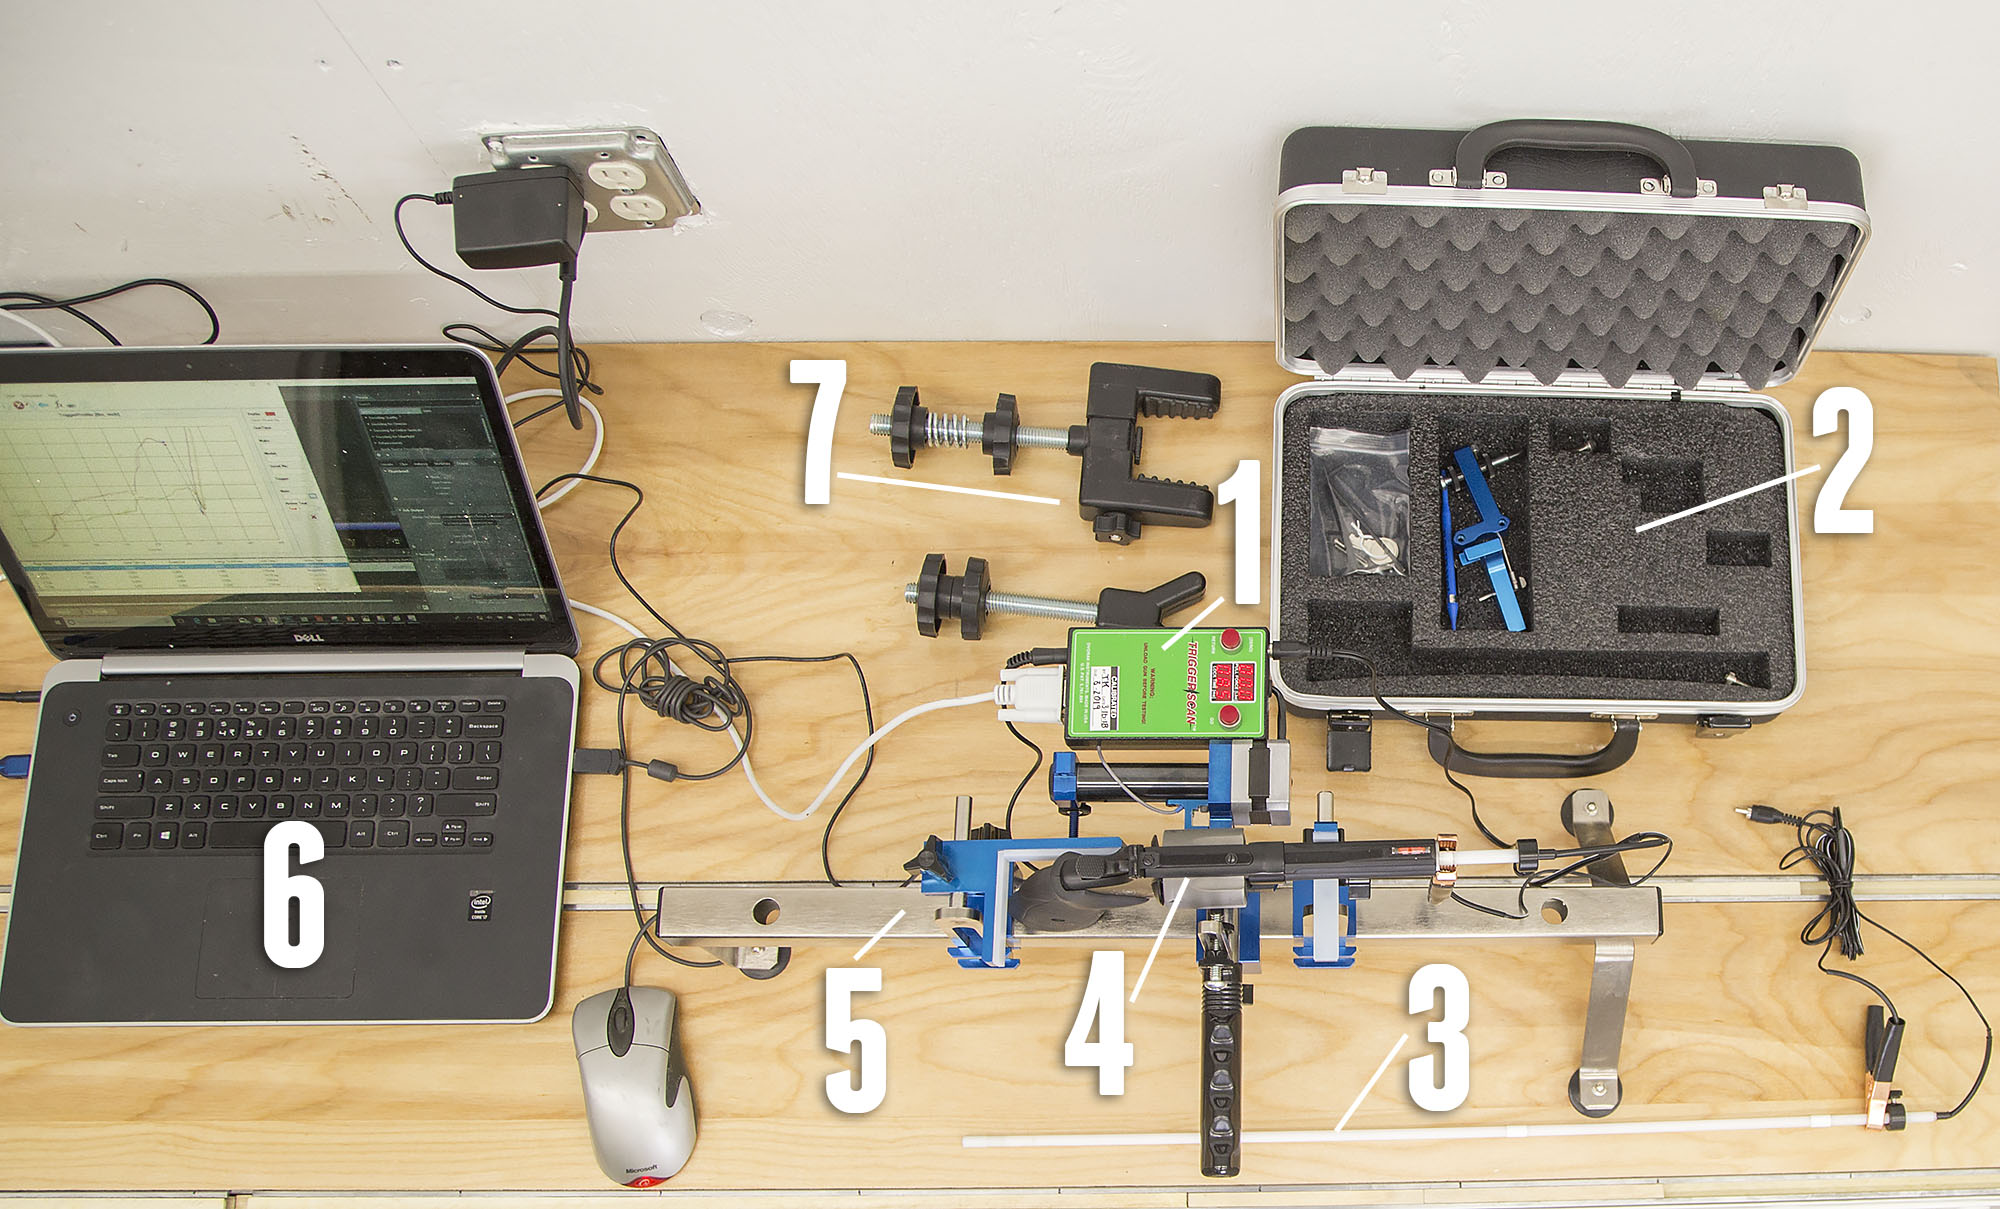
In the above picture we have:
- TriggerScan TS-11 instrument (brain)
- Padded lockable case
- Firing pin sensor (rifle, used to measure lock time)
- Firearm under test (not included)
- Firearm rest
- Windows PC with serial port or serial-to-USB adapter (not included)
- Long gun rest attachments
Setting Up the TriggerScan
Setting up and using the TriggerScan involves patience and attention to detail, but is not difficult. The first activity is to mount the firearm under test. This involves installing the appropriate rests, and then making precise adjustments so that the firearm is level and stable, and so that the trigger force gauge is centered vertically and horizontally with respect to the trigger being tested. The second activity involves hooking up power to the instrument (by means of included AC adapter), and optionally hooking the instrument up to the PC by means of serial cable (and serial-to-USB adapter if your computer doesn’t have an RS-232 serial port). With everything connected and powered on, you can launch the TriggerScan 4.0 software on your PC, and start testing.
Running TriggerScan Tests
Each time you run a test, the following steps are performed:
- Firearm check: magazine (if applicable) is removed, chamber(s) are checked to be empty.
- Semi-auto pistols without exposed hammer only: the slide is racked in order to “cock” the trigger (double action revolvers may be scanned without cocking the hammer)
- Firearm is placed in the TriggerScan rest and secured. A light push back on the firearm will remove any “slop”
- *Firing pin sensor and electrical connection clamp are installed (optional)
- The trigger is cocked (by means of cycling the bolt, pulling back on hammer, etc) – see #1 for semi-auto pistols without exposed hammer, optional for Double-Action revolvers
- The test is executed by means of buttons on the instrument or (in most cases) initiated by TriggerScan software interface on PC
*For double-action revolvers, the firing pin sensor can only be used for single-action scans since the revolving cylinder will be blocked by firing pin sensor rod during cylinder rotation.
Results
I’m just getting started with the TriggerScan, but have scanned multiple handguns with great reputability and results. Here are some of the scan results that were shown in the video.
Glock 20 Factory Trigger -vs- Raced-Out Glock 17 Trigger
Yes, I can easily “feel” the difference between my factor Glock and my modified/enhanced Glock, but the picture tells the “full story”. The picture in this case is a set of Force-Distance data plots!

TriggerScan 4.0 App Screenshot: Factory -vs- Modified Glock Triggers (click/tap to enlarge)
Here are a few things I learned about these Glock triggers from running the trigger scans:
- The factory Glock and modified Glock both have about the same travel characteristics (things happen at the same trigger pull distances)
- The modified Glock has about 1/2 the peak trigger pull force
- Both triggers have clean pulls – you can “feel” the first and second stages
- The modified Glock has a more consistent trigger pull (lines overlap) – this is a validation of the accuracy and precision of the TriggerScan TS-11 system

In short- the TriggerScan validates what I thought about these triggers, but supplies a lot of data and insights that I would have only speculated about before running these tests.
Smith and Wesson 329PD 44 Magnum
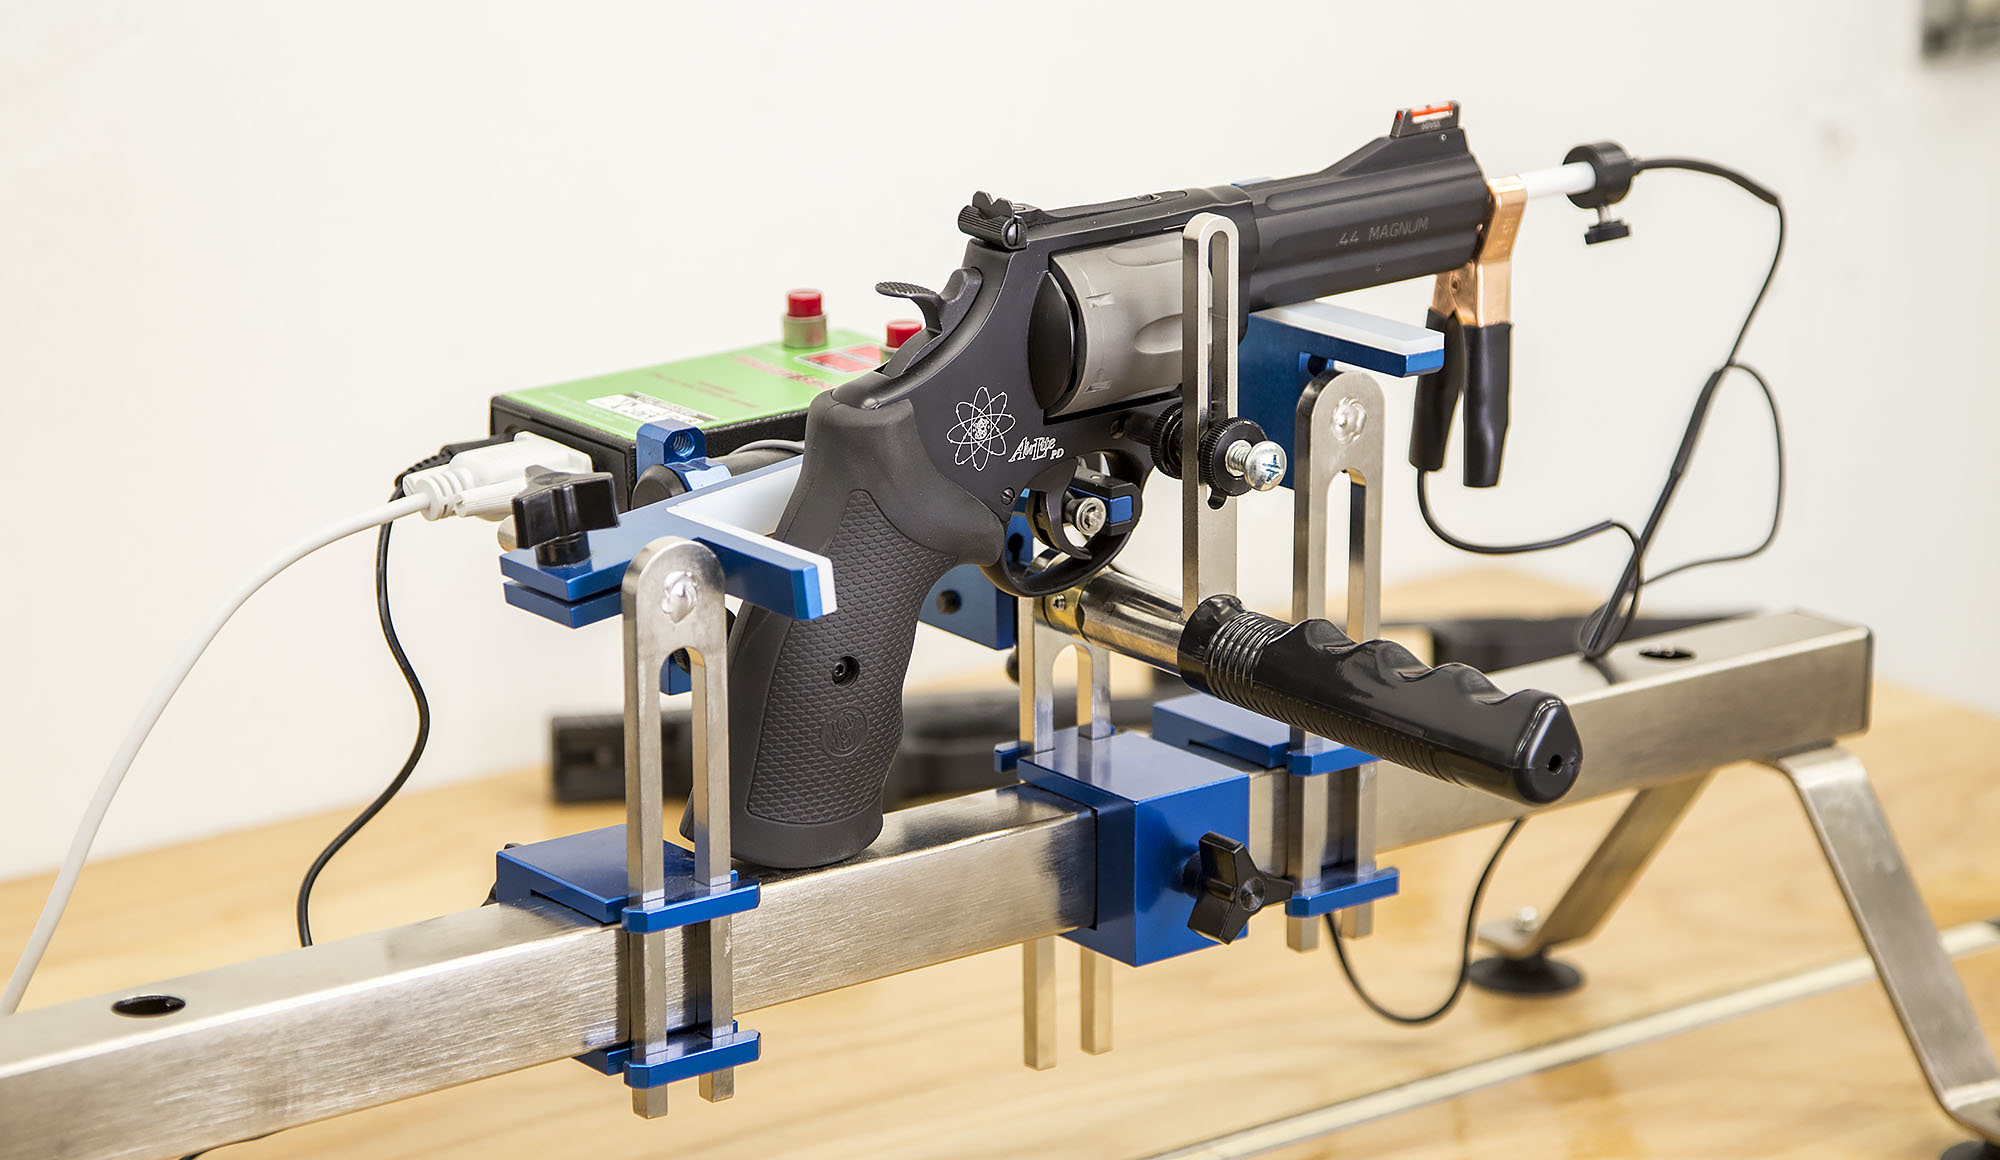
I like Smith and Wesson revolvers for a number of reasons, one of the main being their great triggers. I just got an ultra-light-weight Smith and Wesson 329PD 44 Magnum revolver for “woods and ranch carry” – and was excited to profile the trigger with the TriggerScan. This was the first SA/DA revolver I’ve run with the TriggerScan TS-11. Here’s what happened!
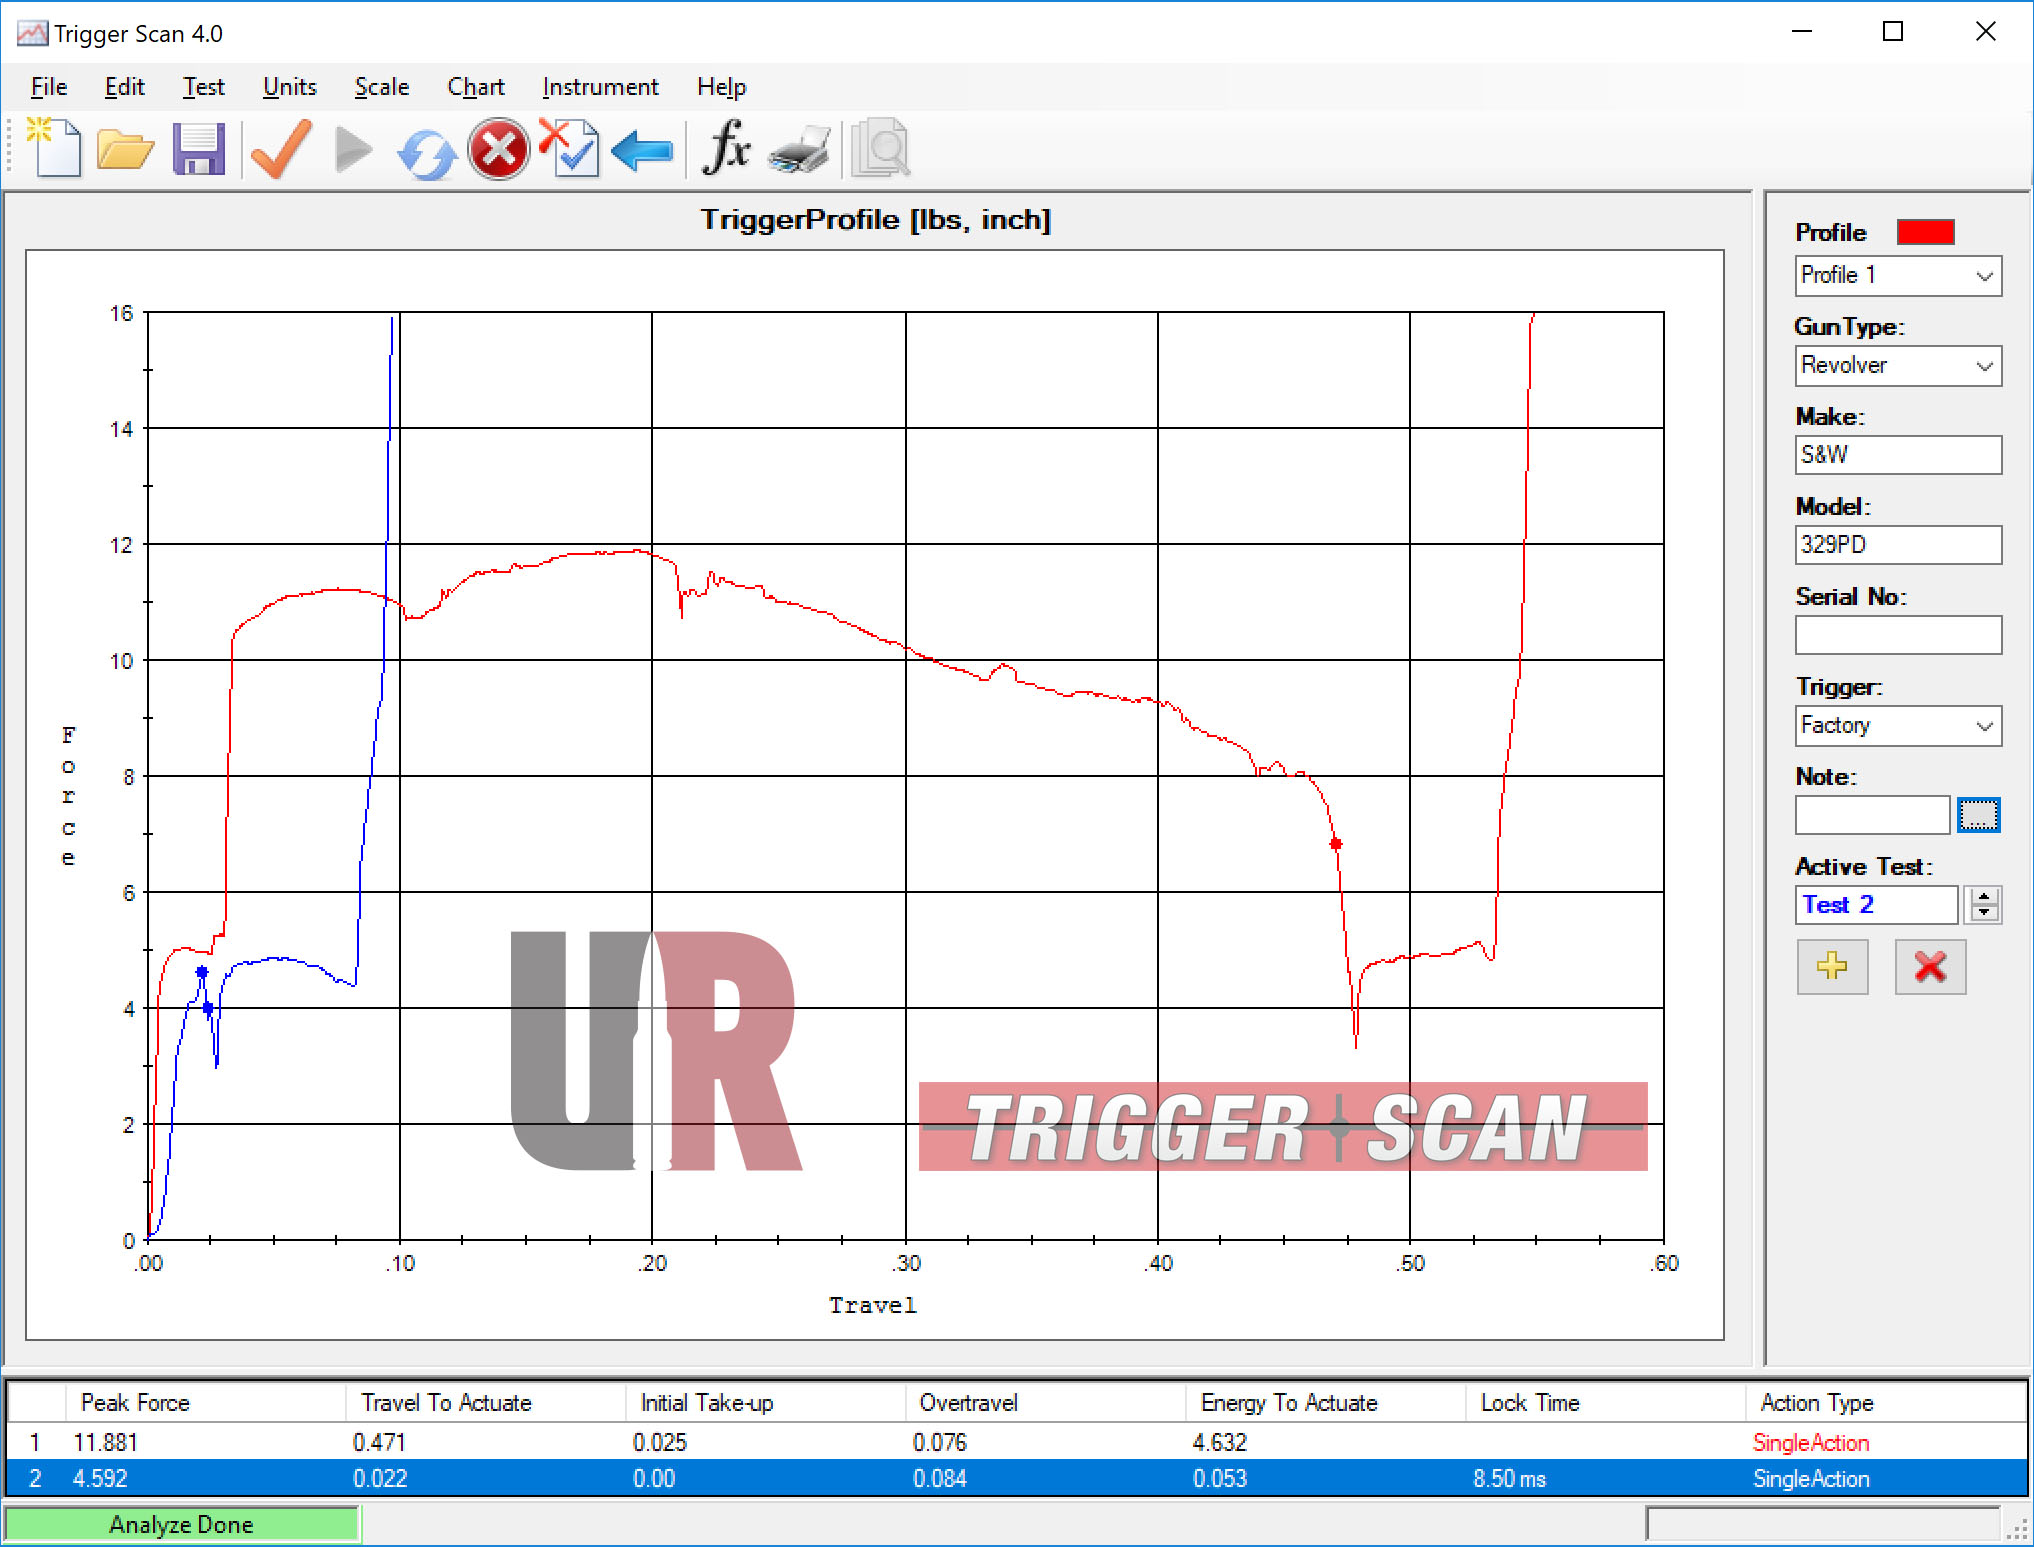
TriggerScan 4.0 App Screenshot: S&W 329PD Revolver (click/tap to enlarge)
Very interesting to see the Single-Action and Double-Action trigger pull scans side-by-side for the same revolver. Very different results for trigger dynamics that feel very different when you pull the trigger! Here’s a few things I observed regarding these scans (note: you can ignore the steep lines at the end of the scan- those are where the trigger “bottoms out” at the end of the trigger pull distance range):
- The Single-Action trigger pull is short and smooth- just why I like shooting targets in “SA mode”!
- 4.5lb peak force for Single-Action is great for a carry weapon.
- The Double-Action pull shows the hammer spring tension as well as cylinder rotation – it would be interesting to determine what the small force peaks are about (latching dynamics as the cylinder rotates?).
- The Double-Action break is more “rounded” than I would have guessed, but this is “new territory”.
Conclusion
I have wanted a TriggerScan for a number of years- and now that I have one, I’ll have to say it’s “everything I hoped for and more”. This tool has been flawless in operation, and I am very much looking forward to the process of learning more about triggers, and using this tool both to quantify factory trigger dynamics as well as to “visualize” gunsmithing on triggers before, during, and after a trigger job.
If you are interested in obtaining your own trigger scan, please contact me to find out how you can get a GREAT discount (not for large corporations, sorry).
Stay tuned, because there’s MUCH more TriggerScan action coming in the months and years to come!
Do you want to see something specific tested with this tool? Please leave a comment!
Thanks,
Gavin


Hi I’m definitely interested in the triggerscan. Your “contact me to find out how you can get a great discount” link is not working for me though. If you could would you email me with some details?
Thanks, Shawn
would like info on how to purchase a triggger scan system