In my last post, I talked about what an amazing experience it was preparing for and shooting in my first PRS match. It was fun, it was challenging, and it changed the way I think about shooting a rifle. In this post, I’ll talk about all of the gear that I used to compete in this competition, and share some of the insights on PRS gear from my friend and shooting partner Jim Findlay.
As I mentioned in the video, there are numerous great sources of information related to both Precision Rifle in general, and PRS (Precision Rifle Series). Here are a few that I come across frequently:
- Accurate Shooter – all sorts of precision rifle content and related discussion forums with a leaning towards bench rest style shooting.
- 6.5 Guys – a blog and YouTube channel dedicated to PRS techniques and gear.
- Precision Rifle Blog – detailed and analytical information and data related to precision rifle, including a recurring feature called “what the pros use”.
These guys are the true “experts” – so I would recommend that you check out their sites if you are wanting to learn as much as possible about PRS and precision rifle in general. At the same time, I’d like to share with you “the rest of the story” of my first PRS match: “the gear”. Hopefully this newcomer’s perspective will be helpful if you are thinking about competing in your first PRS match!
PRS Rifles
In order to be successful in a PRS match, you need a rifle that is accurate enough, extremely reliable, has great ergonomics, handles well, and fits your budget. Here are some of the criteria that you should evaluate when selecting a rifle:
- Chambering: Selecting the right caliber (bullet diameter) and corresponding cartridge is a great place to start. Calibers like 6.5 mm have grown in popularity due to the high-BC bullets they use, lessened felt recoil (compared to cartridges like .308 Winchester), and optimized case designs. Cal Zant over at the Precision Rifle Blog put together a great article outlining the most popular calibers and cartridges for Precision Rifle. Most competitors these days are using 6mm or 6.5mm caliber bullets, but there are exceptions like for gas gun categories where .223 Remington and .308 Winchester are used.
- Action Type: Bolt -vs- Semi: While most PRS competitors use bolt action rifles, there are classes of competition that specifically call for semi-automatic actions to be used. Even so, in open class where you can pick which action type you’d like to use, there’s a split between the two for various reasons. I used an AR-15 in my first match, and for comparison, I think I’ll use a bolt action rifle in my next match!
- Form-Factor: These days you can choose between many different styles of rifle designs for PRS competition. There are conventional rifles that are like hunting rifles, specialty stocks with thumb holes or pistol grips, chassis-style rifles, AR-type designs, and more. Ultimately you’ll need to select a rifle platform that you are comfortable with, and have practiced on (the more trigger time the better).
- Barrel Length and Twist Rate: Barrel length will affect rifle handling/balance, velocity, and the ability to use muzzle accessories like suppressors. A shorter barrel can make your rifle handle better, and can keep the rifle’s overall length reasonable even with a suppressor attached. A longer barrel can give more velocity, but not always. Twist rate will affect the weight of bullets that can be stabilized, and will also affect factors like spin drift. When in doubt, check out what other seasoned shooters are using, and ask why they selected the specific rifle components they did. In some cases, you may just want to “copy cat” someone who has this kind of experience.

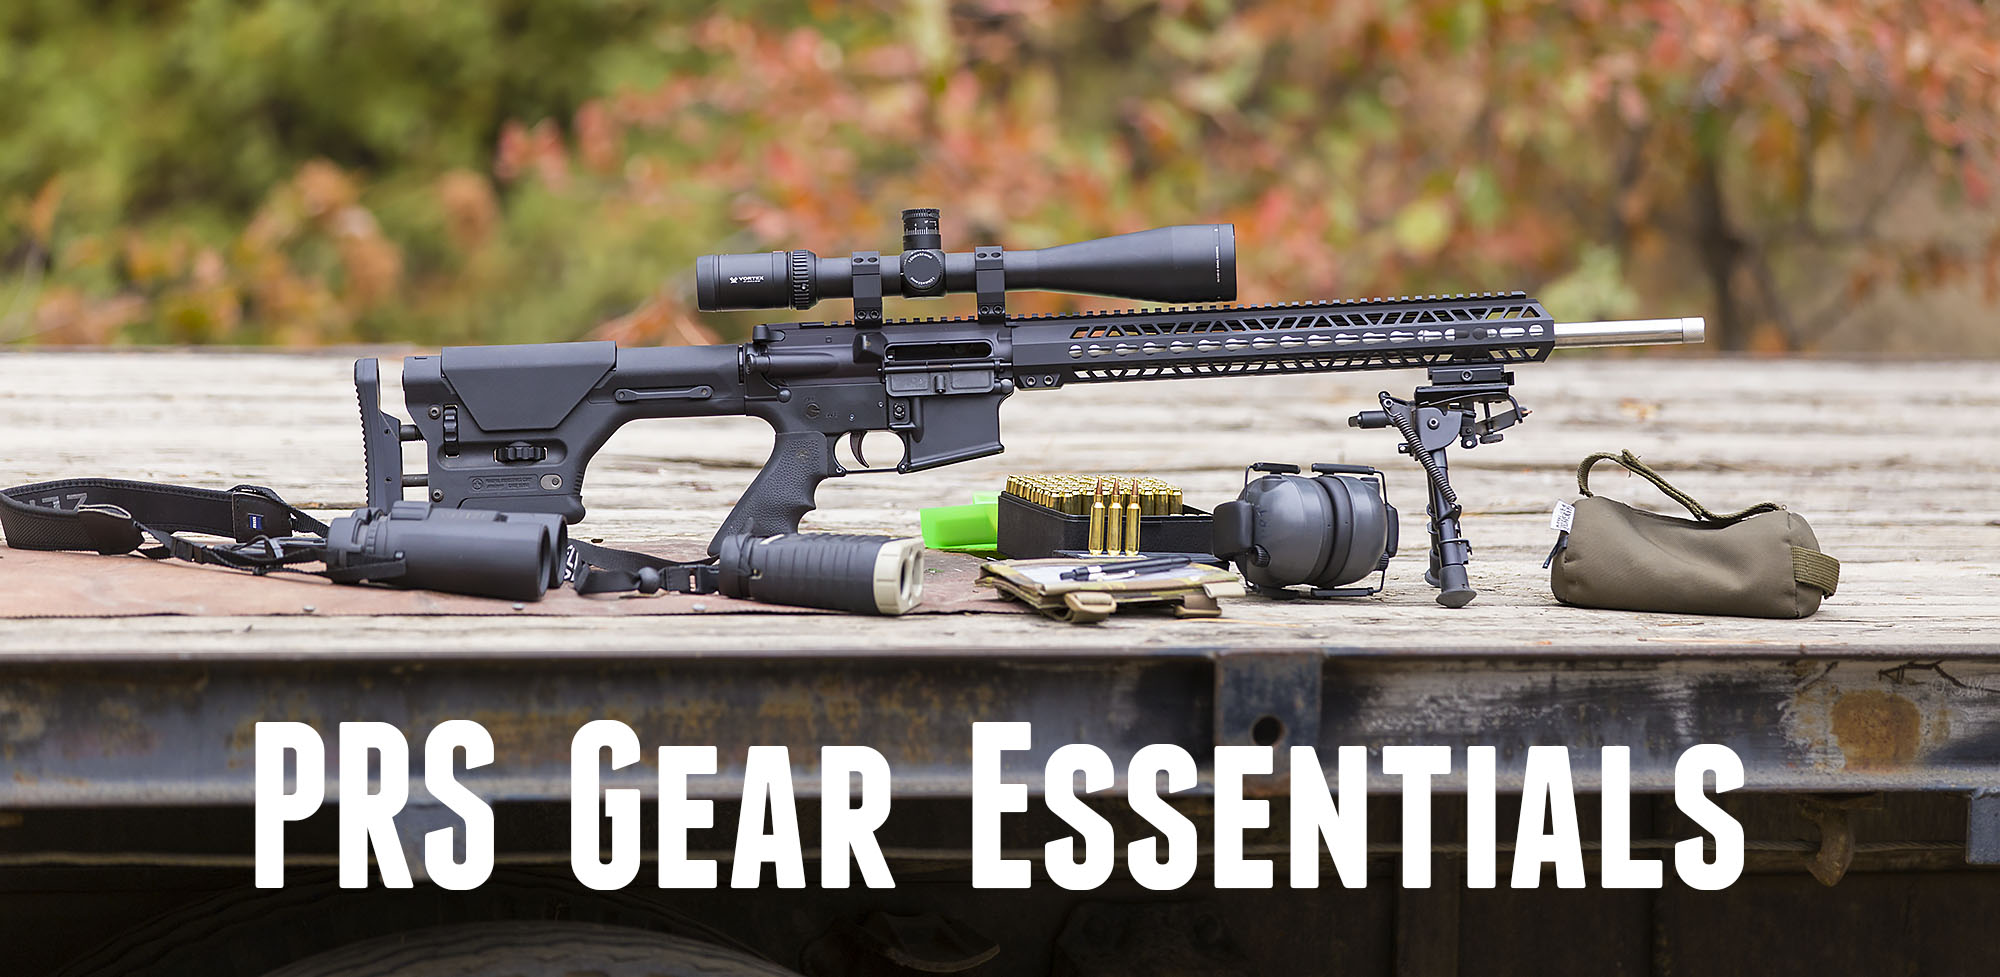
Above: 22 Nosler AR-15 rifle used by Gavin in the PRS match:
- 18″ 1:8 twist 22 Nosler Upper
- Two Stage Match Trigger – .154″ Hi-Speed DMR (GEISSELE AUTOMATICS)
- Hogue AR-15 rubber grip
- Magpul PRS stock
- Harris S-BRM 6-9″ bipod
- Vortex Viper HS-T 6-24x50mm scope
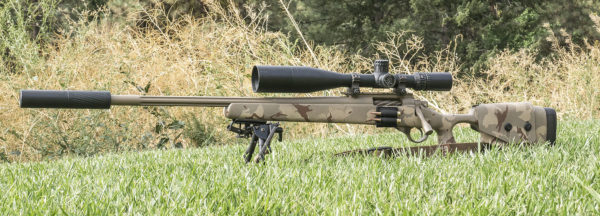
Above: R-Bros 6.5x47mm Lapua rifle Jim used in the PRS match:
- Remington 700-style action
- 6.5x47mm Lapua 1:8 twist barrel
- Nightforce NXS 5.5-22 power scope
- Thunderbeast TBAC Ultra 7 suppressor in 6.5mm
- Jewell trigger adjusted to 8oz (way lighter than most shooters would go with)
PRS Optics
The scope you use in a PRS match is perhaps more critical than the rifle it’s mounted on. With the right scope, you’ll be able to quickly adjust your dope to compensate for drop and drift, return to your zero without even looking, see targets clearly at various magnifications, and have faith that your point of aim will be consistent regardless of how your rifle is “banged around”. Furthermore, the reticle in your scope can provide invaluable real-time compensations for things like shifting winds and different ranges (target distances).
Here are some things to think about when choosing a scope for PRS shooting:
- First Focal Plane: If you can afford it, a high-end first focal plane scope is a great investment for PRS. A first focal plane scope will maintain reticle hold-over scale/proportion over the entire magnification range. In contrast, a second focal plane scope will only have accurate scale for reticle marks/graduations at maximum magnification. In a sport where multiple magnification values are used in a single stage, this is an important factor!
- Units: Mils -vs- MOA: The debate over Minute of Angle (MOA) versus Milliradians (Mils) is to some extent arbitrary. The most important factors related to this preference are that you are super-familiar with whatever units you decide on, and consistency within the group you shoot with. Having a “common language” for holdover values in the “heat of the battle” is an invaluable point of alignment. This can be true for both PRS and hunting.
- Magnification: PRS matches will commonly reach out to distances of 700 yards or more. At these distances, you’ll want max magnification to be in the range of about 24-30 power. At the same time, you’ll have targets as close as 100 yards or so, and that means you’ll need the ability to back magnification down to about 6 power. Some shooters (like Ed Mobley from the 6.5 Guys) like to use a lever which makes adjusting magnification easier on the fly.
- Clarity: Scopes are like diamonds- you can’t get one that’s “too clear”, but clarity costs money. The quality of the optic will allow you to see your targets more clearly, and that could mean the difference between hitting and missing. I saw first-hand just how small and difficult some of the KYL (Know Your Limits) rack targets can get- you can barely see the smallest target with a 24 power scope! This is where clarity can be the “game changer”.
- Zero-Stop: A good PRS scope needs to have a zero stop. In a single PRS stage, you may adjust your dope 4 times or more, and each time you exit a stage you’ll need to “dial out your dope” (return to zero). Without a zero-stop (turret bottoms out when your elevation is set to zero) you can’t be sure you’re at zero. This feature also enables you to zero out without having to look at the turret reading- an added benefit.
- Construction and Quality: Your scope and its mount should be of sufficient quality that you “don’t have to worry” about a mechanical problem during competition. Most PRS shooters would agree that if you have to choose between spending more on a scope or more on a rifle, the scope is where the money is better spent. (the same is true with photography and lenses).
The 6.5 Guys have put together an article and video talking about their scopes, it’s a great read/watch! With what I’ve learned, I’m thinking about upgrading to a Vortex Razor HD Gen II 4.5-27x 56mm scope with zero-stop. We’ll see when budget allows for that!
PRS Rifle Support
I think the first thing I said when trying to shoot from a barricade was: “You have to be kidding”. For someone that’s used to prone shots from a bipod (when shooting long-range) this new challenge seemed impossible. My reticle was literally all over the place trying to shoot a target at 400 yards. But over time things improved drastically! Part of this improvement came from practice and technique, and part came from using the right support systems. Here is some of the gear you’ll need to steady that rifle when shooting in a PRS match:
- Bipod: A good quality bipod will provide front support for your rifle while shooting prone, can be used to push up against barricades, can be used to shoot off obstacles, and many more scenarios. There are many great options including Harris and Atlas, and if you want a great overview check out the following video/article from the 6.5 Guys.
- Sling: A sling can also serve multiple purposes- you can obviously use it to carry your rifle, but slings can also come in handy for a variety of shooting positions/techniques where they can help to steady the rifle.
- Rear Bag: One or more rear bags are an absolute necessity when shooting in PRS competitions. In my first match, I used multiple rear bags (thanks guys from my squad for the loaner equipment!). I used these bags to support the rear of the rifle when shooting prone, to support the front of the rifle when shooting off barricades, and under my right arm to lock my shoulder area when shooting off a tank trap. Some of the factors to consider when choosing a bag include size, weight, mold-ability, and profile.
Here are some bag options worth considering:
KYL “The Bag” 10″ x 8″ x 7″
This is one of the bags I tried out during the competition, and I loved it’s size and light-weight construction. This would be a great all-around bag for PRS and for field work like hunting. If you want to know more about this bag, check out the product page on the KYL Gear website.
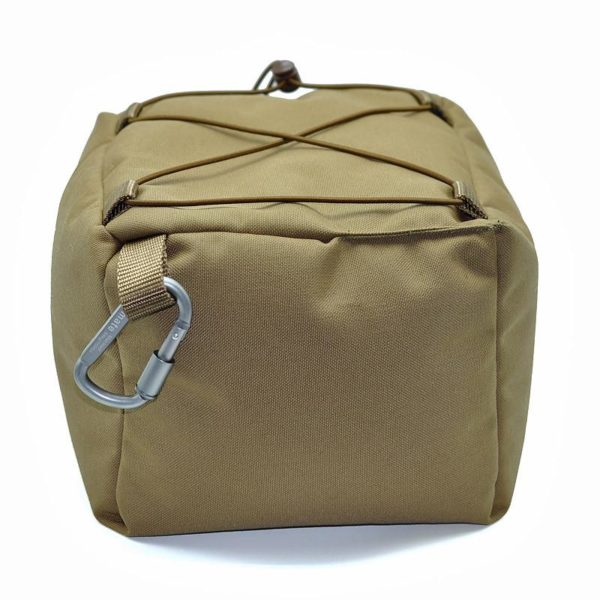
RedTacGear Bean Bag
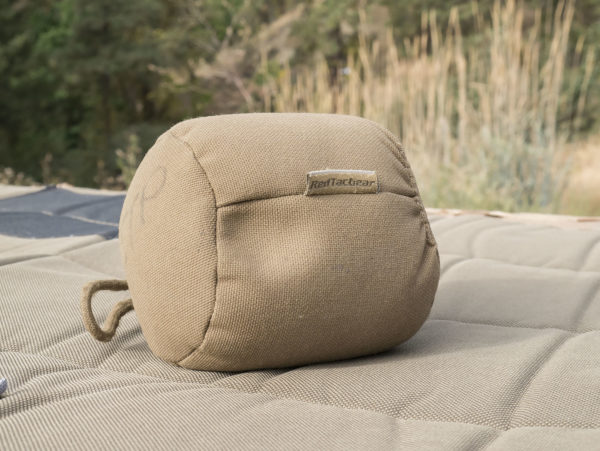
Jim tends towards the “less is more” approach with rear bags and field gear, so he chose to use a small-and-simple RedTacGear ~6″ rear bag. This bag offers basic support in a small form-factor and can be clipped to your pack via the integrated loop. In discussing the gear we saw at the match, Jim indicated he was thinking about adding a larger bag into the lineup. Perhaps something like the Game Changer!
Armageddon Gear Game Changer Bag
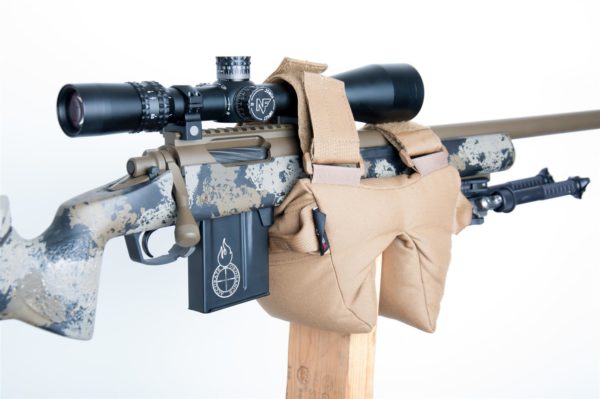
One popular choice with top PRS shooters at the match was the “Game Changer” bag from Armageddon Gear. (image courtesy Accurate Ordnance). This bag was heavier than the KYL Gear bag, and features two profiles, a notch on one side, and a flat-top on the other side. I really liked how this bag worked shooting off a ladder barricade during the match.
PRS Ammunition, Ballistics, and Dope
When shooting in a match, you need to have 100% confidence and knowledge with regard to the cartridge you are shooting. This could be factory ammunition, but in most cases is reloaded ammunition. Here’s the process I went through in order to settle on a cartridge and related ballistics:
- Select cartridge: I chose 22 Nosler for this event.
- Perform load development: This could employ techniques like “Optimal Charge Weight” (focused on rifle characteristics), 10 round quick load development (focused on “accuracy nodes”), selecting from manufacturer’s load data and notes, or many other techniques. The goal is to find a load that will offer repeatable accuracy, and will perform reliably.
- Chronograph loads: Getting an average velocity from at least five shots will give you the data you’ll need to analyze your ballistics.
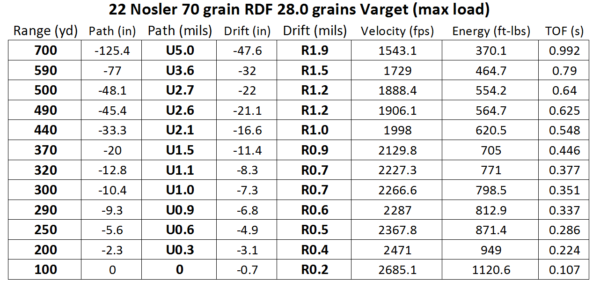
- Build a Dope Card: Using ballistics software (I used the “Shooter App“) you’ll need to build a table that includes bullet drop and drift (due to wind) for the distances you’ll be shooting in the match, and the conditions that are likely to be present at the range that day. You’ll also incorporate the optic units (Mils/MOA), rifle characteristics (twist rate, sight height, etc), and ballistics data. The Ballistic Coefficient (BC) for the bullet you’re shooting is one of the most important data points.
Once you have your ballistics data tabulated, you’ll need to make sure it’s available at a glance during the shoot. For me this boiled down to three things:
- Rifle Dope Card: A small ~3″x2″ card I printed out and laminted that had 200, 300, 400, 500, 600, and 700 yard data from my ballistics table for both bullet drop and drift.
- Arm Board and Tactical Wrist Coach: This accessory allowed me to write the specific dope for each stage on an arm-worn dope card. Using a grease pencil, I was able to write the dope on the white surface, and erase it by wiping with a cloth after each stage.
- Phone Ballistics App: Since I had all of my ballistics data in the “Shooter App” – I could and did refer to it during the match to get additional data and double-check specific data sets. I wouldn’t want to use a phone as a primary source of ballistics data during a match, but it makes a great supplement or backup!
Above: Gavin’s “extended data” dope card for the PRS match, data exported from the Shooter App (iOS or Android) and formatted in Excel.
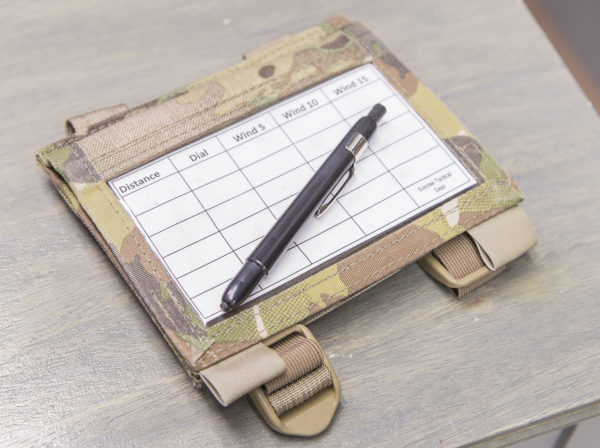
Above: The Arm Board / Tactical wrist coach from Sunrise Tactical. A great way to keep your dope data at arms reach for any part of a PRS match.
PRS Accessories
There are a few other accessories that are important that don’t cleanly fall into the categories mentioned above that I’ll cover here. Some of these items could be considered optional, but I feel they are important at very least!
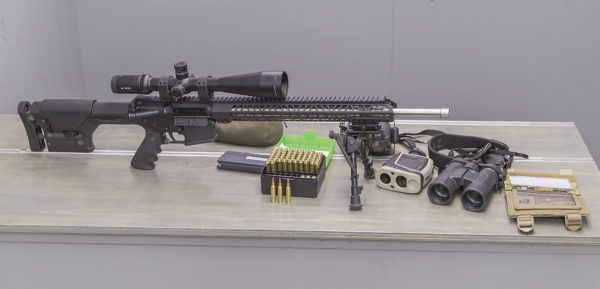
Above is most of the gear I used during the PRS match. Here are some of the items not covered in other sections: (not all pictured above)
- Binoculars: With a good pair of ~10 power binoculars, you’ll be able to see what’s happening while other competitors are shooting (if your rules allow, not always the case)
- Wind Meter: With a hand-held wind meter, you’ll be able to accurately measure wind speed and direction *at the firing line*. Since you have only one data point, you’ll still need to read the terrain between the firing line and the target to accurately estimate the total wind effect.
- Laser Range Finder: While you’ll most likely know the ranges of the various targets you’ll be shooting at, it’s still nice to have a range finder to sanity check and for other purposes (such as ranging a stand of grass you’re reading wind from). While optional, a range finder is still very nice to have.
- Rifle Case: A good rifle case (I used a Condor single rifle case) with lots of pockets is a great piece of gear to haul your rifle and accessories to and from the event. I stored my rifle, magazines, and ammunition in the case when it was being transported, and that worked really well.
- Light-weight pack: a good light-weight backpack is a great way to carry all of your gear (except rifle) around as you walk from stage to stage during the event. It’s not a bad idea to throw in a bunch of water, snacks, a cleaning kit, and tools as well.
- Hearing Protection: Hearing protection is easy to forget, but super-important in PRS. I used electronic muffs so that I could hear the chatter during stages, and they worked really well!
Summary
Having the right gear is imperative if you want to be successful in PRS, but it’s also easy to over-think or obsess on. Ultimately, you’ll evolve the gear you use because “we’re all different” and hopefully learning and adapting continually. Just because one shooter like a particular bipod doesn’t mean it will work well for the next guy. What is best is to focus on is fundamentals and quality. If you invest in something like a quality scope, it’s likely you’ll use it for a long time, and it will pay for itself many times over.
Do you have PRS gear experiences or insights you’d like to share? Please leave a comment. Also be sure you’re subscribed because I’ll be following up with a lot more 22 Nosler content right here on Ultimate Reloader!
Thanks,
Gavin


Great article. Thanks for posting.
Great article.. especially for those going into their 1st match!
Great video and article. I was wondering why you chose the 22 Nosler over the 224 Valkyrie? Would you still go with the 70 grain RDF bullets or chose a heavier bullet in the Valkyrie? I’ve been toying with a 6mm Creedmore build on a Rem 700 action. Maybe an Oryx chassis. I really enjoy your videos, so keep it up!