
There are certain tools that can save you a lot of time, effort, and money. For reloaders of ammunition, a case gage is one such tool. Have you ever gone to the range and discovered an issue with your handloads? I certainly have. While a case gage can’t prevent all ammunition problems, it is what I would call “cheap insurance”. If you properly use a case gage, you can be have confidence that your ammunition will chamber properly, and feed reliably (for magazine fed firearms).
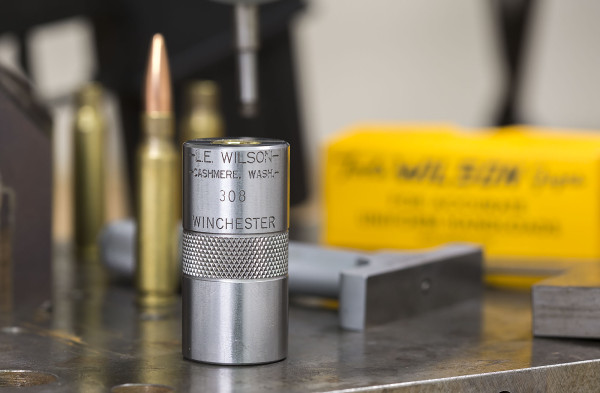
I have recently upgraded to L.E. Wilson case gages for all of the cartridges that I load (with the exception of 7.62x54R which L.E. Wilson doesn’t make a case gage for). I had a bad experience with a 308 Winchester sizing die setup on one of my progressive presses and ended up with some batches of bad ammunition. From now on, using a case gage is “mandatory process” for every press setup I perform. There are plenty of options for case gages, but I use L.E. Wilson because their products are top quality, they are a family run business, and they are “local”: just 4 miles from the “Ultimate Reloader Outpost”. The information in this article will be in reference to the L.E. Wilson bottleneck rifle case gage, although most of the principles will apply to other brands and types of case gages. I’ll use 308 Winchester as the “example cartridge” here, but note that the concepts apply to most other bottleneck rifle cartridges. Gages like this are used to verify your sizing die setup, and to verify trim-to length for your brass.
Before talking about how to use this type of case gage to verify sizing die setup, it’s important to understand the concept of “headspace”. There are various classes of rifle and pistol cartridges that have their own concept of headspacing (bottleneck rifle, belted magnum rifle, traditional semi-auto pistol, rimmed revolver cartridges, …). Headspace is a measurement that determines what the cartridge “stops against” when chambered, and any corresponding dimensions/tolerances. In the case of bottleneck rifle cartridges this dimension is between a “datum line” on the shoulder on the front side, and the bolt face on the back side. The datum line corresponds to a portion of the shoulder on the case of known diameter.
Headspace is a measurement that determines what the cartridge “stops against” when chambered, and any corresponding dimensions/tolerances.
The diagram below shows the headspace measurement for 308 Winchester:
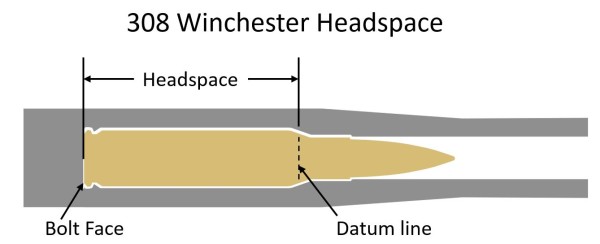
From the SAAMI 308 Cartridge Dimensions Page, the headspace dimensions are as follows:
- Datum shoulder diameter: .400″
- Headspace length: 1.634″ -.007″ (1.627″ – 1.634″)
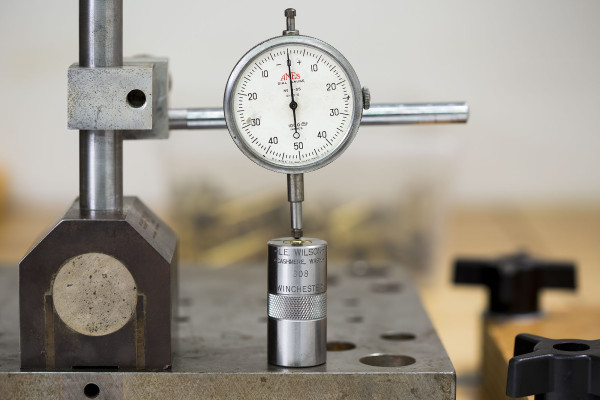
When checking to see if your cartridge will properly chamber, the case gage is checking the “datum to head” length between the case shoulder and the case rim. The nice thing about this type of gage is that you don’t have to have special tools that are used with calipers- you just drop in the case/cartridge and check min/max indicators on the gage compared with the depth of the case/cartridge. It’s fast and easy.
After gaging my “bad batch” of 308 Winchester, I noticed that these previously machine gun-fired cases had neck bulging. A further examination of my reloading press setup revealed that while the sizing die appeared to be “bottomed out” – flex in the press sub-plate resulted in a not-deep-enough sizing die condition. Here’s the before and after shot showing what the brass looked like:
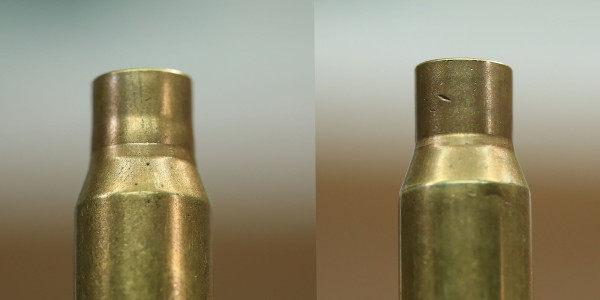
While I could have found this by visual examination, using a case gage would have made this issue instantly apparent and obvious. Lessons learned! I have since decided that for super-duty sizing operations (like this military 7.62x51mm brass) I’m going to size on a single stage press first, then prime/charge/seat on a progressive press. Hopefully that will yield reliable and consistent results. If you are full-length sizing brass on a progressive press, be sure to check your sized brass carefully both while sizing a case (only case in press) during setup, and while performing full-progressive loading with cases in all stations.
Using the L.E. Wilson case gage to validate sizer die setup is simple- you size a case, then drop it in (case mouth first) into the large opening on the case gage. There are two surfaces on the top of the gage:
- The upper surface: corresponds to max length
- The stepped-down lower surface: corresponds to minimum length
If the case rim for the case/cartridge your are checking protrudes above the max length surface, there’s no gurantee your completed cartridge will chamber. If the case rim falls below the minimum surface, the case shoulder will not be tight in the chamber which is bad for accuracy. Furthermore, if the shoulder moves forward more than ~.005″ when the cartridge is fired, the case head could separate- and that’s not good at all!
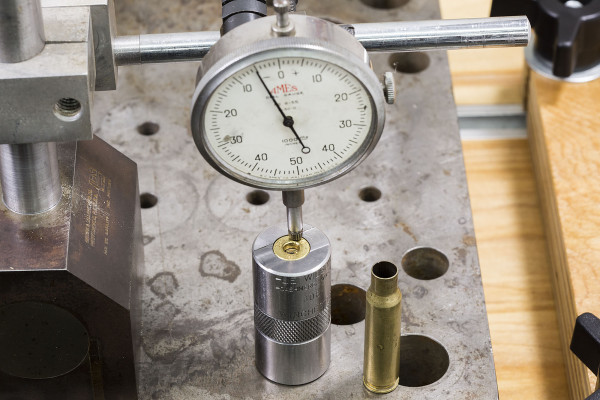
In the picture above, you can see the dial indicator reads – 0.005″ indicating off the case rim, which means it’s flush with the lower step, which means it’s in-spec.
There are a few different ways you can perform this measurement:
- Use a straight edge – scraping over the upper surface, should clear the case rim. Scraping over the lower surface should “skim” or catch on the case rim
- Use a dial indicator on a stand (shown in the pictures in this article, and demonstrated in the video below)
- Use a depth micrometer
- Use dial or digital calipers
Note: if you use the dial indicator method to measure headspace length, you need to make sure the case mouth does not protrude out the bottom of the case gage or sit flush. This will cause a faulty measurement/indication. If this is a possibility it is best to position the case gage over a suitable recess or hole to prevent such a condition.
If you use the reference surfaces on the case gage, you’ll be assured that your ammunition should chamber in any “in-spec” firearm of the proper chambering. But what if you want optimized sizing for precision and accuracy for ammunition intended for a single (non semi-auto) firearm? If that’s your desire, you can use the method recommended by L.E. Wilson:
- Drop a previously fired case into the gage (ensure there are no dings or nicks, case mouth not bent/collapsed)
- Take a depth reading of the case rim relative to the upper surface of the case gage
- Subtract .002″ – .004″ (depends on how tight you want cartridge to chamber)
- Use the adjusted depth measurement to evaluate and fine-tune your sizer setup
As mentioned previously, the case gage can also be used to measure the trim-length of the brass you are working with. To perform this measurement, drop a case into the gage, flip it over, and set the gage on a flat surface as shown below:
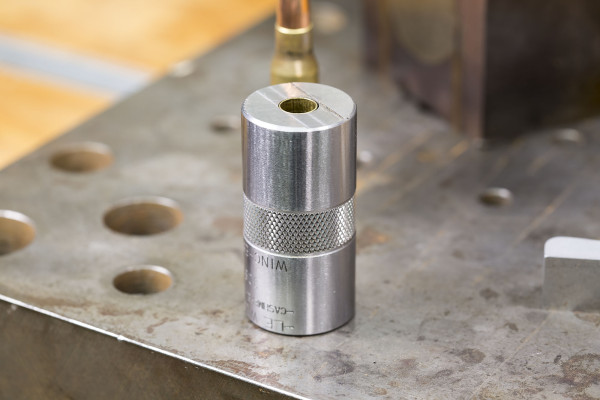
Reading the measurement is simple, just check that the case mouth length falls between the lower surface and upper surface of this end of the gage. Very fast and easy to use! By checking sizing die setup and case trim length, you’ll be confident that your ammunition will perform optimally from a performance/accuracy perspective, and will also chamber and feed reliably.
It’s also important to understand that final sized brass dimensions are a function of the pre-sized brass dimensions, case wall thickness, sizer die setup, and other factors. This concept is important, because the result is that different batches of brass will size to different final dimensions due to the “spring-back” effect. You push back the shoulder with a sizing die, and the shoulder “springs back” a few thousandths of an inch (but will vary based on the factors described previously). If you are particular about precision and accuracy, you should sort your brass into “groups” and then validate sizing die setup for each group of brass that you process.
Sorting criteria for groups of brass can be simplified to:
- Cases that are over max headspace
- Cases that are at or close to max headspace
- Cases that are close to min headspace
This way you can be certain of your results.
Here’s a video demonstrating how the L.E. Wilson case gage is used to validate 308 Winchester sizing die setup and trim-to length:
You can find L.E. Wilson gages on various online retailer’s websites, or go directly to L.E. Wilson.
Happy [confident] loading to you all! Stay tuned here because I’ll be following-up with an article and video covering L.E. Wilson pistol gages.
Thanks,
Gavin


Good article! I’ve used Wilson case gauges for years – both for F/TR, as a check to make sure my cases are within spec, and when I shot Service Rifle, to make *sure* my ammo chambered readily. They work well, and can catch things (like a bunged up rim that won’t let cases chamber all the way) that other tools may not.
If you’re just checking headspace, the Hornady LnL case comparators work pretty well. I’ve got a complete set of headspace and ogive comparators for these… I’ve used them a *lot*.
Another new option is the Whidden case gauge… CNC machined stainless steel, it is easy to use and doesn’t tie up other measuring tools. http://www.whiddengunworks.com/product/case-gauge/
With Mil Surplus Brass 7.62 which is mostly machine gun fired from open bolt guns and some with questionable headspace. Brass has a memory, even resizing in a single stage press one pass might not be enough. I have resorted to sizing twice, first pass making sure the press cams over on the die, then turning the case 90 degrees and resizing i again. The brass has some spring back, so I try to push the shoulder back 8 thousands which I find leaves my brass just under maximum for my chamber. Your results may vary, not all sizing dies are the same. Some have problems with sizing cases as they adjust their dies using the same case, as they adjust the die the case is reworked a couple of times bumping the shoulder multiple times. The brass is resized two or three times, when you resize a new case the brass springs back more since it is resized only once, resorting to its memory.
Thanks for the info.
The “feel” method works fine. Learn how to take spring tension off firing pin so bolt doesn’t cam forward.If not a 3 way safety (that you would usually turn into up position to release spring tension on firing pin) bolt needs to be disassembled. Turn out die after touching shell holder to die. Clean off lube after sizing and fit into chamber. Bolt must close with no or extremely light pressure. This will bump shoulder enough to give minimal and proper head space. If bolt does not chamber the sized case with light pressure, turn down die in small increments till it does. (WARNING – NOT TOO MUCH-TINY DOWNWARD ADJUSTMENTS ON DIE- OR TOO MUCH HEAD SPACING WILL OCCUR-SHOULDER BUMPED TOO FAR- THAT MAY CAUSE CASE HEAD SEPARATION-A POTENTIALLY DANGEROUS SITUATION). DOUBLE CHECK EVERY SO OFTEN WITH CASE GAGE AND OR BY CHAMBERING CASES.
Gavin please expand on this topic. Unfortunately I am still confused. It seems like it is 3 or 4 different subjects when referring to headspace. I shoot a lever action 30-30 and a single shot break action .22 hornet. In my journey to understand “headspace” I have seen many different topics. One being if your rifle has too much tolerance it is unsafe to shoot. Use a go/no go gauge to determine if it is. Can you expand on this? Also I am trying to determine how much to trim a neck. This seems to do the trick, but when you flip it upside down do you not lose .005″ because the case is flush with the table and not the gauge? Is there any other method of determining proper neck trim length? So far I have fireformed brass and I am ready to bump it down .003″. Can you save me before I blow myself up? thx.