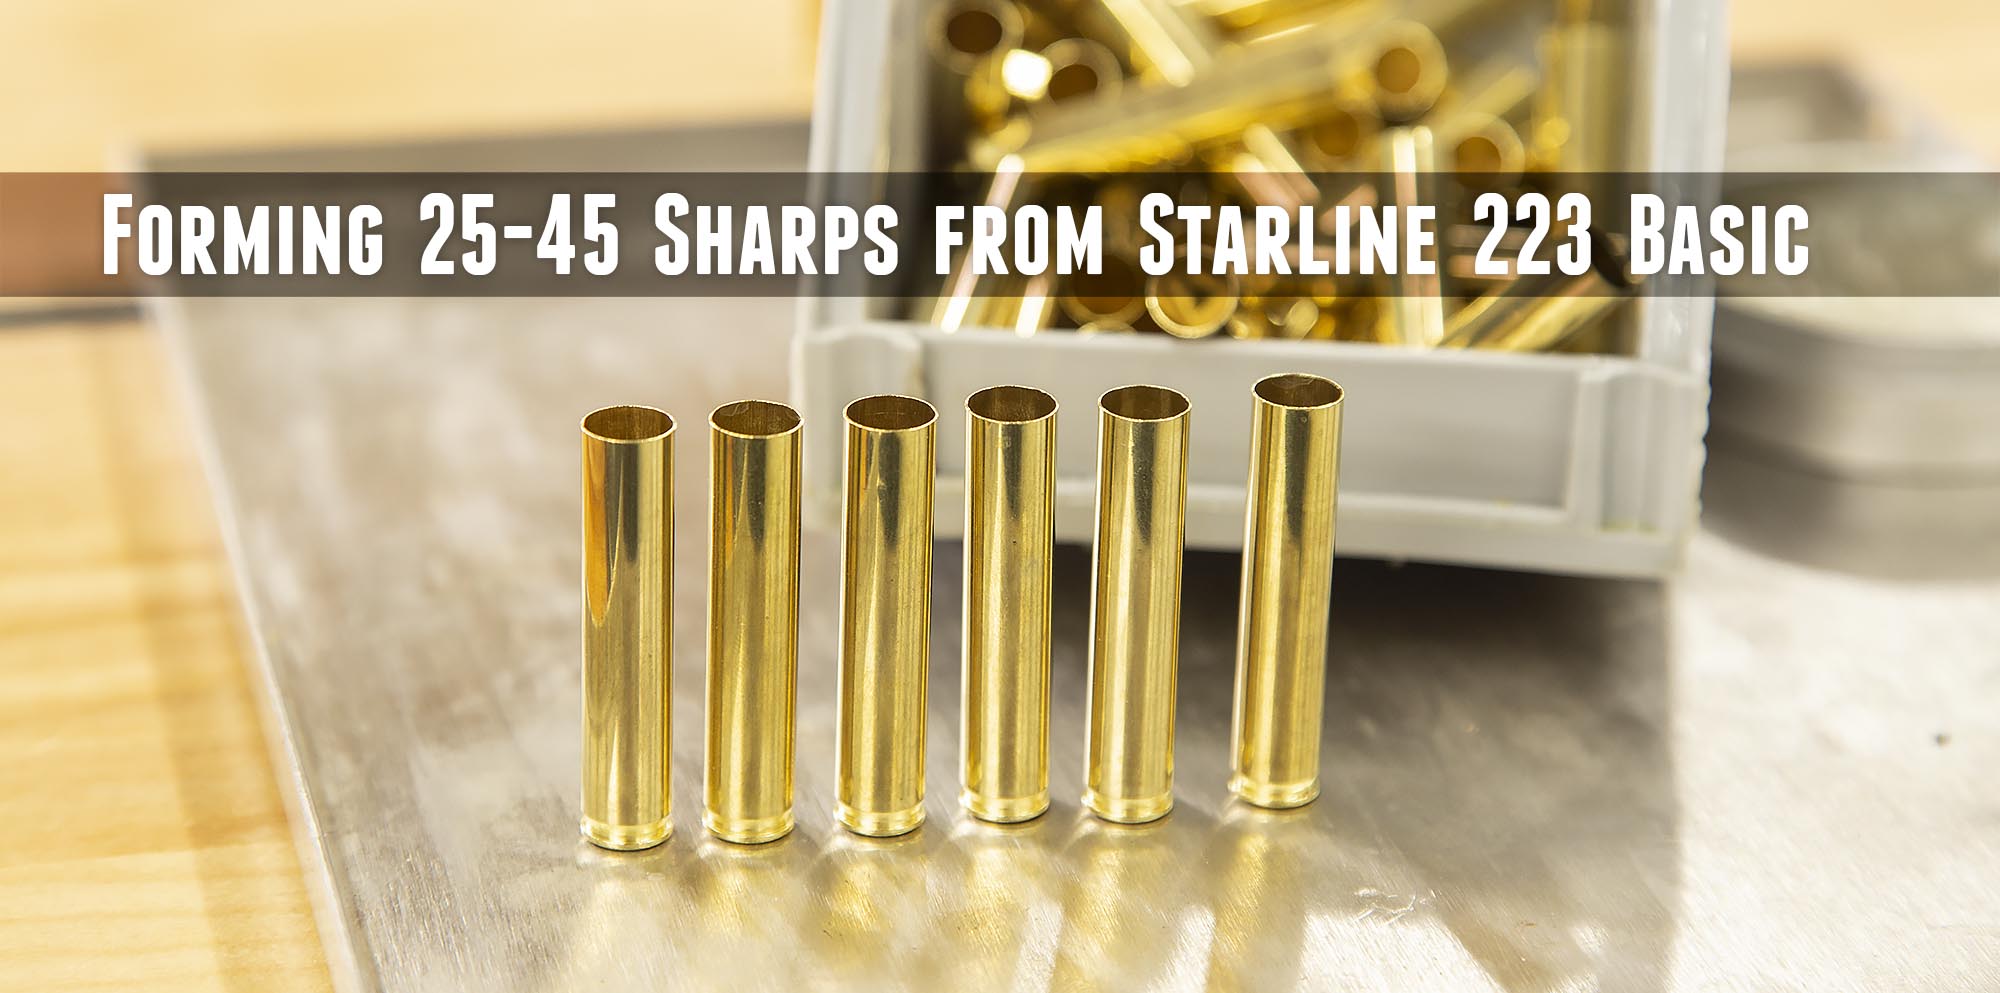
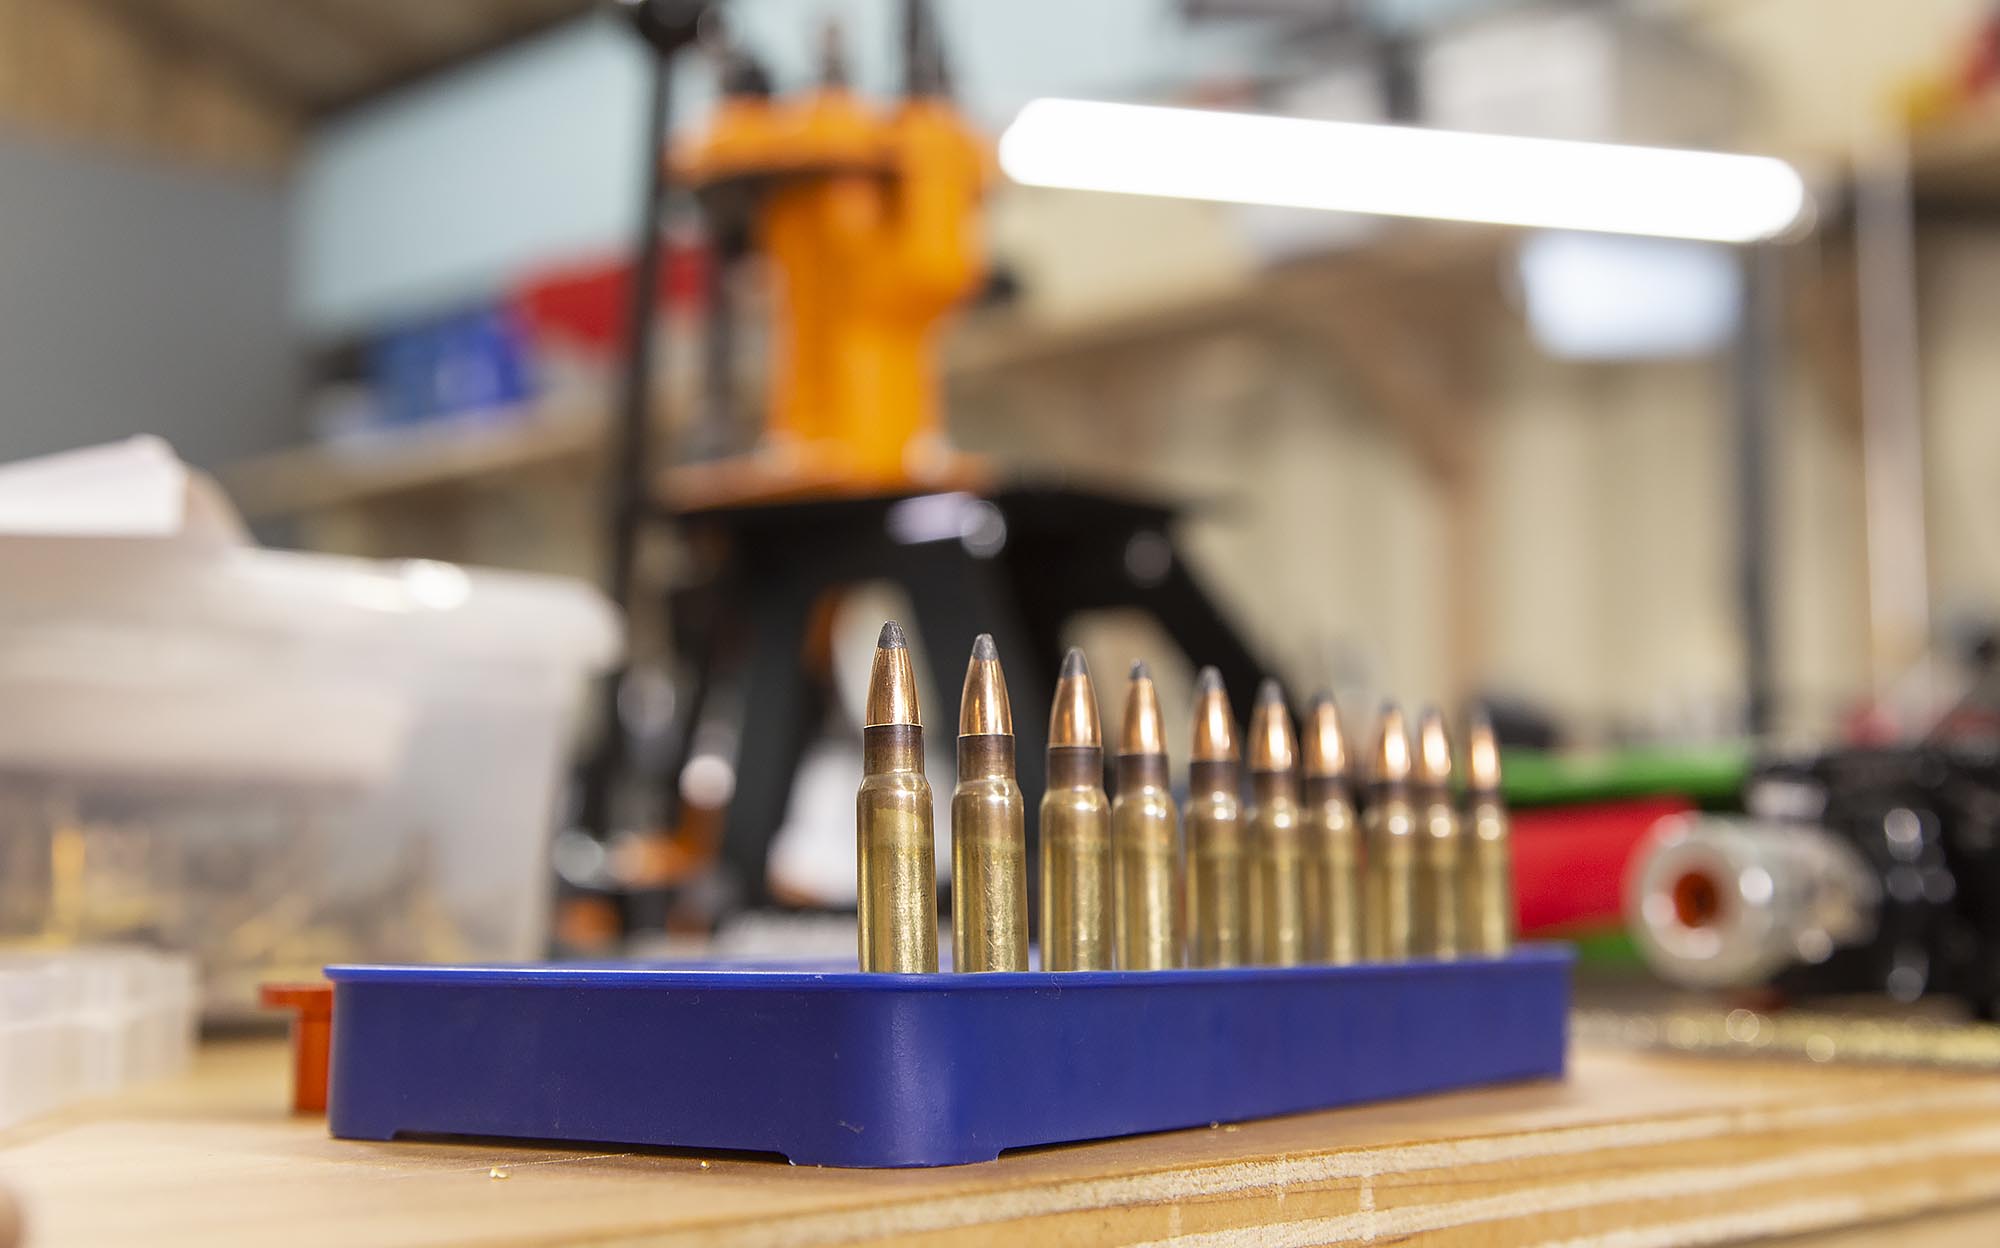
I’ve formed cases by “necking up” and “necking down”, but this is the first time I’ve formed cases from blanks (a straight-wall version of a bottleneck rifle cartridge). I’m talking about my recent interest in forming 25-45 Sharps cases from Starline 223 Basic cases. In the process of working on this project, I learned a lot from the team at Starline about how brass is made! I also learned from the Annealing Made Perfect team about considerations for “extreme forming” (more than just simple necking) for brass cases. It took a while to work through all of the issues realed to forming 25-45 Sharps from 223 Basic cases, but it turned out to be a lot of fun.
Starline 223 Basic Cases
Starline produces cases called 223 Basic that are intended for wildcatters, and those who want to form cases with a 223 case rim into whatever they want. From Starline’s 223 Basic product page:
This brass is the same as our standard .223 Remington brass except that it has not been formed and has no caliber designation on the headstamp. It should work perfectly for most .223 Remington based wildcats. This brass has not been annealed, and will require a body anneal prior to forming, and possibly a neck anneal after forming, depending on how far it is necked down. Wall thickness at the mouth of this brass is approximately .009″, which is the same as our .223 brass prior to forming (the walls will get thicker when formed down, and the case will also get longer). Length is approximately 1.800″
*Since this is a basic case, and Starline has no control over how it is formed, we accept no liability and offer no warranty in its use or your inability to properly form cases. Since this case has not been formed there may be more out-of-round mouths than normal.
Calibers that this could possibly be formed into: 6mm TCU, 6.5 TCU, 7mm TCU, 6x45mm, .25-45 Sharps, 6mm Mongoose, 7.62x40WT, 7Raptor, .357 MAX AR, etc.
Just what I needed for my 25-45 Sharps forming project!
Note: by continuing to read this article, you agree to the Ultimate Reloader disclaimer. Ultimate Reloader, LLC is not responsible for any errors or misuse of the information shared in this article.
25-45 Sharps Forming Process
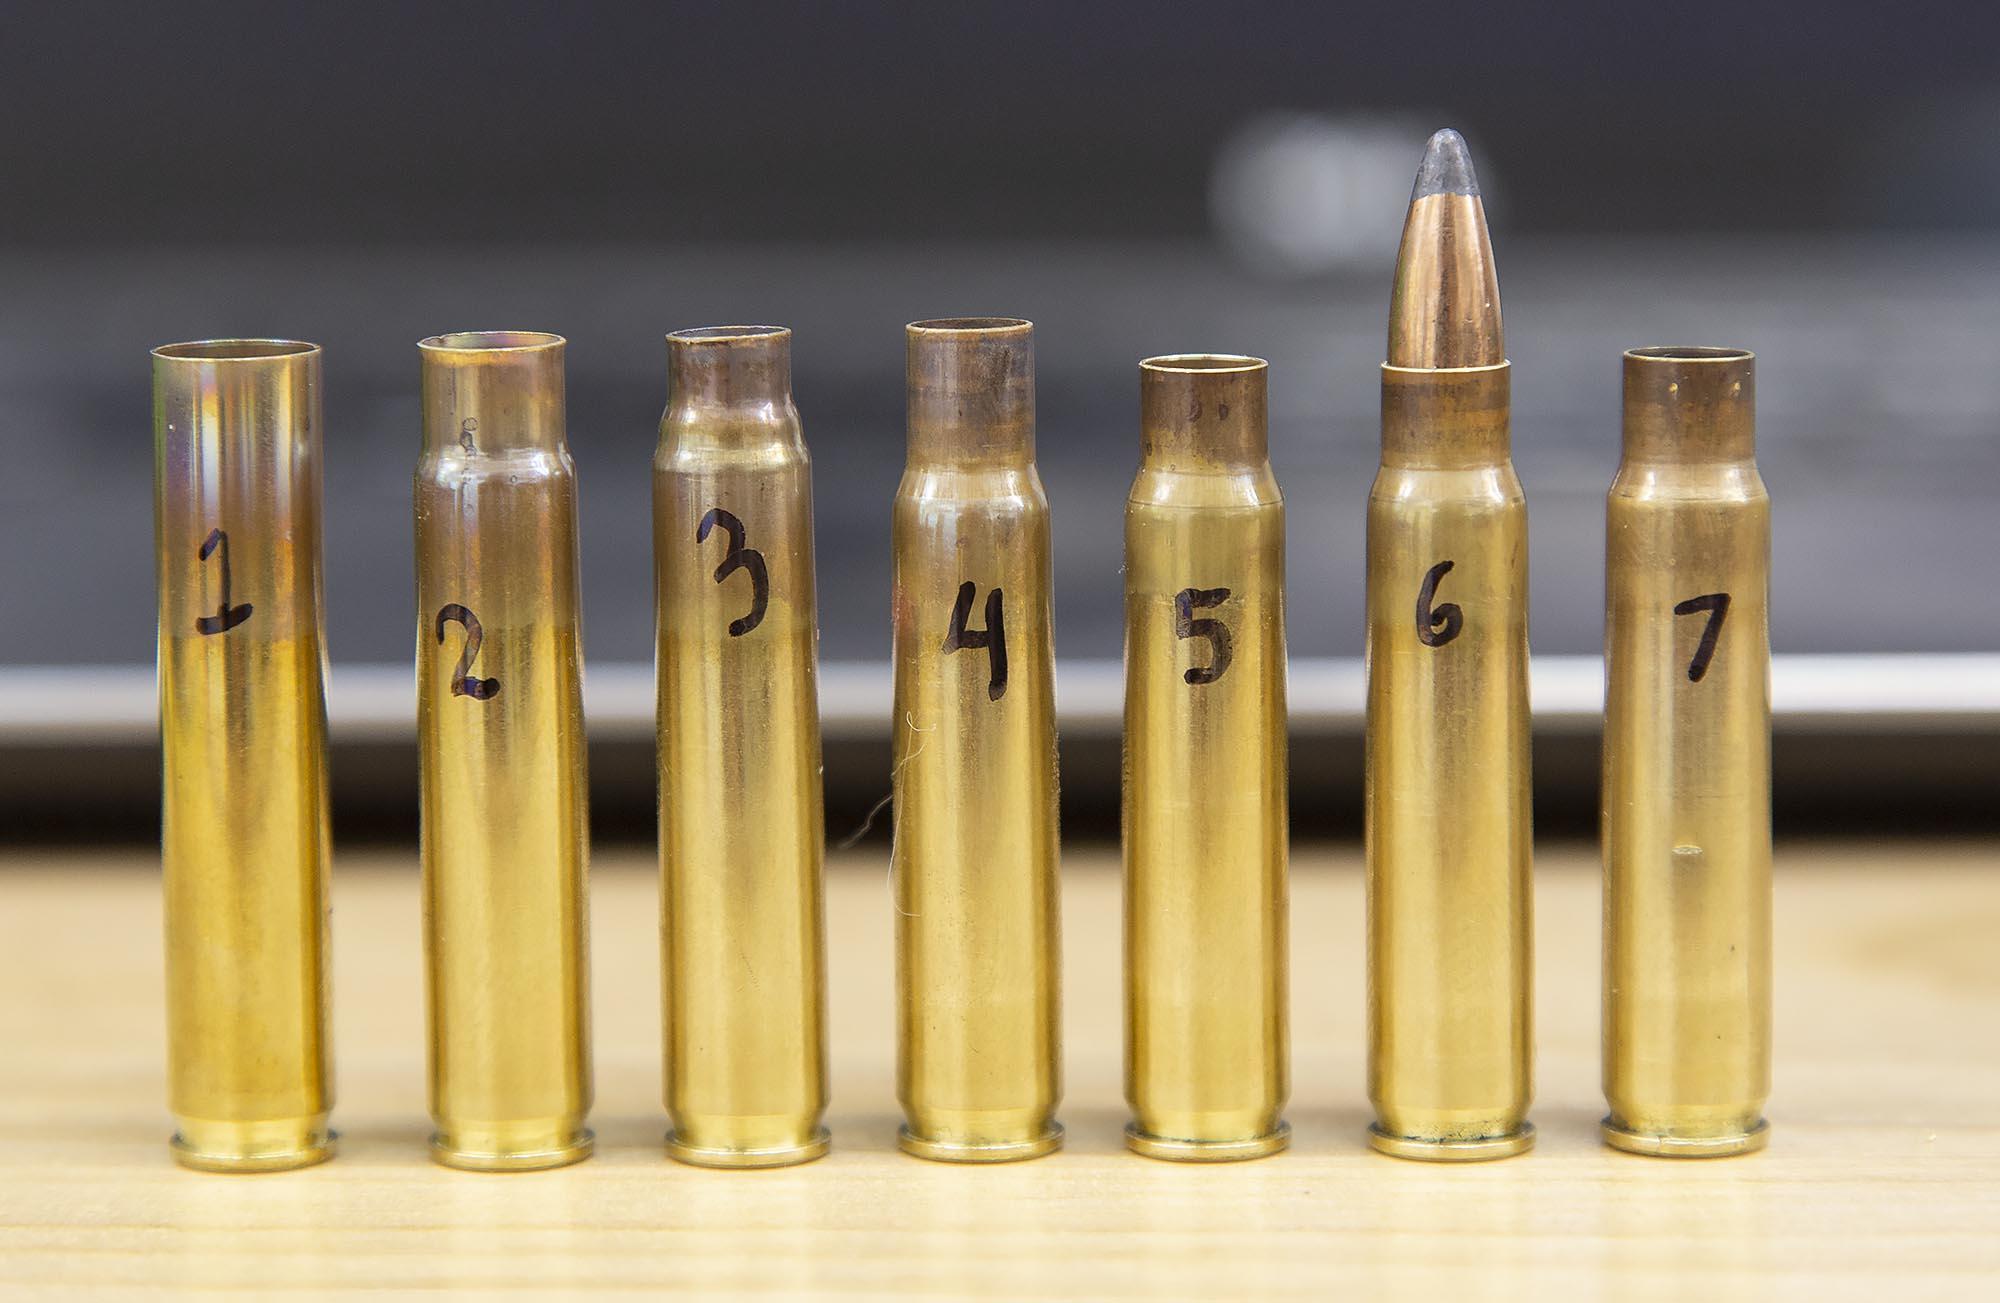
The picture above shows my process for forming 25-45 Sharps step-by-step. Please note that not all of these steps are absolutely necessary- I’ll be continuing to refine my process (more on that later in this article).
Step 1: Anneal the 223 Basic Case
Before you form 223 Basic cases, a body anneal is required. This will soften the brass and enable it to form without cracking. For any of my annealing, I use the Annealing Made Perfect (AMP) Mark II computer-controlled induction annealer. See my full story HERE for more background information and context on the AMP Mark II.
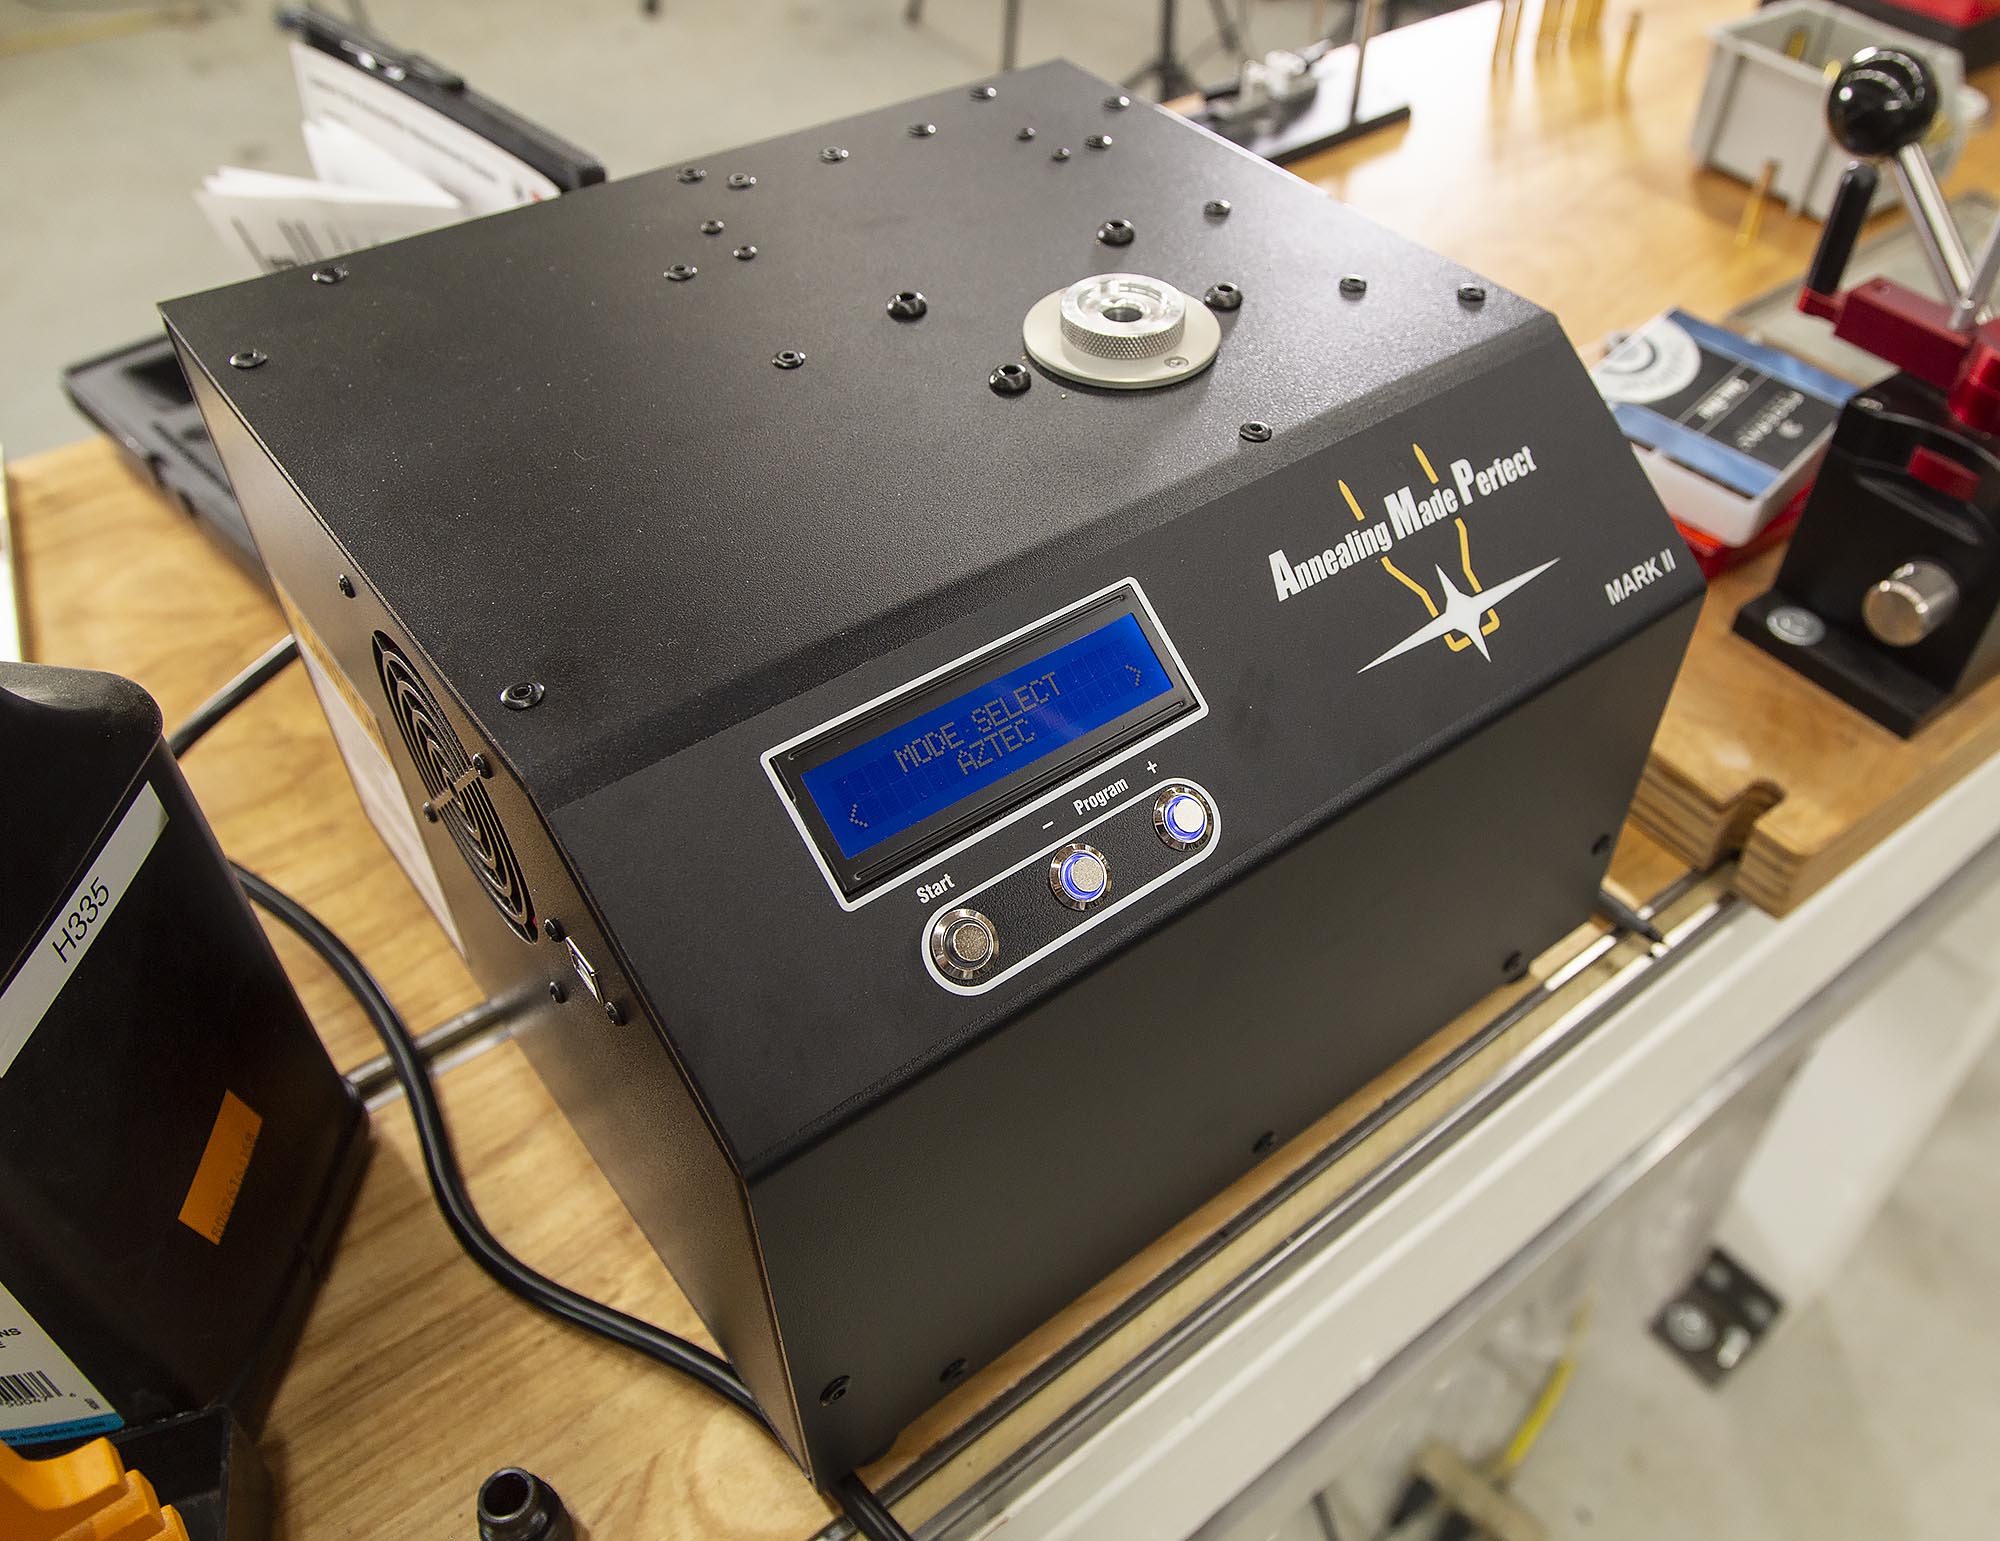
In order to determine the optimal annealing code (setting for heat) I analyzed a 223 Basic case- this is a test routine that brings the case to its melting point to determine its heating properties. The code produced had a value of 115. With input from the AMP team, I increased this to a value of 120 in order to “over-anneal” slightly. This brings more heat into the body of the case: important in order to soften the body of the case adequately for forming.
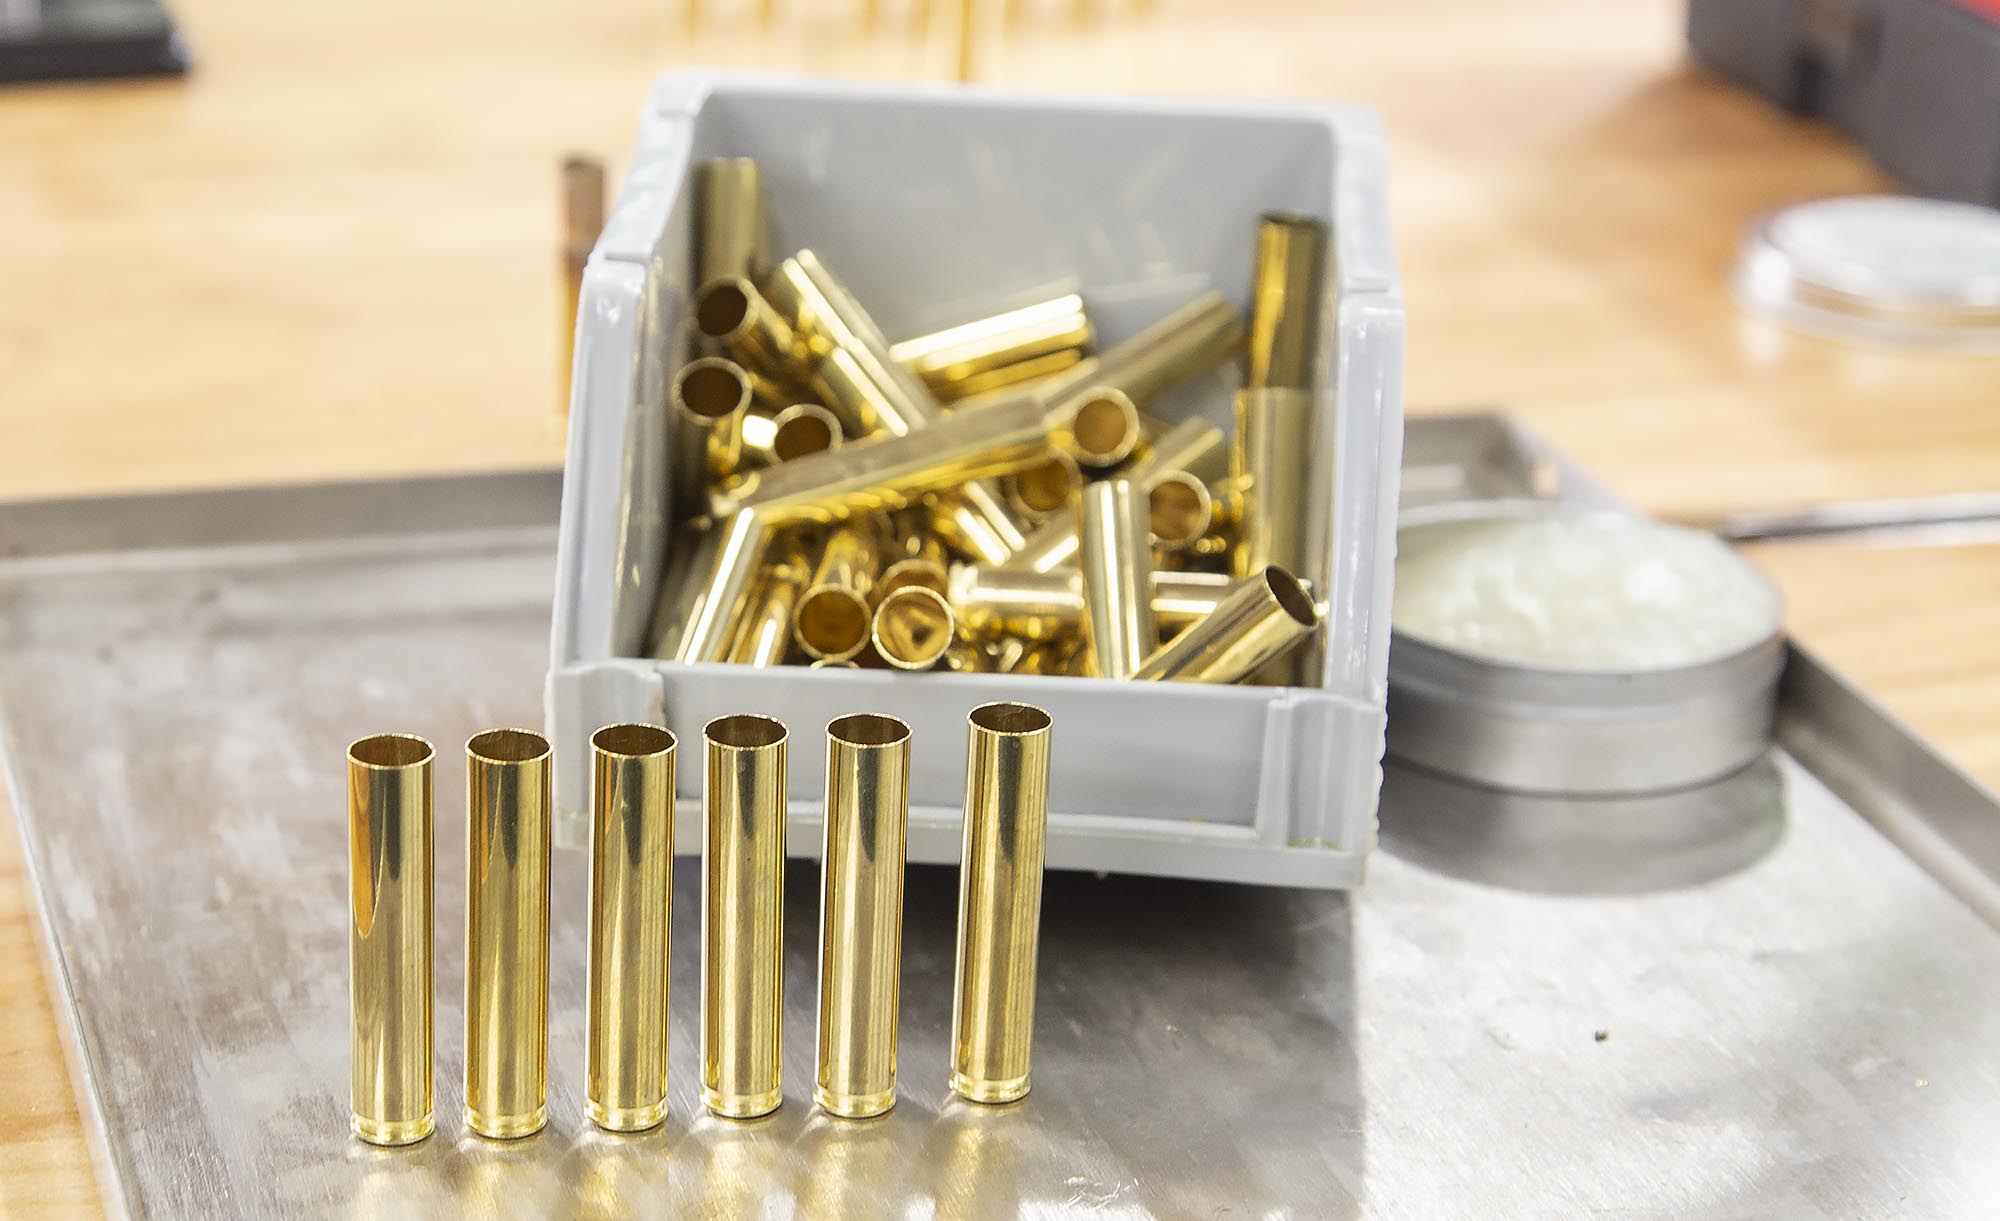
Here’s what the 223 Basic cases look like when body annealed:

Step 2: 300 BLK Die Forming
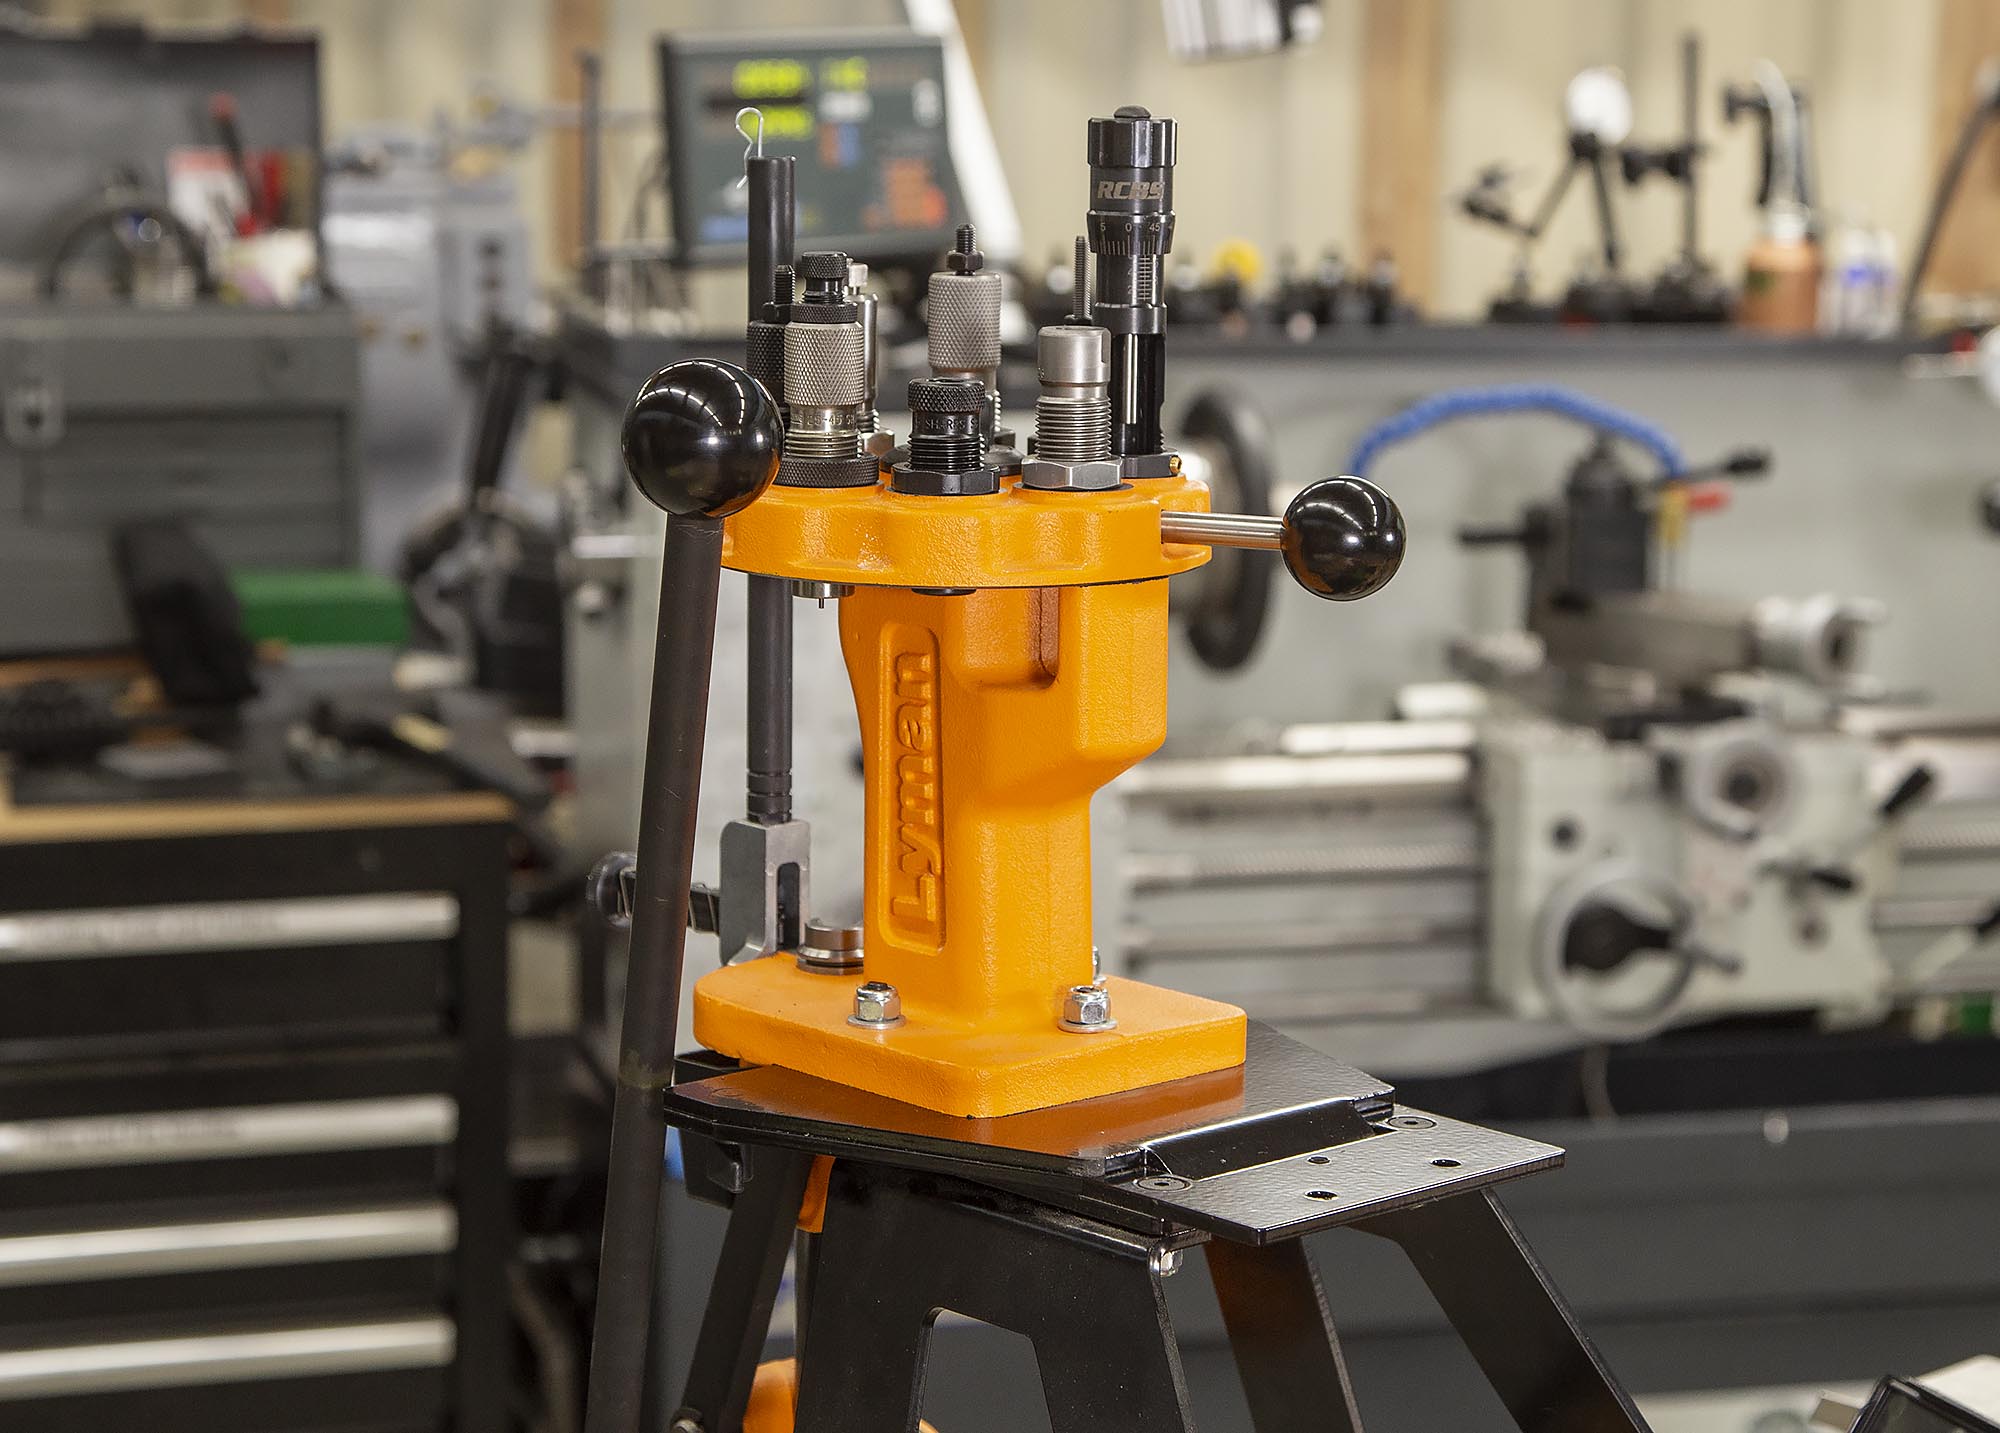
The second step is to perform a first-pass forming to a 30-cal neck profile using a 300 AAC Blackout die backed out from its “touching shellholder” depth. For all of the forming and loading operations related to this project, I used the Lyman Brass Smith All-American 8 turret press, which is a great option for case forming:
Since the cases have been annealed, the forming process is quite smooth. I used a LEE 300 Blackout sizing die for this forming operation with the decapping rod and expander ball removed. Here’s what the cases look like after this forming operation:
Step 3: 25-45 Sharps Forming, Pass 1
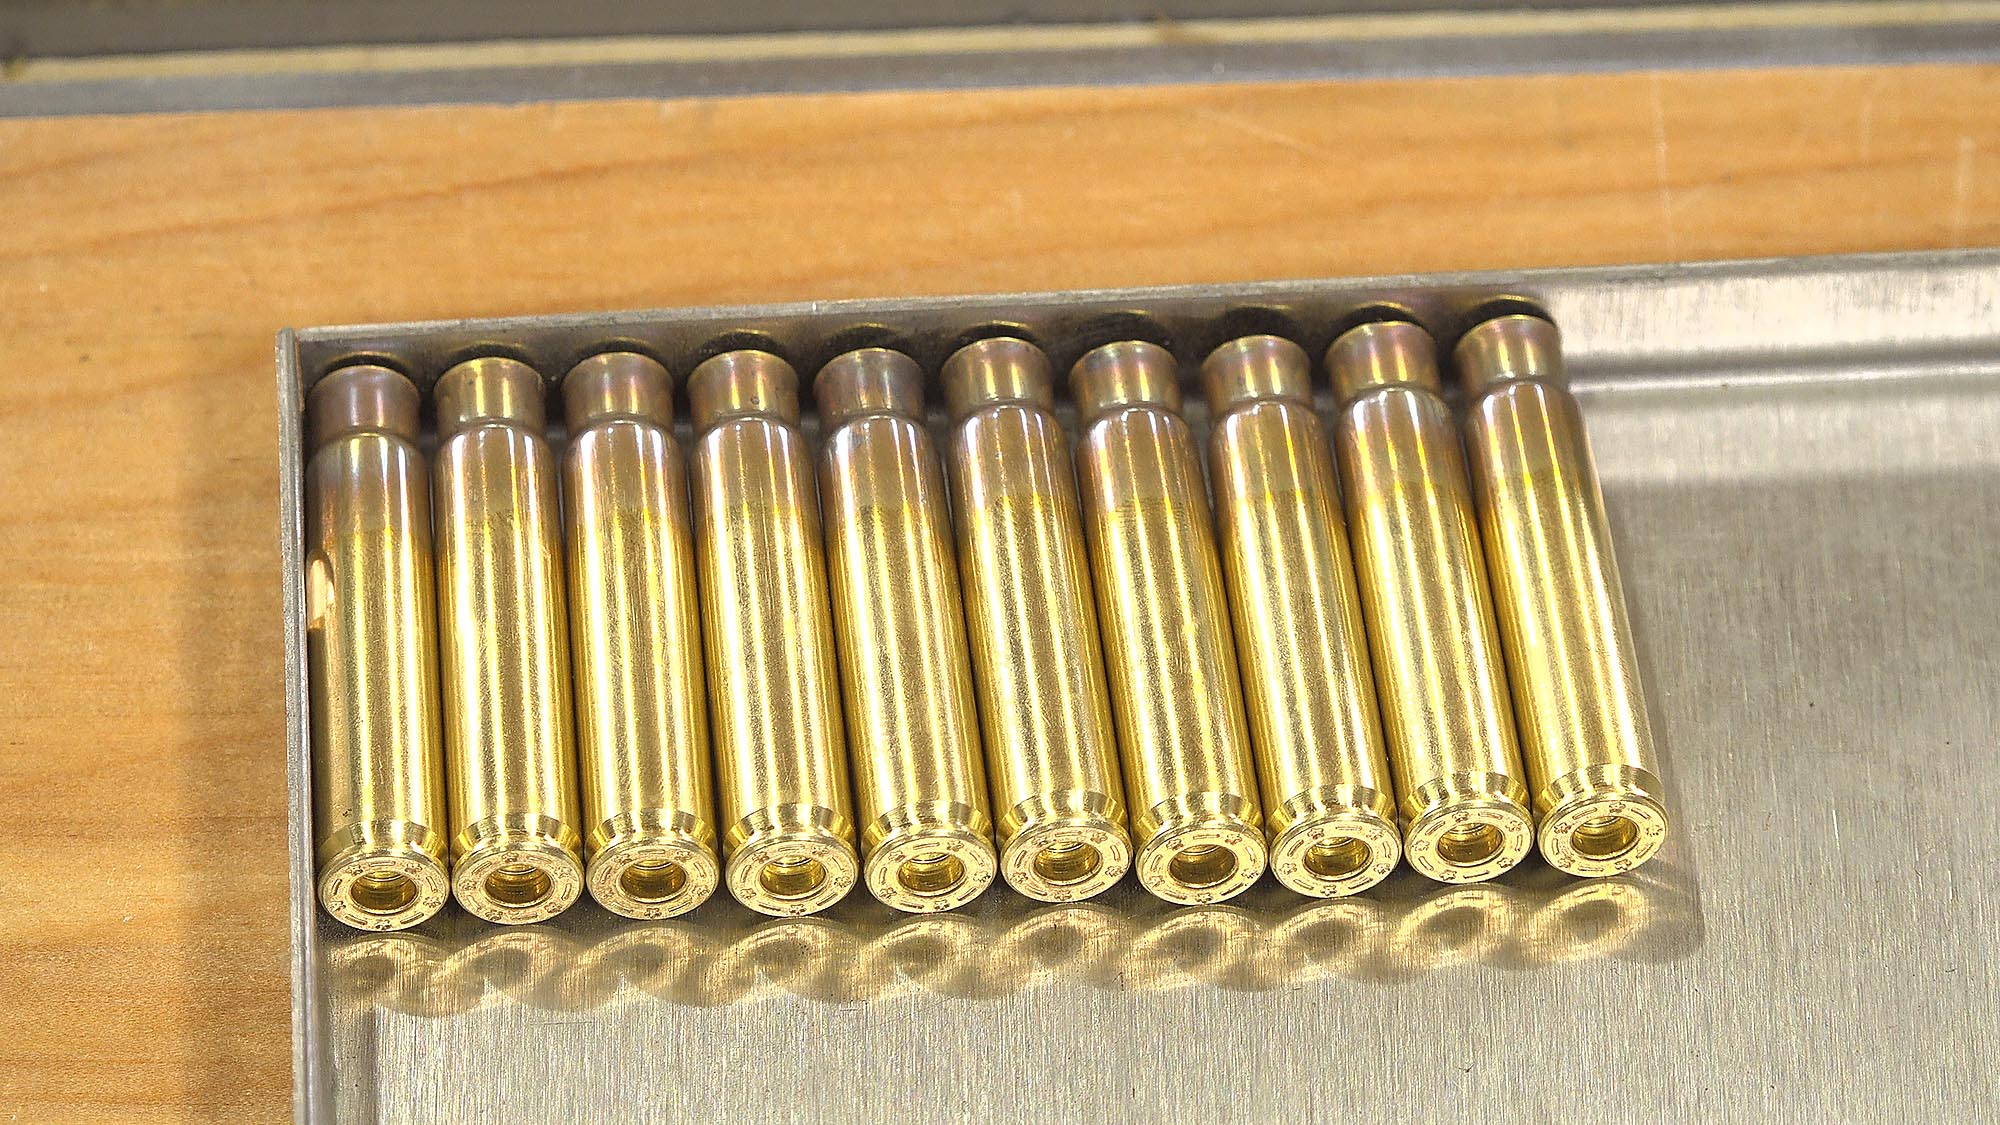
I decided to form from the 30-cal neck down to 25-45 Sharps profile in two stages. After the 300 Blackout forming pass, I annealed the cases again with the same setting of 120 on the AMP Mark II. Then, a 25-45 Sharps sizing die was used (backed out from the shellholder) to perform the first pass of 25-45 Sharps forming. Here’s what the cases look like after this first pass. Note the “double case shoulder”:

Step 4: 25-45 Sharps Forming, Pass 2
At this point, I adjusted to the AMP Mark II increasing the annealing code from 120 to 126. This was based on an “Analyze” pass done on one of these “first 25-45 Sharps formed” cases. I then passed the cases through a 25-45 Sharps sizer die adjusted to touch the shellholder. This results in a 25-45 Sharps formed case that will chamber in a 25-45 Sharps rifle once we trim it. Here are the cases after “final forming”:
Step 5: Trimming and Chamfering
At this point, the cases are long- and need to be trimmed. I knew just what tool I’d use for this job: the Lyman Case Trim Express!
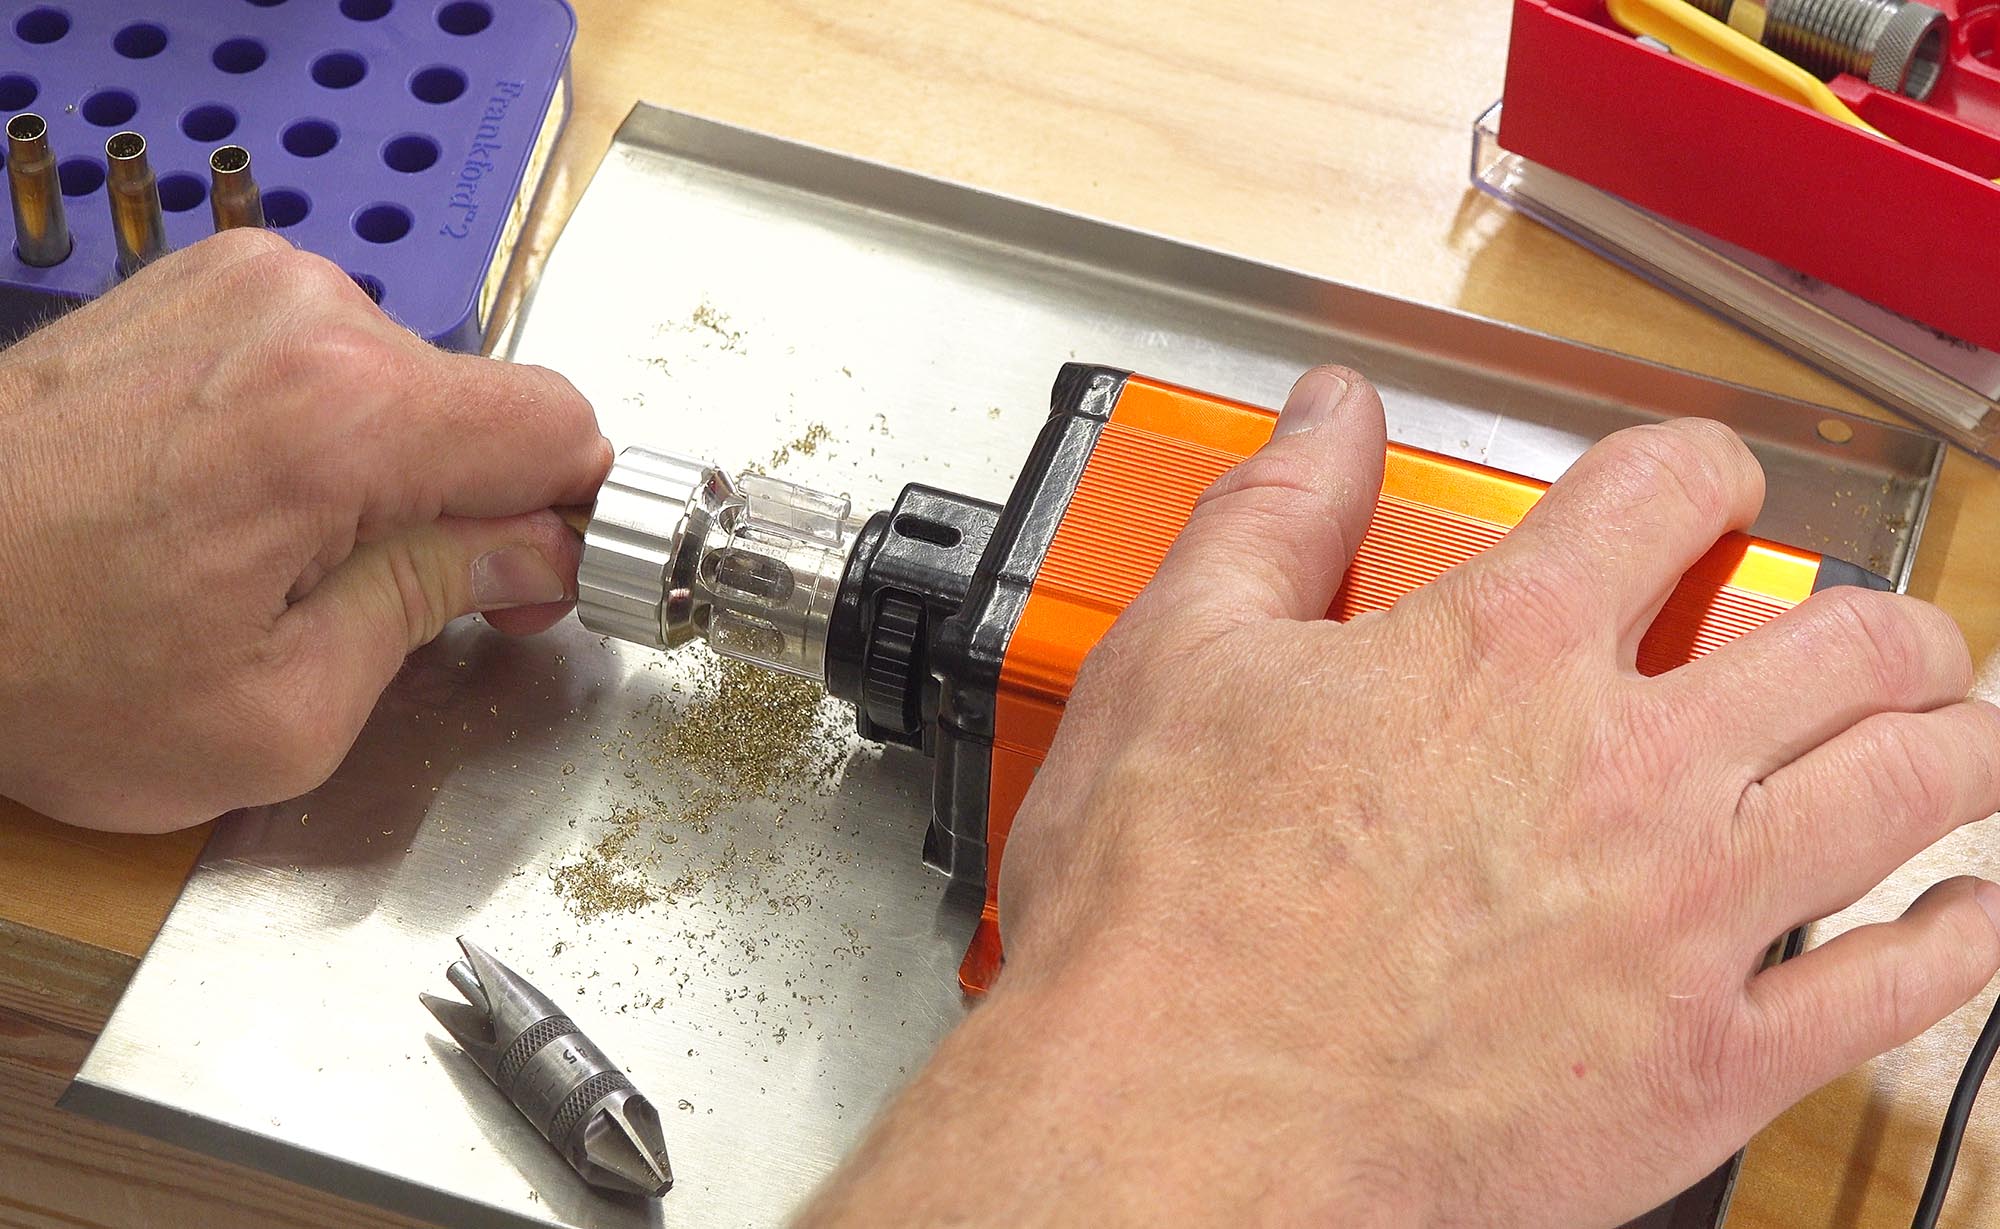
Using a #4 bushing, this case trimmer worked great when cranked up to maximum speed. I trimmed to 0.010″ under the case length spec, and followed that up with a quick chamfer of the insides and outsides of the case mouths.
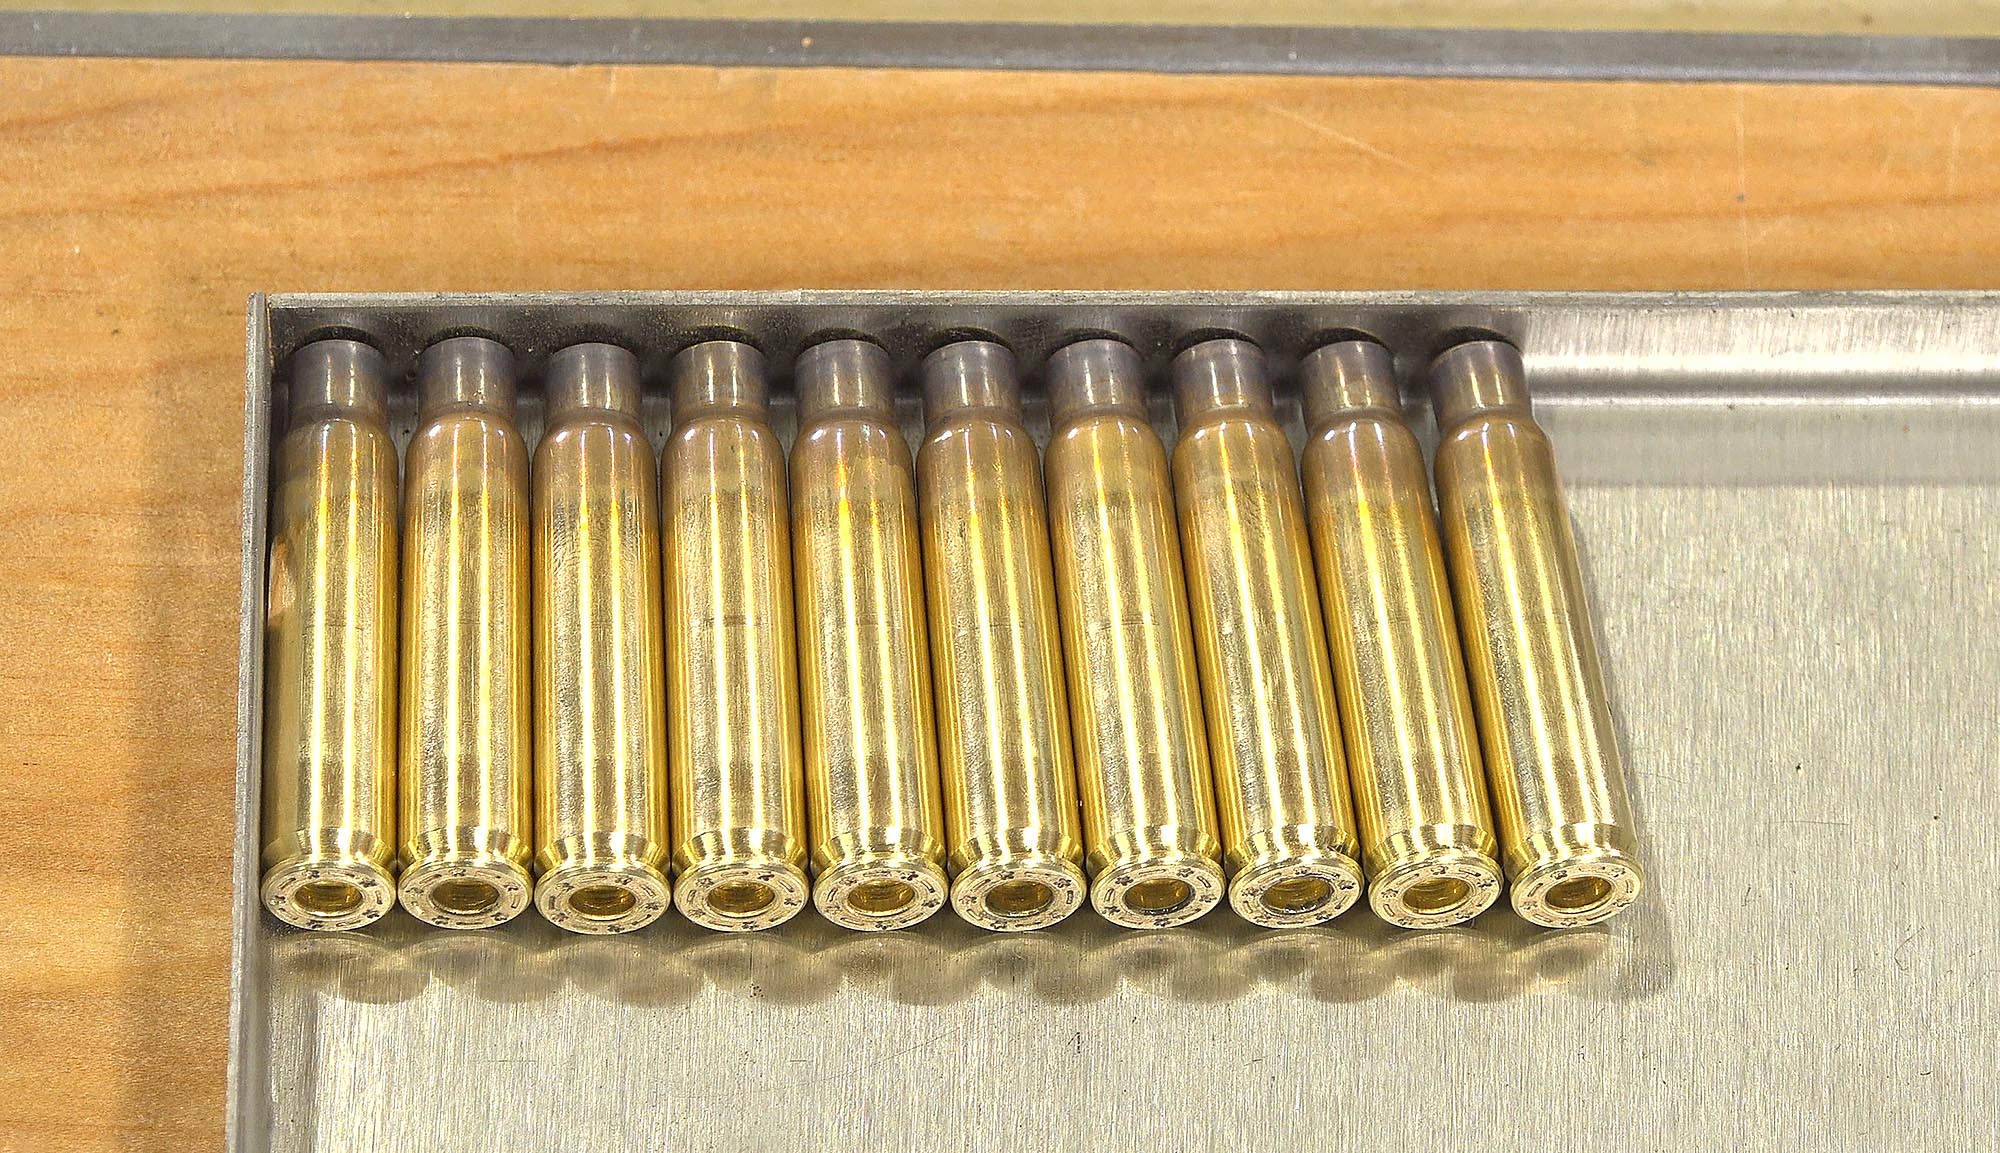
Step 6: Loading 25-45 Sharps for Fire Forming
I once again annealed the cases in preparation for loading, again using the 126 code value with the AMP Mark II. For priming, I decided to use the Primal Rights Competition Primer Seater– I already had it loaded with Federal 205 primers, and I love to use this tool whenever I can.

After priming, I threw powder charges with the Lyman Brass Smith Powder Measure, and then seated bullets on the Lyman Brass Smith All American 8 Turret Press.
Here’s the load that I used:
- 25-45 Sharps cases formed from Starline 223 Basic cases
- Speer 87 Grain Hot-Cor 25 caliber bullets (#1241)
- Federal Small Rifle Primers (No. 205)
- Hodgdon H335 spherical powder – 28.0 grains
- 2.240″ COL
This data was taken directly from the Sharps Rifle Company 25-45 Sharps Load Data Sheet (PDF).
Use load data at your own risk. Ultimate Reloader is not responsible for errors in load data on this website. Always cross-reference load data with manufacturer’s published data.
Here’s the cartridges reading for fire forming:
Step 7: Fire Forming

For this case forming scenario, fire forming is an important step. I measured case neck runout before and after fire forming, and found a big improvement after fire forming. The case profile is also expanded to the chamber you’ll be shooting the rounds in (an important consideration for bolt-action precision shooting scenarios). After fire forming, you’re ready for “prime time”, which could be match ammo, plinking ammo, hunting ammo, what ever you plan to load with your formed cases!
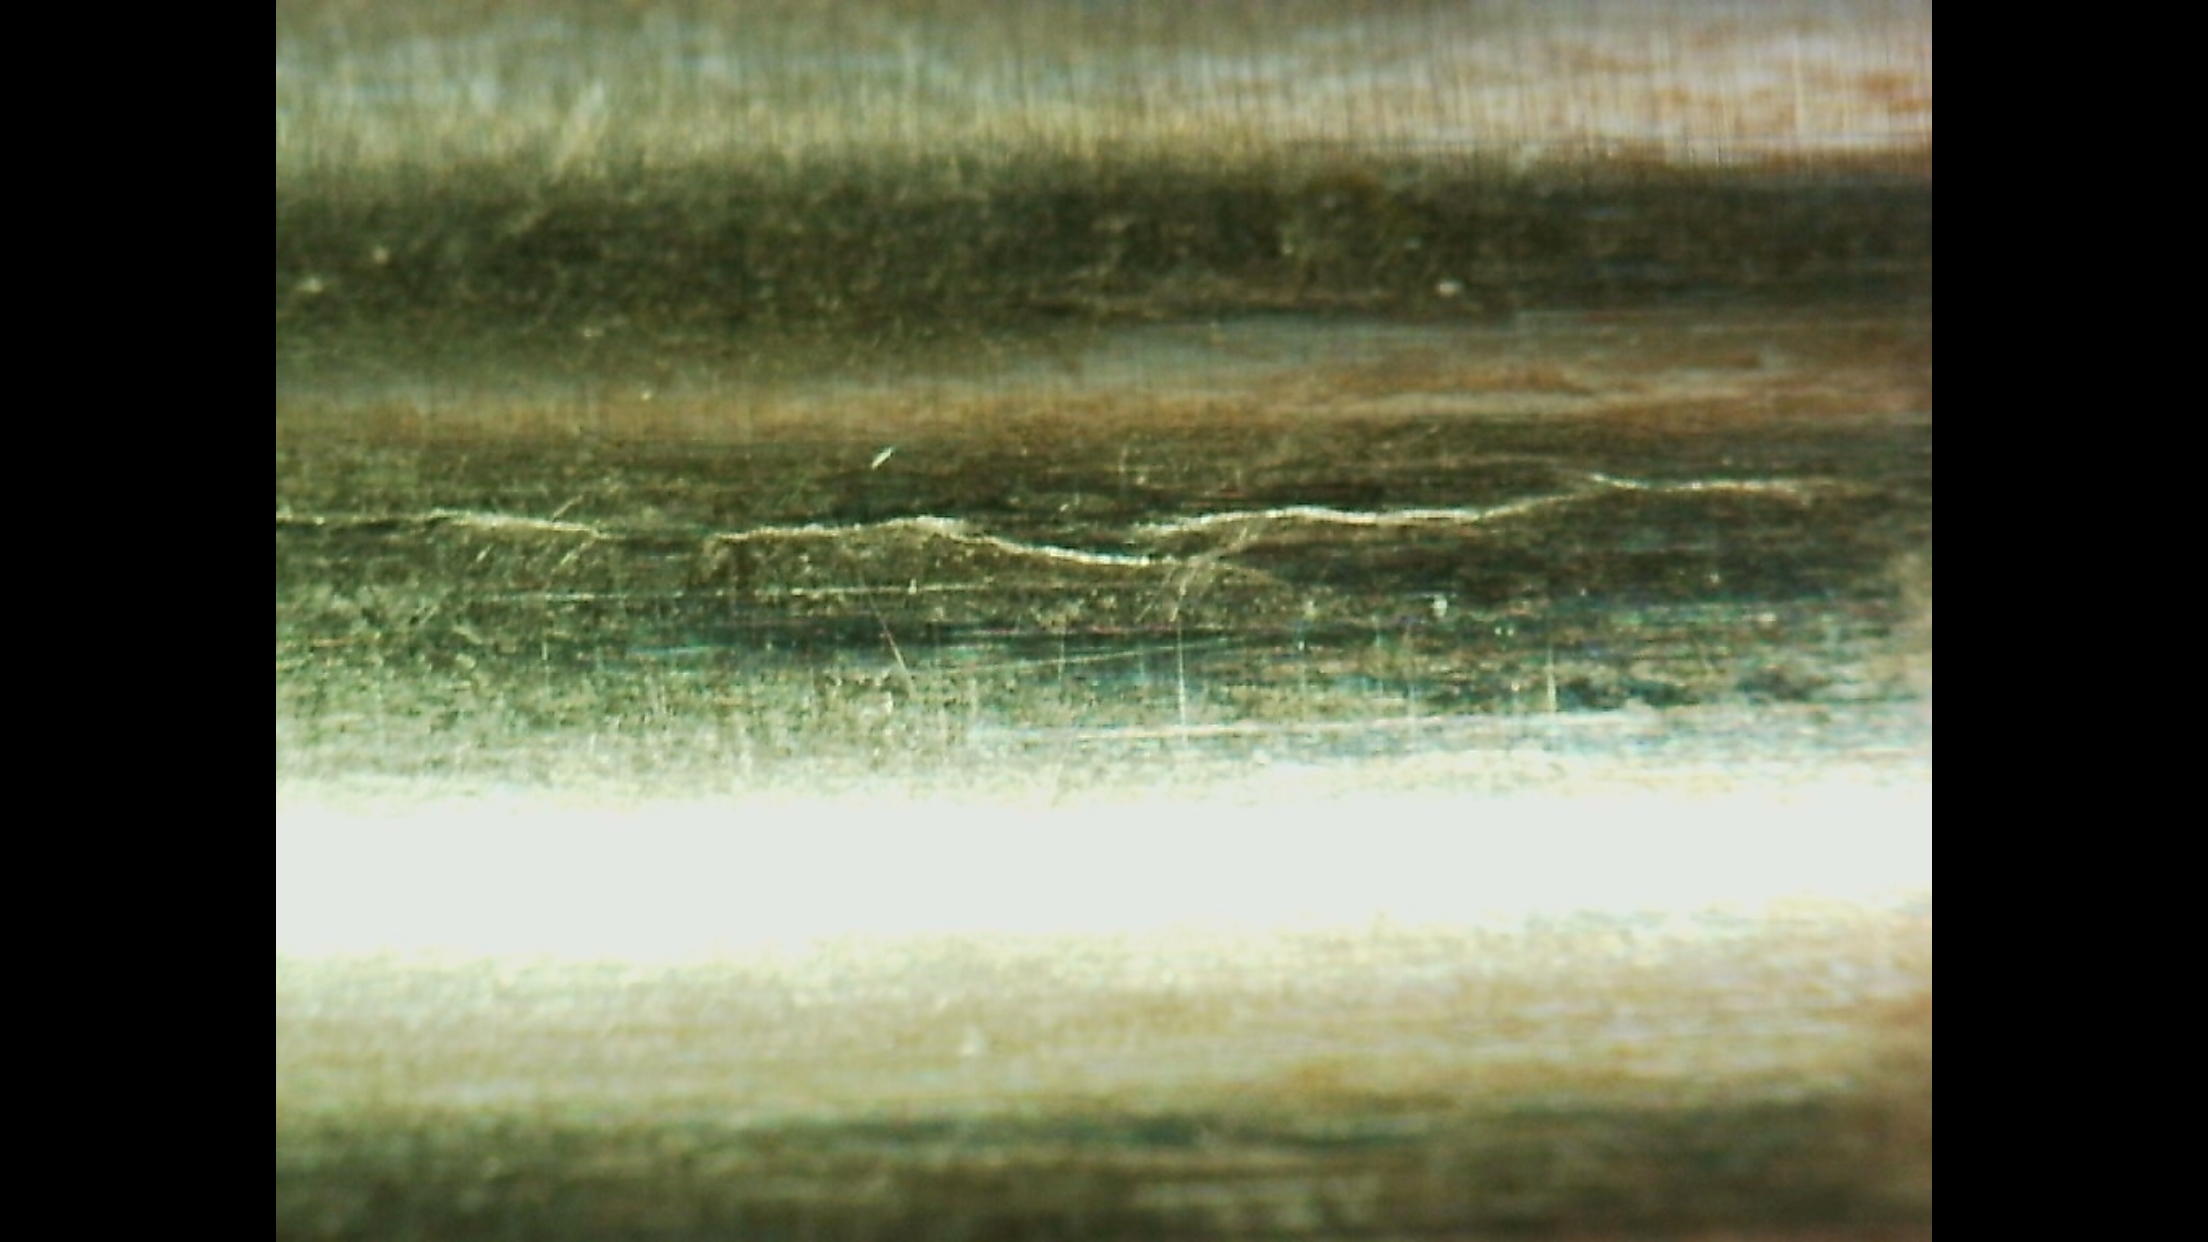
Alternative Processes and Improvements
I was pretty “conservative” with this entire forming process. Annealing and forming perhaps more times than was necessary because I wanted to avoid brittle fragile brass as a result of my work. I did try some alternative workflows and approaches, without much luck. One such simplification was to body anneal and attempt forming to 25-45 Sharps in one pass. The resultant case looked OK to the human eye, but under the microscope I found what looked like small cracks on the surface of the case:
I also wonder if I could skip Step 2, the first 25-45 Sharps forming pass. Only more experimentation and trials will tell if I can skip any of these steps or make the process quicker and easier. The process isn’t about speed when you get into these specialty scenarios, it’s really about pride in your work, and craftsmanship. If you can achieve great work more quickly, that’s great. If not, you learn to enjoy the process.
That’s it! These formed cases have been performing well so far. Do you use Starline’s 223 Basic cases for your own forming projects? I’d love to hear what you are forming, and any details you want to share about the process!
If you are interested in the AMP Mark II annealing machine, you can get more details HERE.
Don’t miss out on Ultimate Reloader updates, make sure you’re subscribed!
Thanks,
Gavin


Interesting video. At first I thought you were ‘over’ annealing, until i saw the section about small surface cracks. After making the brass for you rifle, you want it to last as long as possible. I’ve got a batch of 223 Basic which I’m going to use for a 357AR that I’ve built. The process is slow due to things like work and honey do lists. I’ve been looking at annealing solutions, but the costs seems to range from inexpensive to outrageous, with processes from liquid salts to induction. This field of reloading may be another field of videos and comments like you did with the Lee, RCBS, Hornady & Dillon videos.
Yeah, that’s how long I’ve been following you.
That seems like a whole lot of work. You guys are pretty devout loaders. Heck I’d just clean the firearm and admire it in my gun case like I have with grandpa’s Mannlicher- lol. I kind of admire folks that put that type of effort into their equipment. Not my cup of tea- but highly commendable. Hey Gavin I don’t use Facebook because of their privacy invasions and political censorship. I can’t find another way to email photos to you.
I do 6 case conversions.
5.56 to 7.62×25 Tokarev
5.56 to .222 Remington
7.62 Nato to 7mm08 Remington
.303 British to 6.5x53R Dutch
.270 Win. to 6.5×55 Swede
.30-06 Sprg. to 8mm Mauser
I don’t have the budget for the tooling/equipment you have. I anneal with a socket and a drill motor. In 3 of these conversions I make use of a file/trim die. I enjoyed the video and appreciate the level of precision you seem to bring to everything you do. Oh, 1 more thing – I wish you’d start casting your own bullets.
Thanks, Mike.