If you are serious about reloading ammunition, you need a good chronograph. Without one, you won’t be able to measure the consistency and performance of your loads. Furthermore, with a chronograph you can evaluate loads and load data for each particular firearm in your collection. Want to know if you’ve achieved 4000+ fps with that 22-250 rifle? No problem! Want to keep your loads in the high-but-subsonic range for that suppressed rifle? No problem!
I recently got a CED M2 Chronograph from Competitive Edge Dynamics, and will be using it for a variety of articles here on Ultimate Reloader. We’ll start in this article with an overview of the features of the system, talk through setup, and demonstrate shooting with rifle and pistol. In future articles, we’ll dig into cartridge-specifics, check out accessories for the CED M2, and link the CED M2 to a PC in order to transfer data. It’s going to be fun!
Overview of the CED M2 Kit
For about $200. you can get a complete CED M2 chronograph kit. This kit comes with everything you need to get started chrono’ing your loads *and* to connect the CED M2 to your PC (including the USB cable!). Let’s take a look at box contents:
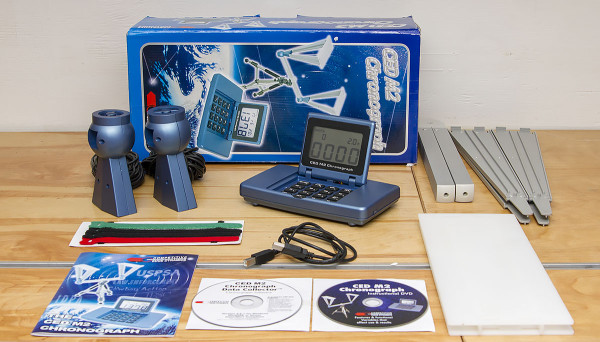
In the box you’ll find, starting with the back row in the above picture, left to right:
- Sensors
- Main unit (brain with display and keypad)
- Mounting bar/base
- Sun screen support arms (4)
And in the foreground, left to right:
- Owner’s manual
- Cord retainers
- Software CD
- USB cable
- User’s guide DVD
- Sun screens (2)
After unpacking the unit, I watched the entire DVD to get acquainted with the CED M2 chronograph system. This is definitely a good place to start as you’ll learn how to setup the unit, how the unit works, how to attain optimal results, and see the unit in action. This unit is a *BIG STEP UP* from the chronograph that I had previously purchased. The display is massive, and gives you a lot of information while shooting at the range.
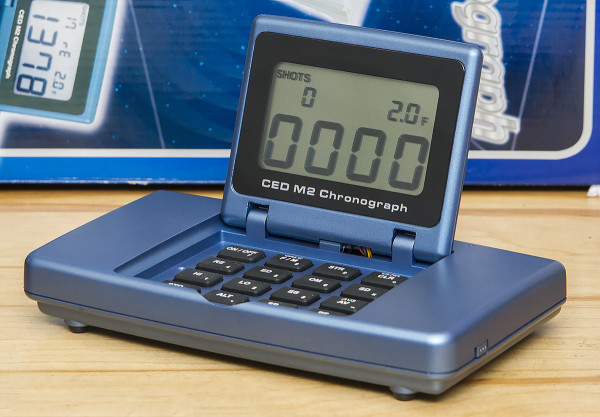
The large keypad supports many functions (many of the keys have two functions based on “shifted state”). You can easily store and delete/edit strings, calculate power factor, view average string velocity, and use the unit as a calculator to name a few functions. The unit is powered by a single 9V battery which is simple to install.
When I first setup the chronograph, I was surprised at how simple and quick the process was. There are no rods to deal wtih (bonus!), and the entire setup was designed with simplicity and portability in mind. It’s no wonder that this is the chronograph of choice for many competitive shooting organizations.
Here’s the steps required to setup the unit:
- Unfold the bar/base and attach to tripod or other mount (1/4″ x 20 TPI hole in base fits standard camera tripods)
- Slide on each sensor and tighten knob to secure onto bar/base
- Assemble sun screens and supports, slide into sensor slots
- Plug sensor cables (start and stop) into main unit
The entire process takes about 2 minutes at a casual pace. In the video below I’ll show the process, and shoot some 44 special, 44 Magnum, 45 ACP, and 5.56 NATO rounds:
All in all I’m very impressed with the CED M2 so far. Stick around because we’re just getting started with chronograph content!
Have chronograph experiences/thoughts you’d like to share? Please leave a comment!
Thanks,
Gavin


Just be sure you do not shoot your chrono….sounds crazy that anyone would but I’ve came close (Blew one of the support legs form the sunshade in two close to the instrument)….I know people that did shoot the chrono…expensive lesson to learn I’d say.
Just be careful and don’t get into the trigger until you’re set to fire….just some advice.
How well does this model work indoors? Most of my shooing is done at an indoor range and I have found most chrono’s need more light in order to work properly. Your results, thoughts?
They are pretty much useless indoors under fluorescent lighting or outdoors in most lighting, you will just get error after error.
Lash out and fit the additional Infra Red then it will work tested under fluorescent, changing daylight dull to full on sun and pitch black.
What s the point in an inaccurate chrono.
One more item to add to my wish list. Don’t need it now, but I know I will in the future when I have to verify load data. Then I’ll get to mess with SD and all of the other statistics. Looking forward to follow-on videos!
The Caldwell Chronograph is another option with the added ability to store data on your iPhone or iPad.
What I especially like is the ability to email my test data. I can then import it into my spreadsheet where I keep a long term record for comparison.