I’ve been working with RCBS on some issues related to the priming system on the RCBS Pro Chucker (5 and 7) for a while now addressing issues where the primer slider can break. Today, I’m happy to announce that RCBS has replacement primer sliders available for all Pro Chucker owners that will address these issues!
Here’s the full story with a description of the issue, how to fix your primer slider, and how to avoid priming system issues on the RCBS Pro Chucker presses:
As mentioned in the video, RCBS has made two updates to the primer sliders- here’s a side by side view of the old style (original) on the left, next to the updated style on the right:
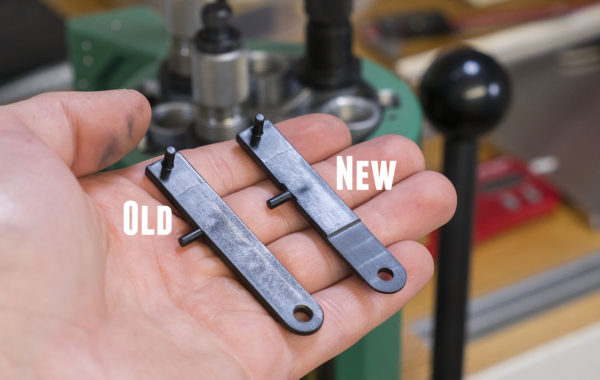
There are two key changes to note here:
- The area where the “post” joins up with the main body of the slider has been strengthened significantly (via stress reduction cutouts)
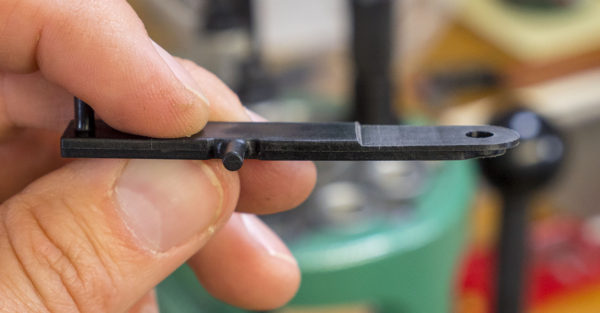
- The area of the primer slider where the hole is located is “stepped down” to avoid primers getting bound when dispensing a primer from the primer drop tube
Here’s a closeup showing the “step down” feature on the updated primer sliders (this is a prototype, shipping units will have a different texture on the step down):
If you need to replace your primer slider, you can do so without unloading reloading stations or emptying the primer drop tube. Here’s the process I show in the video above:
- Remove the primer slider return spring
- Remove the rear guard (remove allen screw)
- Remove the primer drop tube assembly (remove allen screw, pivot, catch primers with finger, lift off)
- With the ram raised slightly (moves primer punch out of the way) remove primer slider
- With the ram raised slightly, slide new slider into place
- Replace the primer drop tube assembly
- Replace the rear guard
- Put spring back in position (on primer slider vertical post)
That’s it! It’s a part of the same process you follow when changing the press over from large to small primers and vice versa.If you need to get new primer sliders for your RCBS Pro Chucker 5 or 7 press, all you have to do is email or call!
Here’s the info:
- RCBS Tech Support email (can issue replacement parts): rcbs.tech@vistaoutdoor.com
- RCBS Tech Hotline: 800-379-1732
I hope that’s helpful to all of you Pro Chucker loaders out there! I’ve been using the updated sliders with good success. See you all- I’m back to loading!
-Gavin






















Very informative
Even with these new and improved slides, I have snapped off the tab twice through only about 300 rounds. Really pathetic, in my estimation.
Yikes! That’s not fun 🙁 – have you reached out to RCBS for help? What has happened when you had your snap-ages? I’ll help if I can…
does RCBS sell it separatly ? or I have to wait to have a problem with it, to ask them for it ? Becuse I search it in the web and I didn’t find it. Thanks
Before you use the primer feed , chamfer out the plastic hole for the primer feed bars. Put a good chamfer on both sides of the plastic hole . The hole RCBS has in it is a little to tight causing the primer to hang up during delivery snapping the plastic post off . Useng a case neck chamfer tool works well. . RCBS also has a replacement spring with less tension they will send you…….
The indexer dog gets snapped off easily………..
You will have to reset of corse all your dies if your switching from one type of progressive press to this one. In doing so the spent primer removing pin in you resizing die needs to be adjusted as well . RCBS says in the die instructions to have the pin 3/16 below the bottom of the resizing die. The prochucker 5 requires at least 5/16. Below the die to push the spent primer past the shell plate. This will stop the spent primer from getting wedged in between the shell plate and the press.
It should stop the indexing dog from getting snapped off..I also changed the indexing locking pin to a longer one I made from a rcbs pro 2000 press it has a longer more pointed taper.( RCBS sent me the part so I could modify it) It seems to force the shell plate in place better than the factory one on the press (although I need to try and compare it some more ) My new issue is a lot of high primers (I think the primer pusher has dented the softer aluminum base of the press) I have temporarily put a .005 shim stock there and taped in in place . Seems to have stopped the high primers..
Thanks for detailing the issue with the primer slider. I replaced my RCBS Pro 2000 with a Pro Chucker 7 and am frustrated with the primer sliders breaking @ every 300 rounds of reloading. RCBS Tech Support are very nice, however, it takes at least a week for spare parts to arrive. They need to be more like Lee and have parts for this press readily available for on line ordering. It would also be great if they provided the tips you did!
I am also a bit disappointed with their bullet and case feeder solutions. Either you feed @ 10-15 cases through a single tube or purchase the more expensive motorized feeder similar to what Hornady used with their Ammo Plant. I have adopted the top portion of the Lee case feeder to the RCBS unit and use a Hornady bullet feeder die with a Bully Adapter and Lee bullet feeder multi tube setup. Both work great! Now if the Primer Slider issue gets solved this will be my ultimate reloading press!
To all RCBS Pro Chucker 5/7 owners, would you recommend waiting until a proven fix is available before purchasing a reloader?
Yes Wait, I have found this primer system the most frustrating. I have worked through the other issues but can’t get past this one, I am constantly waiting on replacement bars to reload. In the end i became so frustrated i went back to my Lee 4 hole turret press. The main issue is not being addressed, the week spot on the bar is the plastic tab. this need to be metal so that when you feel it getting hung up you can stop. with the plastic, by the time you feel the issues its snapped off.
To hell with RCBS then. I’m going with Dillon. This is why companies end up in bankruptcy!
I currently have a 5 and I experienced most of what you guys are having-except I have worked through them.
Primer sled:
1- Chamfer the primer hole for easier loading. Doesn’t hurt, but you get less problems.
2- Smooth out all riding surfaces to eliminate any snags or hangups.
3- To reduce the bending leverage on the “pin” of the sled, the distance from the black rail mounted on the chassis must be closer to the primer sled: to do that, I removed the rail then shimmed them with ONE washer per mounting spot. It moves the rail about .032″ closer which surprisingly results in a 10-12% reduction in twisting force on that plastic pin. Everything gets REAL close there but should clear and work fine
4- Put a bit of marine grease on the bottom side of the rail so the pin slides rather than catches on spots.
So far this stopped the breakages.
A bit of an update on the use of the Pro 5 with additionally noticed shortcomings:
When advancing the shellplate operation while making ammo, I noticed the shellplate was no longer moving smoothly, but started to get very jerky. lNot good as powder would start to spill out of the short 9mm cases. A bit of investigation revealed the following:
1- Under the shell plate there is a post that assures alignment to the dies and priming system. Additionally, there is a spring loaded steel ball bearing pushing up that snaps into a recess under the plate to maintain position throughout the process. The spring is strong and pushes the bearing quite high.
2- There is an additional spring loaded pointed post 180 degrees across from it that also pushes the die plate up very forcefully. which scrapes along the bottom of the plate eventually wearing a rough groove in the bottom of the shell plate.
3- There is only a washer under the nut that holds the shell plate in position that the plate rotates against.
The biggest problem is the pointed post that was creating a rough groove under the plate and the attending higher than needed friction.
To fix all that, a couple of items needs to be purchased and some readjustments need to be performed.
1- Get a needle bearing/washer set to replace the supplied washer. All you need is a .5″ ID and 15/16″ OD and a thin set of washer bearings. Direct replacement.
2- Cut a coil or two off the spring that pushes up the ball bearing, making it LOWER so it does not push up as much. You can also replace the ball bearing with a 3/8″ delryn ball if you want. Works smoother but not absolutely needed.
3- Adjust the pointed post LOWER by using two 8/32 nuts locked together turning it so the is less upward pressure on the shell plate.
A little fiddling is needed as the pointed post needs to push up just enough to lift the plate off of the press ram, but not so much as to overpower the opposing ball bearing, as the plate needs to balance between the two.
Once that is done, the whole operation will be MUCH smoother and most of the jerkiness will be gone. You will need to slow down on the down stroke of the handle a bit so as not to make the shell plate rotate too fast and sling out the powder.
Works even better now.
RCBS Pro Chucker 5 or Hornady LNL AP. If you had to choose, which one would you recommend?