In the first RCBS Lock-Out Die article, I discussed how the RCBS Lock-Out Die works. In this article, we’ll take a look at how to setup the die, and also how to disassemble and reassemble the die for cleaning and maintenance.
There are multiple ways to skin a cat, and likewise, there are multiple ways to setup the RCBS Lock-Out Die. You can either set it up on the bench, or on the press. I’ll demonstrate how to setup the die on the bench, and fine tune on the press. I feel this is the easiest and quickest way to get this die setup.
Here are the basic steps:
- Charge a case (with spent primer) and set it on your bench
- Install the correct foot on the RCBS Lock-Out die
- Place the die on top of the case and press down, note the level of the indicator line on the die detector rod
- Adjust as needed by rotating the ends of the die detector rod assembly (tighten or loosen) – the goal is to “split the line” where the top of the die body meets up with the die detector rod
- Install the die on the press – exact height is not critical, but instructions suggest bottom of die approximately 1/4″ from the shellplate
- Check the setting and fine tune by cycling the press with a charged case in the RCBS Lock-Out Die station, adjust die detector rod as needed
- Validate setting by cycling the press a few times with charged case in place
So those are the basic setup steps- but if you’re like me, you’d rather “see” the setup, so here’s an HD video showing setup of the RCBS Lock-Out die on the Dillon XL-650:
So now that you know how to setup the die, how about disassembly, cleaning, and re-assembly? Before we jump into this procedure, let’s review the parts that make up the die, this time in more detail (we covered conceptual part assemblies in the first RCBS Lock-Out Die article):
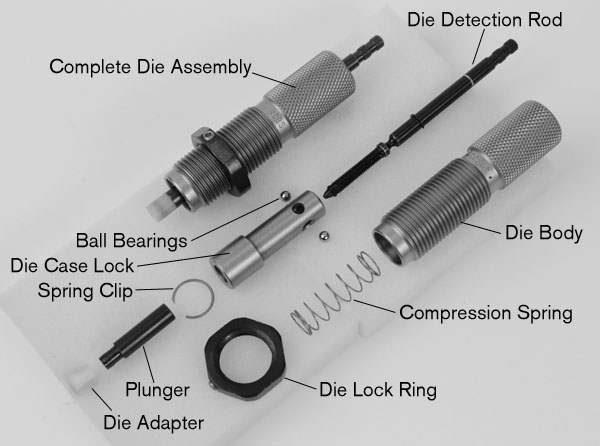
Here, we see a complete die assembly, and a disassembled RCBS Lock-Out Die next to each other. In order to make sense of these parts and assemblies, I’ll show you the complete disassembly and assembly process by means of an HD video of course!
Now that we’ve covered the basic bases for the RCBS Lock-Out Die, you should be ready to claim “RCBS Armorer” status, or something like that.
Do you have tips and tricks that you’d like to share? Please submit your comments and join in on the discussion!














Can this die be used in other reloaders such as the Hornady AP?
Yes. and it’s better than the Hornady Powder Cop!
I am glad to find you web site. Awesome! So, does the powder checker die and the lock out die do the same thing? If so, which is better? Do either of these dies work with both hand gun and necked rifle cases, such as the .223, .308, etc?
Thanks, Richard
They both work with pistol and rifle cartridges, but one locks up the press (lock-out die) and the other just shows you the powder level in the case, much like the Hornady Powder Cop die. The lock-out die is the most safe I think… (but takes more setup)
RCBS instructions read it is “for use with pistol calibers (9mm and larger) on progressive reloading presses.” Are you certain it can be used with rifle reloading? More specifically, with .223/5.56? That is the caliber where it would be most advantageous. I guess it depends on whether the little foot will fit inside the small neck of the .223. And also whether there is enough travel for the longer nature of a rifle case.
So how does the RCBS Lockout die work ? You show what happens when a properly charged case is inserted into the lockout die but what happens when an impropperly charged case is inserted ? Please explain both overcharged case and undercharged case warnings. I don’t believe your video deals with the benefit the die offers for the reloader
Joe- please see the following post which includes diagrams showing undercharge, proper charge, and overcharge. 🙂
http://ultimatereloader.com/2010/09/19/rcbs-lock-out-die-part-i-theory-of-operation/
Joe, It looks like the die captures the case in question and thus prevents the turret from moving. I rekon the die body must be removed to rectify any issues.
Looks like at 3:20 in the video you see what would happen, the die does not allow the case to enter, and stops the press from completing the upstroke.
Great video!!
Have you used the lock-out die with Rifle cartridge like 30-06? I read it is for handgun only. Can you confiirm it works well with rifle?
thx
I haven’t tried it, but I have used the powder cop die on rifle cartridges… The RCBS powder checker would be another option.
very good vids thank you, i would like to see how the press locks up when the load is incorrect, and how to clear the lock, and then get the press going again, you have done a great job showing the operation and parts, but i think it would be helpful to see it “lock-up” thanks again keep up the good work
I’d be interested in another 30 seconds where you actually show what it looks like/does when you have a squib or double charge. There’s lots of seeing-is-believing folks out there (like me). Great video though as always.
I attempted to use this die in my pro 2000. I am new to reloading but I tried to use it with 9mm luger 124 grain Speer TMJ. Irrelevant I know, but the powder charge with Alliant Blue Dot in my 9mm luger cases was at 7.1 (7.2 as a buffer). When cycling it pressed the plunger further up than I could adjust as required in the instructions. I might hold onto it for my .40 and .45 reloading, but I would imagine with 9mm you need a less case filling powder. Thoughts?
I know this question is old as the hills, however, I also load on a Pro 2000 with the RCBS Lockout Die and would not trade the press for anything else on the market. You might consider looking at Hodgdon Titegroup as a good low volume powder that works well in 9mm, .38 Super, and .45 ACP. You have to be careful about overcharging, however, you should be able to cut about three grains off of your Blue Dot recipe. FWIW, IMHO, and YMMV. Regards, Matt.
Btw, Hodgdon lists loads for a 124 grain HBRN TP from 3.6 grains on the bottom end to 4.1 grains on the top end. By all means verify, verify, and verify…
Gavin, I know you have addressed a similar question above, but I am wondering if this lock out die will work with a .223 rifle cartridge? The instructions from RCBS says for handgun loads only. But I know you have a lot of experience and knowledge in loading .223’s from reading your articles and watching your videos. I would be using it on a Hornady Lock-N-Load AP.
Thanks, Dan
on the lockout die ,does it have different size plungers? I did purchase the lockout die and tried to set it up for my .223 but the plunger is too large to fit in the neck, even with the adapter taken off.
Hey Gavin,
First, thanks for the great videos you have on YouTube. As a person looking to get into reloading I can’t even begin to imagine trying to figure this out without videos like yours. They are absolutely first rate.
I’m pretty sure that I am going to get the Dillion 550b as it just seems right for me. Pretty much the only reason I hesitate to get it instead of the 650rl is that I really like the audible powder checker on the 650. The auto index feature of the 650 doesn’t really appeal to me at this time.
Looking around for information on powder checkers I found your video and articles on the RCBS Lock-Out Die and think it looks pretty impressive.
What I’m thinking of doing, and finally (sorry) my question, is getting the 550b but going with a die that both sizes and crimps in one stage thus freeing up a die spot for something like the RCBS Lock-Out Die. I know Dillion wants sizing and crimping handled separate but I also know that other presses do them in one stage.
What is your advice on this?
Btw, I have no plans of doing anything but pistol reloads and I’ll be starting with the 9mm and then I’m sure get into other calibers after that, probably .40 next, although the 38 super and 357 sig cartridges look fascinating to me.
Thanks in advance for you help I really appreciate it.
–Ron