
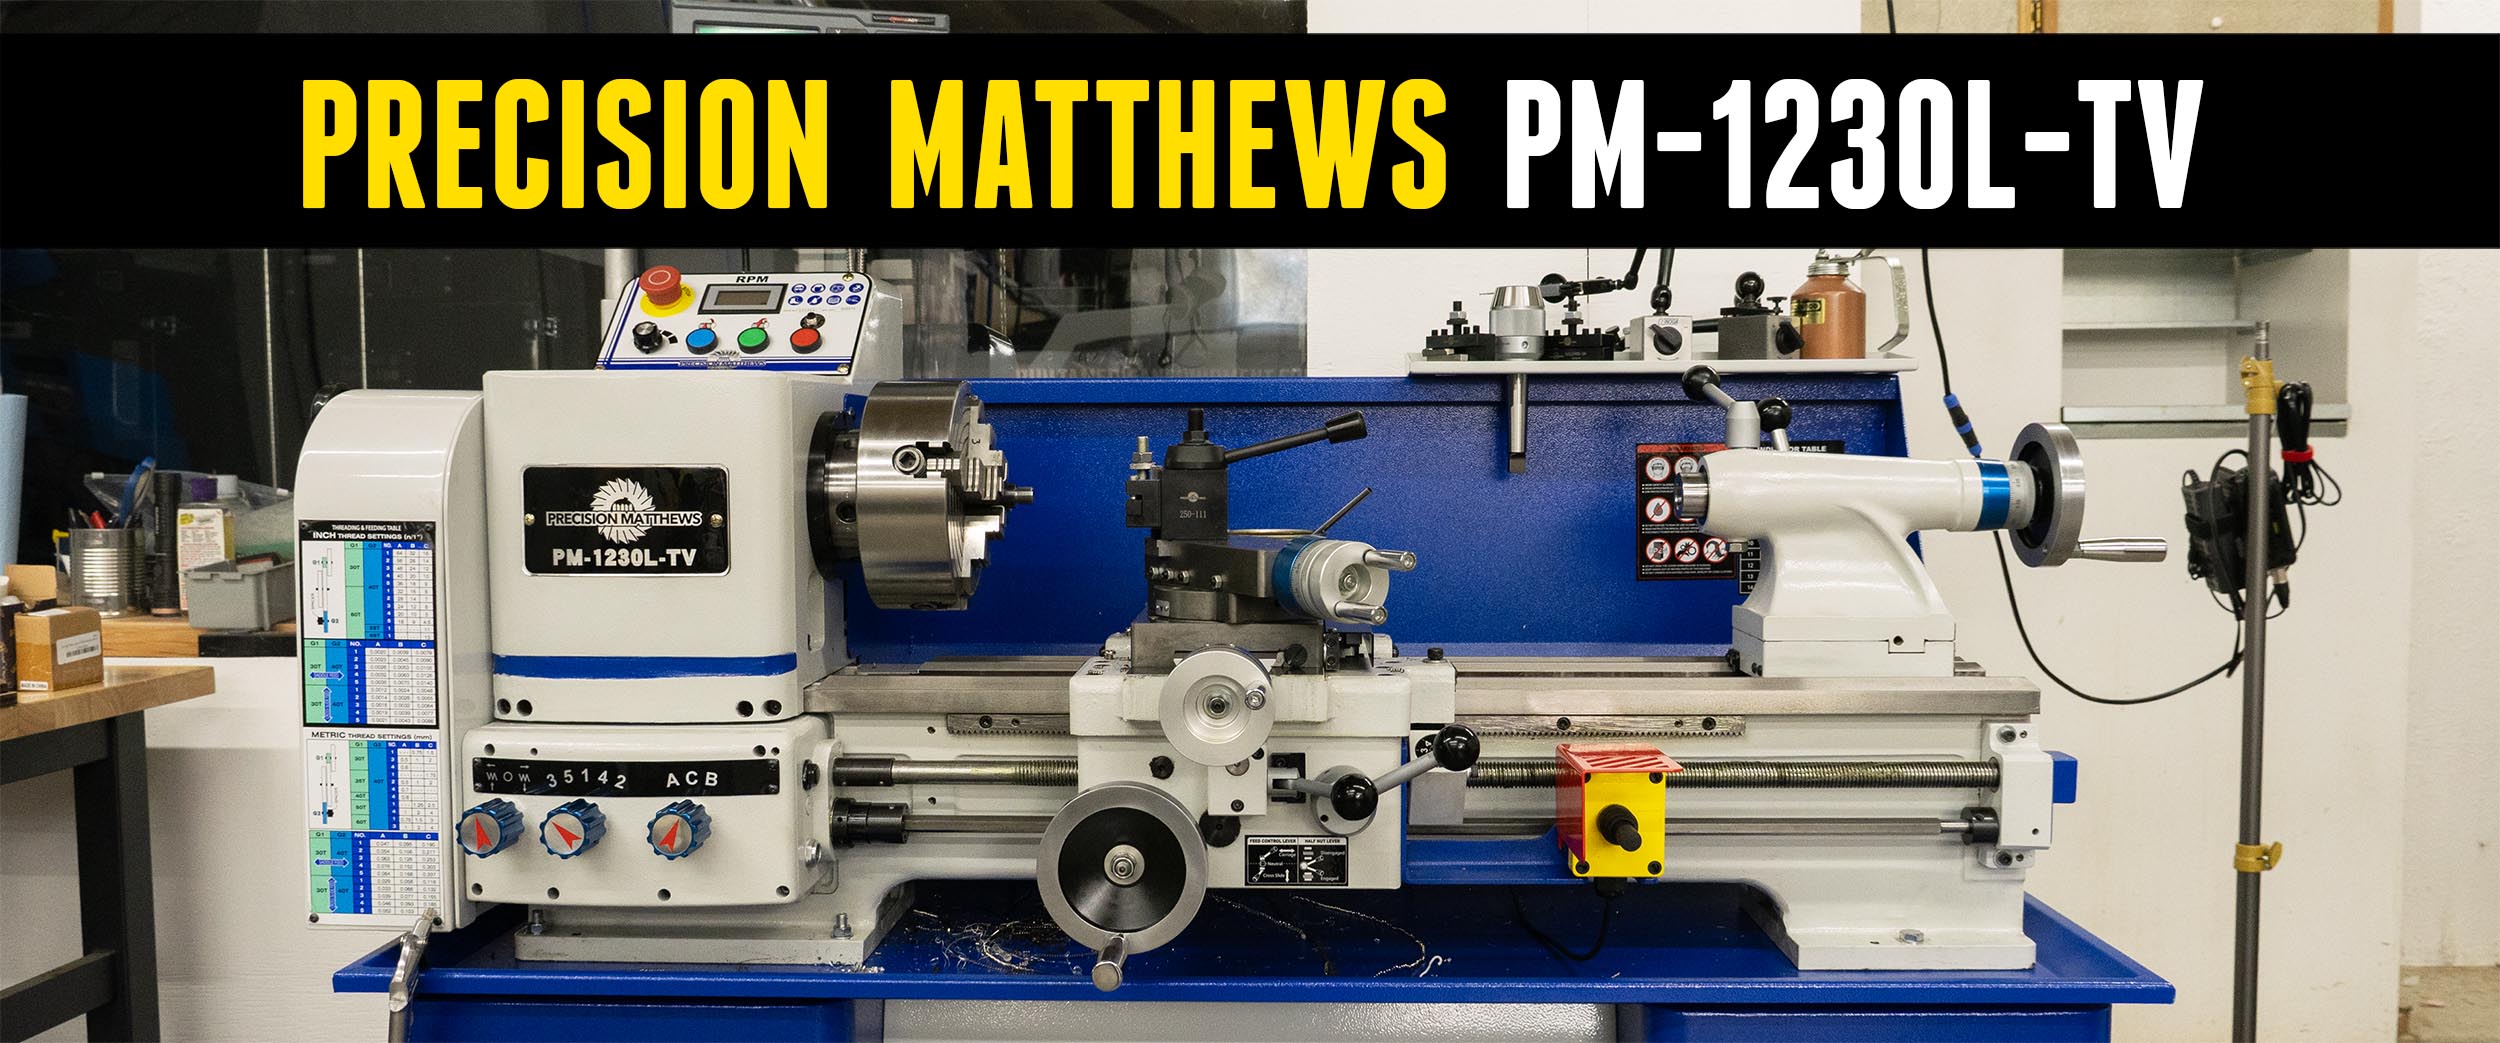
The all-new Precision Matthews PM-1230L-TV may be the most affordable super-high-quality Taiwanese variable speed lathe out there. It’s a smaller, more compact machine that should be great for threading muzzles, chambering rifles and all sorts of general turning tasks. In this article, we’re going super in-depth: uncrating, setup, leveling, specs, a head-to-tail tour, and our first production job. Watch or read on!
Disclaimer
Ultimate Reloader LLC / Making with Metal Disclaimer: (by reading this article and/or watching video content you accept these terms). The content on this website (including videos, articles, ammunition reloading data, technical articles, gunsmithing and other information) is for demonstration purposes only. Do not attempt any of the processes or procedures shown or described on this website. All gunsmithing procedures should be carried out by a qualified and licensed gunsmith at their own risk. Do not attempt to repair or modify any firearms based on information on this website. Articles on this website are derived from original video content and may utilize artificial intelligence (AI) tools for initial drafting, transcript processing, and editorial refinement; no AI technology independently generates or verifies technical instructions or safety data. Ultimate Reloader, LLC and Making With Metal can not be held liable for property or personal damage due to viewers/readers of this website performing activities, procedures, techniques, or practices described in whole or part on this website. By accepting these terms, you agree that you alone are solely responsible for your own safety and property as it pertains to activities, procedures, techniques, or practices described in whole or part on this website.
Uncrating
The lathe and stand arrived in separate crates, along with some accessories. The stand is purchased separately. Everything showed up in great condition. Precision Matthews does an awesome job crating their equipment and making sure there’s anti-corrosion protection on everything.
Included with the lathe:
- Change gears
- Revolving handles
- Tools and hardware
- Compact outboard spider and hardware
- AXA quick-change tool post
The outboard spider was a surprise. It should let us chamber and thread barrel muzzles with no additional outboard work required. I also have some cutting tools and a DRO, which I had Precision Matthews install, so it’s as simple as mounting the display, connecting the cables and going.
The stand includes the two base portions, sheet metal tie pieces that span between them, and a whole box of hardware.
Setup
The stand goes together super straightforwardly. The two side pieces bolt to a couple of lighter gray tie pieces, and then the chip pan goes on top.
I used an engine crane (the kind of engine hoist you’d use in your garage) to lift the lathe onto the stand, following some instructions I had for our 1340GT. The one challenge, which wasn’t a huge one, was getting the hoist legs over the lathe so the pickup point was around the center of gravity.
We used two 2×4 spreaders and two straps on the hoist. We stacked a bunch of 2x4s and pulled the lathe off the pallet far enough to get the hoist over its center of gravity, then got the spreaders in place, lifted it, pushed it over and set it in place.
What I like to do is keep a little of the lathe’s weight off the stand so you can move it around to center the bolt holes. There are three sets of holes that have to align: through the lathe, the chip pan and the base. Once you get a bolt in one corner and another in the opposite corner, you’re set.
With the bolts tightened down, I degreased the machine. That was really easy, because it had a thin film protectant that just wiped off. We also removed the protective film from the aluminum plates and other parts.
First Cuts
The controls are simple. Rotate the emergency stop button so it pops out to turn the machine on. From there, you have spindle speed and spindle direction (reverse, stop, forward). It’s super smooth, with no vibration at all.
After taking a moment to center up my tool, I took my first cut, and wow, that looks good! It’s a nice insert. Then I did a facing cut too, and that is one good-looking cut.
What’s Included
The default package is essentially just the lathe, priced at $7,999.99 (as of the filming of this video). That includes everything above the chip pan, minus my accessories:
- Lathe
- Backsplash guard with a nice tool tray; I really like how they laid it out
- AXA quick-change tool post with five holders: standard holders, boring bar holder, knurling tool holder and parting tool holder (no parting blade, which is typical for these sets)
- Threading dial
- Feed rod clutch to protect the machine from overload
- Foot brake and combo off button, mountable on the front of the machine (holes are pre-drilled) or set on the floor, which is a natural position for me
- Chip tray (it’s part of the lathe package, not the base, which I might have implied earlier)
- D1-4 camlock spindle
- Belt cover with interlock switch and quick-release knobs
- Five-year warranty
The side belt cover is designed so it opens around the spider if you have the spider screws completely retracted, which is a nice feature. The spider came with my machine; I’ll double-check with Precision Matthews whether that’s standard.
Optional Add-Ons
- Steel stand: A no-brainer unless you already have a very solid place to mount it
- DRO: I chose a two-axis [VERIFY: DRO brand] unit. Precision Matthews can install it for you, which I highly recommend, since it’s a bit tedious to do yourself.
- Three- and four-jaw chucks: Not included, but Precision Matthews sells them
- Collet chucks: A 5C chuck and an ER40 chuck. A collet chuck lets you grip small items and screw threads without damaging them. It’s pretty much a must-have for fine precision work.
- Tailstock drill chuck, dead centers and live centers
- Carriage stop specific to this machine
- Cutting tools and holders
Specifications
Precision Matthews has much more info on the product page, but here are the highlights.
This is a Taiwanese-made machine, not Chinese-made, and it’s steps above in terms of quality, precision, fit and finish. I’ve had a lot of brand-new lathes out of the crate, and this is one of the nicer ones, from the paint quality to the silk screening on the control dials and faceplate.
Capacity and Features
- Spindle bore: 1.5 inches, which works for 1.25-inch shank or straight barrels with plenty of room for angling and dialing in
- Spindle length: [VERIFY: 17.75] inches, which is short and convenient for shorter barrel work
- Spindle mount: D1-4 camlock
- Spindle taper: MT5
- Tailstock quill taper: MT3
- Power feed: X and Z
- Bedways: Hardened and ground
- Threading: Inch and metric
- Lead screw: 8 TPI
- Motor: 2 HP, 110V, needs a 20 amp circuit; pre-wired with a supplied 5-foot cord
The 8 TPI lead screw means that for inch threading, which gunsmiths do here in North America and other parts of the world, you can use the half-nut lever and engage directly on each threading pass. That’s super convenient.
The MT3 tailstock quill is great, because I have three other lathes with MT3, so we can share tooling across machines, like an ER32 tailstock chuck. And the D1-4 camlock is what you want: it’s much more convenient than a threaded mount, and much safer when running in reverse, since the chuck won’t spin off and land who knows where.
Travels, Feeds and Threading
| Spec | Value |
| Compound travel | 3.5 in |
| Cross slide travel | 7 in |
| Quill travel | 4 in |
| Longitudinal feed range | 0.002 to 0.014 in/rev |
| Cross slide feed range | [VERIFY: 0.0012 to 0.0086] in/rev |
| Inch threads | 32 options, 5 to 64 TPI |
| Metric threads | 23 options, 0.5 to 4 mm pitch (change gears supplied) |
| Lathe weight | 675 lb (lathe only) |
| Shipping weight | 850 lb |
The 4-inch quill travel is competitive with my larger 1440 lathes. I love that.
I was also very happy to see on the threading chart that the standard change gear combination covers all the common gunsmithing threads:
- 16 TPI for standard Remington 700 and similar actions
- 18 TPI for most Remington 700 clones
- 20 TPI for some Savage actions
- 24 and 28 TPI for muzzle threading
One gear combination does everything I need it to do.
Variable Speed
Variable speed is very nice compared to selecting gear and speed range combinations. It lets you fine-tune for balance, for the sound of the cut and for surface finish, and it’s a heck of a lot quicker and more convenient than geared setups. Great job to Precision Matthews on the layout of the gear changes, speeds, feeds and threading.
Leveling and Alignment
One of the first things I did after bolting down the machine was level it, using a precision Starrett level with 0.0005 inch per foot resolution on the bubble.
The stand has eight foot screws, each with a 19mm hex head welded right onto the foot, which makes precision work really easy, plus lock nuts up top. With steel stands, it’s sometimes tricky; you have to shim the lathe to get the right twist so the bed is perfectly level. The most critical thing is that the level agrees between the headstock and tailstock on the ways. These screws made that easy: I loosened the bolt and cranked the screw down to impart just the slightest twist in the bed, so the bubble agreed from headstock to tailstock.
Next, I did a tailstock quill alignment test, sweeping along the front for horizontal alignment and along the top for vertical alignment. It was crazy: within a ten-thousandth of an inch over 4 inches. That’s very consistent with the level of quality I’ve seen from these Taiwanese Precision Matthews machines over time, and it means the lathe will be super accurate for precision jobs like chambering.
Machine Tour
Here is a brief tour of the machine:
Control Panel
- Emergency off: Typically how you’ll turn the lathe off; twist and let it pop up to turn the machine on
- Speed control: Sets spindle speed
- Stop button
- Blue reverse button
- Reset button: If you take way too heavy a cut and the motor’s about to stall, the circuit breaker will pop; this button resets it
The side cover comes off easily with two knobs. Inside, you’ll find:
- An interlock switch that automatically disables the spindle when the side cover is off
- Motor tensioning, plus a hard stop if you want to tension the belt to a very specific tension
- Primary gears
- Secondary drive belt for threading and power feed
- The spindle RPM sensor for the tachometer
After the cover has been open for a while, the capacitor discharges and the machine turns off. It’s all very clean inside, and we didn’t have to do much of anything to get it ready to roll.
Headstock and Carriage
- Shift levers: Control threads per inch, metric threading and power feeds (inches per revolution), with a threading/power feed selector, A-B-C and 1-2-3-4-5 for all your combinations
- D1-4 camlock spindle
- Carriage: Z feed, X feed (cross slide) and compound, with screws and nuts to adjust compound tension
- Tapered gib: On the cross slide to keep things nice and tight
- Power feed lever: Longitudinal and transverse; goes left, right, up and down
- Half-nut lever for threading, plus the thread dial
- Spindle control lever: Mine came set up for up-is-forward, so I removed the four screws and rotated it 180 degrees for the conventional down-for-forward, up-for-reverse
- Foot pedal button: Stops the spindle and engages the electric spindle brake
The tailstock is very heavy and very nice. It has a lock on the back, a quill clamp up top, and quill feed readout in thousandths. I really like the levers, especially the spherical knobs. There are a couple of oilers, and again, it’s an MT3 internal taper.
Changing Speed Ranges
In low range, the spindle runs from about 20 to about 600 RPM, which is great for things like running a chambering reamer.
To switch to high range, remove the side cover knobs. The side cover is designed to come off around the spider with the screws retracted, which is awesome. Lift the motor slightly with the tension lever, move the belt to the smaller pulley first, then the larger pulley, push down to set the tension, and make sure you have sufficient belt tension. That is easy, and a really well-engineered system. Put the side cover back on, and now we’re cooking: just over 2,100 RPM.
Production Test: Muzzle Threading
Next, we went straight into some production work: our first muzzle threading job on this machine. I loaded a rifle barrel, dialed it in and threaded the muzzle.
After using the lathe for a production job, I feel at home with the machine and can truly feel how it’s going to work. It’s smooth, accurate and really quiet. I turned the speed down to about 200 RPM for threading, and it was so smooth and so quiet I could hear the tool cutting. The threads look great.
Final Thoughts
This machine is just the right size and has just the right features. If you’re looking for an all-Taiwanese, high-quality variable speed lathe that won’t break the bank, I don’t think you’ll find another machine with this build sheet and this quality at this price with variable speed.
I highly recommend adding a DRO. It’s also great that it comes with the AXA quick-change tool post, because you can just buy extra holders as needed, and there’s a great aftermarket for all of that.
I’m planning more machining projects with this lathe, and I’ll definitely get it set up for chambering. If there’s something specific you’d like to see in future videos with this machine, let me know in the comments, and I’ll incorporate it into my plans. I’d also love to hear your feedback and answer any questions about it.
Get the Gear
PM-1230L-TV Variable Speed Ultra Precision Lathe
Don’t miss out on Ultimate Reloader updates, make sure you’re subscribed!
Thanks,
Gavin Gear
About the author